Customizing the Visio Environment
Most of what you see in the Visio environment can be customized to suit the way that you like to work. For example, you can hide the grid if it makes the drawing page look too cluttered for your taste. You can also hide the rulers, as well as show or hide any toolbars.
Tip
To display a list of the Visio toolbars that are available for the template that you have open, right-click the toolbar area to display the toolbar shortcut menu. Then click the name of the toolbar you want to appear. A check mark next to a toolbar's name indicates that it is currently shown.
If you're working with a low-resolution monitor and want more space on the screen, you can move, resize, or close the stencils. If you don't want to have to scroll down a stencil to see all its shapes, you can make the list of shapes more compact by hiding the shape names and showing only the icons. You can also float, or detach, windows and stencils from the drawing window, so that you can quickly resize them as you work. After you're done working, you can dock, or snap, them back in to their default position.
For quick access to related commands or drawing shortcuts, you can use the tools in various windows, such as the Pan & Zoom and Size & Position windows. The Pan & Zoom window displays a miniature version of your entire diagram that you can use to quickly move to different parts of the drawing page. If you want to enter precise dimensions for the shapes in your diagrams rather than resizing shapes with the pointer, you can do that in the Size & Position window.

Tip
By default, the Visio menu bar and toolbars are docked on the Visio window. However, you can float any toolbar or the entire menu bar, or you can dock them in a different location if it's more convenient for you. Position the pointer over the move handle on the menu bar or a toolbar, and when the pointer changes to a four-headed arrow, drag the bar to a new location. If you drag a floating menu bar or toolbar to an edge of the Visio window, Visio docks the item in that location.
Four-headed arrow

In this exercise, you customize the Visio environment. You start by opening a diagram that displays the proposed layout for a tradeshow hosted by Wide World Importers, the fictitious company used throughout this book.
OPEN the GettingStarted file in DocumentsMicrosoft PressVisio 2007 SBS�1_Start.
|
1. |
Start Visio. On the Standard toolbar, click the Open button to display the Open dialog box. Open
|
|
2. |
In the list of files and folder names, double-click the Microsoft Press folder, and then double-click the Visio 2007 SBS folder. Troubleshooting By default, Visio opens the Documents folder in the Open dialog box. Also, by default, all of the practice files for this book are installed in the Microsoft PressVisio 2007 SBS folder in Documents. If you don't see the Visio 2007 SBS folder, go to the DocumentsMicrosoft Press folder. If you installed the practice files for this book in a different location, you need to go to that location when you use practice files throughout this book. |
|
3. |
Double-click the 01_Start folder, and then double-click GettingStarted. Tip If the file extensions on your computer aren't hidden, the file name you will see in the Open dialog box is GettingStarting.vsd. The .vsd file extension stands for Visio drawing. Visio opens a diagram displaying the layout of a tradeshow and four stencils.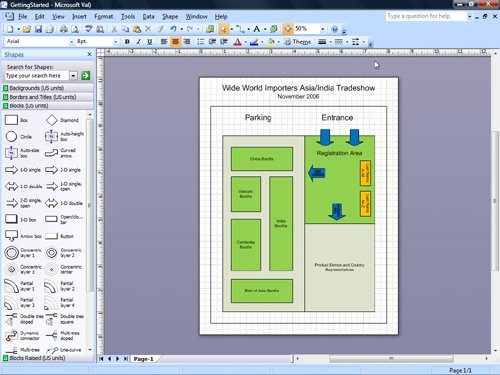
|
|
4. |
On the View menu, click Rulers to hide the horizontal and vertical rulers. |
|
5. |
On the View menu, click Grid to hide the grid on the drawing page. |
|
6. |
On the View menu, click Pan & Zoom Window.
|
|
7. |
In the Pan & Zoom window, drag to draw a selection rectangle around the green area in the upper-right corner of the window. 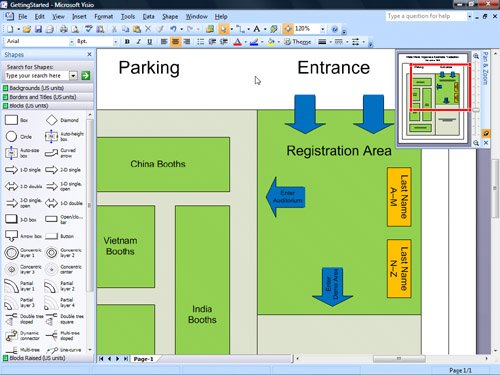
|
|
8. |
In the Pan & Zoom window, drag a corner of the red rectangle out to enlarge the selection area. |
|
9. |
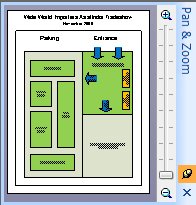
On the title bar of the Pan & Zoom window, click the AutoHide button, and then move the pointer away from the window.
|
|
10. |
Point to the title bar of the Pan & Zoom window. |
|
11. |
Click the AutoHide button again. |
|
12. |
Click the Close button in the lower-right corner of the Pan & Zoom window. Close
|
|
13. |
Press |
|
14. |
On the Standard toolbar, click the Shapes button. Shapes
|
|
15. |
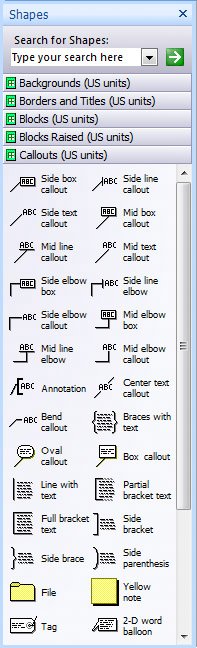
Point to Visio Extras, and then click Callouts.
|
|
16. |
On the Callouts stencil, click the green stencil icon on the title bar.
|
|
17. |
Point to View, and then click Icons Only.
|
|
18. |
On the Callouts stencil, click the green stencil icon on the title bar, point to View, and then click Icons and Names. |
|
19. |
On the Callouts stencil, click the green stencil icon on the title bar, and then click Close. |
|
20. |
On the File menu, click Exit. |


 to zoom out to the whole-page view.


Quick Reference
Getting Started with Visio 2007
- Getting Started with Visio 2007
- Starting Diagrams by Using Templates
- Working Within the Visio Environment
- Customizing the Visio Environment
- Getting Visio and Diagram Help
- Key Points
Adding Shapes to Diagrams
- Adding Shapes to Diagrams
- Working with 1-D and 2-D Shapes
- Adding Text to Shapes and the Drawing Page
- Moving, Sizing, Rotating, and Copying Shapes
- Working with Groups
- Finding Shapes for Diagrams
- Inserting Pictures into Diagrams
- Key Points
Formatting Shapes and Diagrams
- Formatting Shapes and Diagrams
- Formatting Individual Shapes
- Adding Decorative Elements to Diagrams
- Applying Themes to Entire Diagrams
- Key Points
Connecting Shapes
- Connecting Shapes
- Connecting Shapes in Flowcharts
- Modifying Shape Connections
- Changing the Layout of Connected Shapes
- Key Points
Creating Project Schedules
- Creating Project Schedules
- Creating Timelines to View Projects at a Glance
- Exporting Timelines to Create Gantt Charts
- Tracking Project Details with Gantt Charts
- Key Points
Creating Organization Charts
- Creating Organization Charts
- Importing Data to Create Organization Charts
- Storing and Displaying Employee Information in Organization Charts
- Customizing the Layout of Organization Charts
- Key Points
Laying Out Office Spaces
- Laying Out Office Spaces
- Creating Scaled Office Spaces
- Adding Door, Window, and Furniture Shapes to Office Layouts
- Organizing Shapes in Office Layouts by Using Layers
- Key Points
Creating Network Diagrams
- Creating Network Diagrams
- Connecting Shapes in Network Diagrams
- Storing Information with Network Shapes
- Creating Network Reports
- Key Points
Glossary
About the Authors
Choose the Right Book for You
EAN: 2147483647
Pages: 81
- The Second Wave ERP Market: An Australian Viewpoint
- Enterprise Application Integration: New Solutions for a Solved Problem or a Challenging Research Field?
- Data Mining for Business Process Reengineering
- A Hybrid Clustering Technique to Improve Patient Data Quality
- Relevance and Micro-Relevance for the Professional as Determinants of IT-Diffusion and IT-Use in Healthcare
