6.13 Tracking messages
 | ||||||||
| Chapter 7 - Managing Recipients | |
| Monitoring and Managing Microsoft Exchange 2000 Server | |
| by Mike Daugherty | |
| Digital Press 2001 | |
| |
7.1 Managing mailbox-enabled users
A mailbox-enabled user is a Windows 2000 user who has a mailbox in an Exchange message store. A mailbox-enabled user has an e-mail address and can both send and receive e-mail using Exchange. Management of mailbox-enabled users is completely integrated with Windows 2000 user management, using Windows 2000 Active Directory Users and Computers. When you install Exchange 2000, the installation process extends the standard Windows 2000 Active Directory Users and Computers to support Exchange attributes. The extensions automatically ask for Exchange information whenever a new Windows 2000 account is created, and automatically display Exchange property pages when you view the user s Windows 2000 account.
7.1.1 Creating a mailbox-enabled user account
You can use the following procedure to simultaneously create a Windows 2000 user account and make it mailbox-enabled.
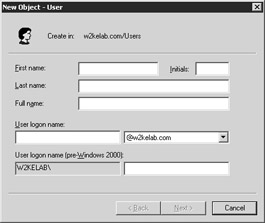
Figure 7.1: The New Object User dialog box
-
Start the Active Directory Users and Computers from the Windows 2000 Start menu by selecting Programs Administrative Tools Active Directory Users and Computers.
-
Right-click on Users, and select New User to display the New Object User dialog box (Figure 7.1).
-
Enter the users given name , initials , and surname into the First name , Initials , and Last name fields. Windows 2000 will automatically fill in the Full name field by combining the First name , Initials , and Last name fields. You can override this value if necessary.
-
In the User logon name field, enter the users Windows 2000 logon name. The Windows 2000 account will be given Owner permission on the mailbox meaning the user has full permission to send and receive mail from this mailbox.
-
Windows 2000 automatically sets the User logon name (pre-Windows 2000) field to the same value as the User logon name field. You can override this value if necessary.
-
Select Next to continue.
-
Enter information about the users password, confirm the new password by retyping it, and select the password options that apply. Select Next to continue.
-
Select the Create an Exchange mailbox check box to automatically create an Exchange mailbox using the alias, Exchange server, and information store shown in the Alias , Server , and Mailbox Store fields (Figure 7.2). If you clear the Create an Exchange mailbox check box, the Windows 2000 account will be created as a mail-enabled user rather than a mailbox-enabled user.
-
The Alias field is automatically set to the users Windows 2000 logon name. You can override this value if necessary.
-
The Server field lists the Exchange server where this users mailbox will be stored. You can use the drop-down list to select another Exchange server.
-
The Mailbox Store field lists the mailbox store where the users mailbox will be created. You can use the drop-down list to select another mailbox store.
-
Select Next to display a dialog box summarizing the information you entered.
-
Verify that the information is correct, and then select Finish to create the Windows 2000 account and associated Exchange mailbox. Select Back if you need to correct any information.
The Windows 2000 new user process is very simple and quick. Unfortunately, it collects only a minimal amount of information. The information is enough to allow the user to send and receive e-mail, but it does not include any of the additional information needed to produce a fully populated Default Global Address List entry for the user. The minimal information is also typically inadequate to effectively generate e-mail addresses or create custom address lists based on user attributes such as location or department. You can enter this additional information only by modifying the users Windows 2000 account once it has been created. See Section 7.1.3 for more information on modifying accounts.
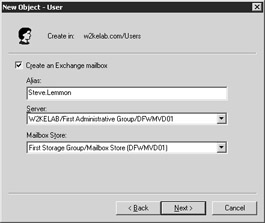
Figure 7.2: New Object User alias dialog box
7.1.2 Designating an existing user as mailbox-enabled
When you create accounts for your Windows 2000 users, you may have chosen to not create Exchange mailboxes for all of your users. Perhaps they did not need e-mail at the time. You can use the following procedure to easily designate an existing Windows 2000 user as mailbox-enabled.
-
Start the Active Directory Users and Computers from the Windows 2000 Start menu by selecting Programs Administrative Tools Active Directory Users and Computers.
-
Expand the Users section.
-
In the details pane, right-click the user you want to modify, and select Exchange Tasks to start the Exchange Task wizard.
-
The Exchange Task wizard will display a list of Exchange-specific tasks that can be applied to the user account. Select Create Mailbox, and then select Next to continue (Figure 7.3).
-
The wizard automatically sets the Alias field to the users Windows 2000 logon name. You can override this value if necessary.
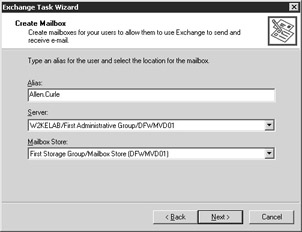
Figure 7.3: The Exchange Task wizard -
The Server field lists the Exchange server where this users mailbox will be stored. You can use the drop-down list to select another Exchange server.
-
The Mailbox Store field lists the mailbox store where the users mailbox will be created. You can use the drop-down list to select another mailbox store.
-
Select Next to display a summary of the information you entered.
-
Verify that the information is correct, and then select Finish to create the Exchange mailbox for this Windows 2000 user. Select Back if you need to correct any information.
7.1.3 Modifying a mailbox-enabled user account
All Windows 2000 Active Directory objects and propertiesincluding those added by Exchange 2000are managed using the Windows 2000 Microsoft Management Console (MMC). Exchange users are just Windows 2000 users with an Exchange mailbox. The Exchange properties associated with a user are just additional property tabs for the Windows 2000 user and are managed using the same Active Directory Users and Computers MMC add-in that is used to manage other user- related properties.
There are many property pages for each Windows 2000 user. However, only a handful of these property pages are needed to manage Exchange. These property pages fall into two categories:
-
Property pages with settings that allow you to tailor the users Exchange capabilities. This includes items such as protocol settings, mailbox rights, mailbox information store, delivery restrictions, delivery options, and storage limits.
-
Property pages containing information that is useful for identifying the user in the Global Address List. This includes information such as name, addresses, office, telephone numbers , department, title, company, and managers name. This type of information is required if you want to generate e-mail addresses or create custom address lists based on attributes such as location or department.
You can use the following procedure to modify an existing mailbox-enabled user:
-
Start the Active Directory Users and Computers from the Windows 2000 Start menu by selecting Programs Administrative Tools Active Directory Users and Computers.
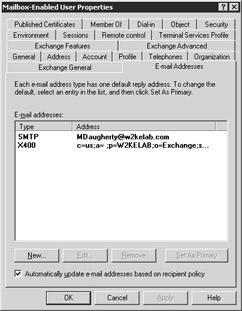
Figure 7.4: The E-mail Addresses tab -
In Active Directory Users and Computers, select Advanced Features from the View menu. This will allow you to view the properties listed on the Exchange Advanced tab.
-
Expand the Users section.
-
In the details pane, right-click the user you want to modify, and select Properties.
-
Select the E-mail Addresses tab (Figure 7.4). The E-mail Addresses tab is used to maintain alternate electronic mail addresses for this user. You can have multiple e-mail addresses of the same type. For example, you can assign two SMTP addresses to the user. If you have multiple addresses for an address type, the primary address appears bolded.
-
To change an e-mail address for a mailbox-enabled user, double-click the address you want to modify to display the Address Properties dialog box. This dialog box is specific for the type of address you are adding.
In the Address Properties dialog box, change the e-mail address information, and then select OK to return to the E-Mail Addresses tab (Figure 7.5).
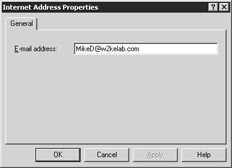
Figure 7.5: The Internet Address Properties General tab -
You can add new e-mail addresses for the mailbox-enabled user. To add a new e-mail address, select the New button to display a list of the e-mail address types you can add. The available choices are: X.400 address, Microsoft Mail address, SMTP address, cc:Mail address, Lotus Notes address, Novell GroupWise address, and custom address. Select the type of address you want to add, and then select OK. The system will display an Address Properties dialog box that is specific for the type of address you are adding. In the Address Properties dialog box, enter the information required by the address type you selected. Select OK to return to the E-Mail Addresses tab.
-
When the recipient no longer needs a particular address, you can remove the unnecessary address by selecting the e-mail address and then selecting the Remove button. You can remove any address, except for the primary SMTP address, since all recipients must have at least one SMTP address. To remove the primary SMTP address, you must first designate another SMTP address as the primary one.
-
You can have multiple e-mail addresses of the same type. For example, you can assign two SMTP addresses to some users, and external Internet users could address e-mail to these users using either of their SMTP addresses. However, when a user sends an e-mail message, the primary address is the one that will appear in the From field.
If you have multiple addresses for an address type, the primary address appears bolded. To change the primary address, select the new primary address and select Set as Primary. The new primary address appears bolded.
-
A users e-mail addresses are automatically generated according to the recipient policies. This keeps you from having to manually enter e-mail addresses for each of your users. However, you may have a small number of users who are exceptions to the address generation rules defined by the recipient policies. For these exceptions, you will need to manually enter their e-mail addresses and clear the Automatically update e-mail addresses based on recipient policy check box to prevent the recipient policies from updating the users addresses.
-
Select the Exchange General tab to display information about delivery restrictions, delivery options, and storage limits (Figure 7.6).
-
Select the Delivery Restrictions button to specify the maximum size of incoming and outgoing messages, and the users from whom mail should be accepted or rejected (Figure 7.7).
-
You can use the Outgoing message size options to specify the maximum acceptable size for this users outgoing messages. Select Maximum KB and enter a value into the associated field to prevent very large messages (e.g., greater than 1 MB) from degrading network performance. Select Use default limit to use the default maximum size as defined in the Message Delivery Properties in the Global Settings section of Exchange System Manager.
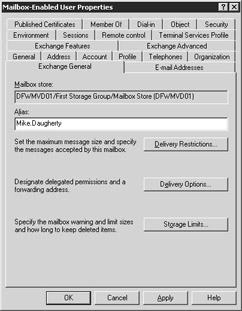
Figure 7.6: The Exchange General tab -
You can use the Incoming message size options to specify the maximum acceptable message size that this user can receive. Select Maximum KB and enter a value into the associated field to specify a limit for this user. Select Use default limit to use the default maximum size as defined in the Message Delivery Properties in the Global Settings section of Exchange System Manager.
-
You can use the Message restrictions options to control the users from whom this recipient can accept e-mail messages.
Select From everyone if you do not want to place restrictions on who can send e-mail to this user. By default, mailbox-enabled users can accept messages from anyone .
Alternatively, you can set restrictions so that e-mail will be accepted only from a specific set of users. To list specific users who can send e-mail to this user, select Only from . Then select the Add button to display the Select Recipient dialog box. In the Select Recipient dialog box, select those users who will be allowed to send e-mail to this recipient. When you have identified these users, select OK to return to the Delivery Restrictions dialog box.
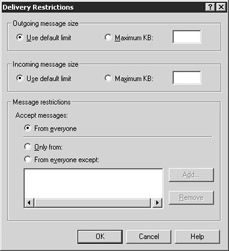
Figure 7.7: The Delivery Restrictions dialog box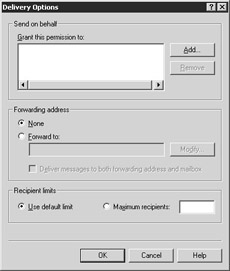
Figure 7.8: The Delivery Options dialog boxYou can also elect to allow messages to be accepted from everyone except a specific set of users. To list specific users who will not be allowed to send e-mail to this user, select From everyone except . Then select the Add button to display the Select Recipient dialog box. In the Select Recipient dialog box, select those users who will not be allowed to send e-mail to this recipient. When you have identified these users, select OK to return to the Delivery Restrictions dialog box.
-
Select OK to return to the Exchange General tab.
-
Select the Delivery Options button to grant Send on behalf permissions, to set a forwarding address, or to set recipient limits (Figure 7.8).
-
In most typical corporate environments, high-level managers often have administrative assistants who are asked to send e-mail on behalf of the manager. To delegate sending privileges to an administrative assistant or to another user, select Add to display the Select Recipient dialog box. In the Select Recipient dialog box, select those users who will be granted Send on behalf permissions for this user. When you have identified these users, select OK to return to the Delivery Options dialog box.
-
You can automatically forward all of this users incoming messages to another user by selecting Forward to , and then selecting Modify to display the Select Recipient dialog box. In the Select Recipient dialog box, select the forwarding address (i.e., select the recipient who will receive this users e-mail). When you have identified the forwarding address, select OK to return to the Delivery Options dialog box.
-
You can also select the Deliver messages to both forwarding address and mailbox check box to have forwarded messages delivered to both the forwarding address and the users mailbox.
-
You can use the Recipient limits options to restrict the number of recipients that this user can include on a single e-mail. Select Maximum recipients and enter a value into the associated field to limit the number of recipients. If a user attempts to send a message that exceeds the specified maximum number of recipients, the message will be returned to the user as undeliverable. Select Use default limit to use the default limit as defined in the Message Delivery Properties in the Global Settings section of Exchange System Manager.
-
Select OK to return to the Exchange General tab.
-
Select the Storage Limits button to control the information storage limits and deleted item retention for the users mailbox (Figure 7.9).
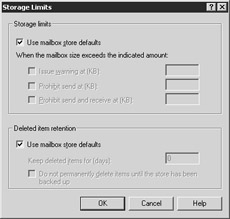
Figure 7.9: The Storage Limits dialog box -
You can use the Storage limits options to manage the users mailbox store. These limits do not apply to Personal Information Stores (commonly known as PST files); they apply only to messages stored in the mailbox store. Select the Use mailbox store defaults check box to use the default storage limits as defined on the Limits tab of the Mailbox Store Properties.
To define specific limits for this user, first clear the Use mailbox store defaults check box. Select the Issue warning at (KB) check box and enter a value into the associated field to specify the maximum size that the users mailbox can reach before a warning message is sent to the user.
Select the Prohibit send at (KB) check box and enter a value into the associated field to specify the maximum size that the users mailbox can reach before Exchange will no longer allow the user to send messages. The user will not be allowed to send messages until enough messages are deleted to drop the storage size below the limit. The value you specify must be greater than the value you entered for Issue warning at (KB) .
Select the Prohibit send and receive at (KB) check box and enter a value into the associated field to specify the maximum size that the users mailbox can reach before Exchange will no longer allow the user to send or receive messages. The value you specify must be greater than the value you entered for Prohibit send at (KB) .
-
When a user deletes a message, it is moved into the users Deleted Items folder. When the Deleted Items folder is emptied, the deleted messages continue to be retained in the information store for a specified amount of time before they are permanently deleted. These deleted items are marked as hidden until they are permanently deleted from the private information store when the retention period expires. Until the retention time period expires , users can recover their own deleted items by using Outlooks Recover Deleted Items command. This process greatly reduces requests for the Exchange administrator to recover deleted items from backup tapes. Of course, retaining deleted items requires disk space, so you must make an educated compromise between user convenience and system resources.
You can use the Deleted item retention options to specify the number of days that the users deleted items are kept before they are permanently deleted. Select the Use mailbox store defaults check box to use the deleted item retention limits defined on the Limits tab of the Mailbox Store Properties.
To define a specific retention period for this user, first clear the Use mailbox store defaults check box. Then, enter a value into the Keep deleted items for (days) field. If mailbox-enabled users do not permanently delete a deleted item, it will be stored on the server for this number of days before Exchange permanently deletes it. To prevent deleted items from being permanently deleted before they are backed up, select the Do not permanently delete items until the store has been backed up check box.
-
Select OK to return to the Exchange General tab.
-
Select the Exchange Advanced tab (Figure 7.10).
-
Exchange sends the simple display name to other e-mail systems that cannot understand any non-ANSI characters you may have used in the users normal display name. To set a simple display name, enter the name into the Simple display name field. The name should include only ANSI characters.
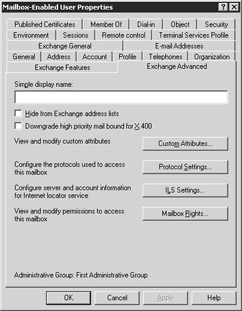
Figure 7.10: The Exchange Advanced tab -
By default, all recipients are listed in Exchange address lists. However, there are two common reasons for hiding a users mailbox.
-
To avoid receiving large quantities of unsolicited e-mail, some key individuals such as the company CEO may not want their names listed in the Exchange address lists.
-
When an employee leaves the company, hiding the mailbox for a period is preferable to deleting the mailbox since deleted mailboxes are difficult to re-create.
You can select the Hide from Exchange address lists check box to prevent this recipient from appearing in address lists. You cannot select the address lists in which the recipient will be listed. If you select this check box, the recipient will be hidden from all address lists. This discourages but does not prevent users from sending mail to the hidden user. Mail can still be sent to the recipient if the sender types the address into the To field rather than selecting the name from an address list.
-
-
For mailbox-enabled users, you can automatically downgrade e-mail that is set for high-priority delivery to an X.400-type e-mail address. This downgrade causes the outbound e-mail to conform to 1984 X.400 standard. Select the Downgrade high priority mail bound for X.400 check box to automatically downgrade high priority e-mail.
-
Exchange maintains hundreds of attributes for each recipient, including names, addresses, and telephone numbers. However, every company has specific needs that cannot be met by the standard recipient attributes. For example, there is no standard attribute for recording an employee badge number or a spouses name. To record this type of company-specific information, Exchange has 15 custom attributes (named extensionAttribute1 through extensionAttribute15 ) that you can customize to meet your companys needs.
To enter company-specific information, select the Custom Attributes button to display the Exchange Custom Attributes dialog box. In the Exchange Custom Attributes dialog box, select the attribute ( extensionAttribute1 through extensionAttribute15 ) you want to change, and then select Edit. Enter a value for the custom attribute, and select OK to return to the Exchange Custom Attributes dialog box. Select OK to return to the Exchange Advanced tab of the Properties dialog box.
-
Select the Protocol Settings button to configure the protocols used to access this mailbox (Figure 7.11). Three protocols are available for remote user access.
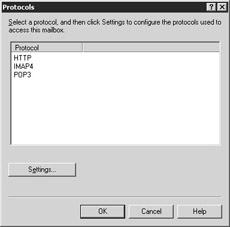
Figure 7.11: : The Protocols dialog box-
Hypertext Transfer Protocol (HTTP)
-
Internet Message Access Protocol version 4 (IMAP4)
-
Post Office Protocol version 3 (POP3)
-
-
HTTP is the protocol used by the World Wide Web, and it must be enabled if users plan to use Outlook Web Access (OWA) to access their mailboxes. To configure the HTTP settings, select HTTP, and then select the Settings button to display the HTTP Protocol Details dialog box.
There really are not many details in the HTTP Protocol Details dialog box. Select the Enable for mailbox check box to allow this user to use HTTP and Outlook Web Access. Then select OK to return to the Protocols dialog box.
-
IMAP4 is an Internet standard messaging protocol. Unlike POP3, IMAP4 allows a client system to access server-based messages without having to download them to the client system. IMAP4 users can access messages stored in their server-based folders and can access public folders. To configure the IMAP4 settings, select IMAP4, and then select the Settings button to display the IMAP4 Protocol Details dialog box.
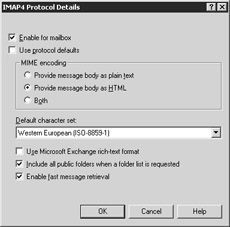
Figure 7.12: The IMAP4 Protocol Details dialog box -
Select the Enable for mailbox check box to allow this user to use IMAP4. The protocol settings are used to determine how MAPI messages are converted when retrieved by the IMAP4 client. Select the Use protocol defaults check box to use the default protocol as defined on the Message Format tab of the Default IMAP4 Virtual Server Properties.
-
To define specific IMAP4 settings for this user, first clear the Use protocol defaults check box (Figure 7.12). Use the MIME encoding options to determine how message contents are sent to the IMAP4 client. Select Provide message body as plain text to send messages as text only, with no special formatting (e.g., no bolding, italics, underlining, or color ). Graphics and active links are replaced with text descriptions. Select Provide message body as HTML to send more fully formatted representation of the message. The HTML message format will include formatted text, as well as graphics and active links. Select Both to send both plain text and HTML formats in a MIME multipart message. If the IMAP4 client does not support HTML, it will default to the text version of the message. The disadvantage of sending both formats is the increased message size.
-
Use the Default character set drop-down list to select the character set to use with older MAPI clients such as Outlook 97. This allows you to support multiple languages using Windows character sets rather than standard Internet character sets. This option affects only Outlook 97 or earlier. Exchange 2000 automatically handles character sets used by more recent versions of Outlook.
-
Select the Use Microsoft Exchange rich-text format check box to send Exchange Rich Text Format messages to the IMAP4 client. If the IMAP4 client software understands Exchange Rich Text Format, the user will be able to view the message. Clients that do not understand Exchange Rich Text Format will include the content in an unviewable attachment named winmail.dat . If you elect to use the Exchange Rich Text Format, you cannot provide the message body as HTML; you must select Provide message body as plain text .
-
Select the Include all public folders when a folder list is requested check box to include public folders when the user requests a folder list. This is the default. If you clear this option, Exchange will include only the users private folders in the list. Clearing the option can be used to improve performance for clients experiencing problems listing a large number of folders.
-
When Exchange sends messages to the IMAP4 client, it also calculates and sends the exact size of the message. If the IMAP4 client does not require exact message sizes, you can select the Enable fast message retrieval check box to improve performance by sending approximate message sizes.
-
Then select OK to return to the Protocols dialog box.
-
POP3 is an Internet standard messaging protocol that allows a client system to download e-mail from the users server-based Inbox. POP3 does not allow the user to maintain folders on the server and does not support public folder access. To configure the default POP3 settings, select POP3, and then select the Settings button to display the POP3 Protocol Details dialog box.
-
Select the Enable for mailbox check box to allow this user to use POP3 (Figure 7.13). Select the Use protocol defaults check box to use the default protocol as defined on the Message Format tab of the Default POP3 Virtual Server Properties.
-
To define specific POP3 settings for this user, first clear the Use protocol defaults check box. Use the MIME encoding options to determine how message contents are sent to the POP3 client. Select Provide message body as plain text to send messages as text only, with no special formatting (e.g., no bolding, italics, underlining, or color). Graphics and active links are replaced with text descriptions. Select Provide message body as HTML to send more fully formatted representation of the message. Select Both to send both plain text and HTML formats in a MIME multipart message.
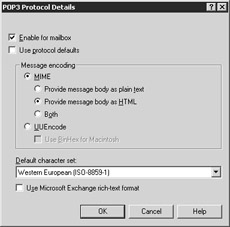
Figure 7.13: The POP3 Protocol Details dialog box -
Select UUEncode if you want to use UNIX-to-UNIX encoding (uuencode) to convert binary files into printable 7-bit ASCII characters. Select the Use BinHex for Macintosh check box to convert incoming uuencoded messages into BinHex for Macintosh.
-
Use the Default character set drop-down list to select the character set to use with older MAPI clients such as Outlook 97. This allows you to support multiple languages using Windows character sets rather than standard Internet character sets. This option only affects Outlook 97 or earlier. Exchange 2000 automatically handles character sets used by more recent versions of Outlook.
-
Select the Use Microsoft Exchange rich-text format check box to send Exchange Rich Text Format messages to the POP3 client. If the POP3 client understands Exchange Rich Text Format, the user will be able to view the message. Clients that do not understand Exchange Rich Text Format will include the content in an unviewable attachment. If you elect to use the Exchange Rich Text Format, you cannot provide the message body as HTML; you must select Provide message body as plain text .
-
Select OK to return to the Protocols dialog box.
-
Select OK to return to the Exchange Advanced tab of the Properties dialog box.
-
You can use the Internet Locator Service (ILS) to provide information about your users to the managers of Web sites that your users visit. Sharing this information facilitates communication between Web site managers and users. If you want to share this information, select the ILS Settings button to display the Exchange Internet Locator Service dialog box. In the ILS Server field, enter the name of the server to which this user is connected. In the ILS Account field, enter the users account name. Select OK to return to the Exchange Advanced tab of the Properties dialog box.
-
Select the Mailbox Rights button to set mailbox permissions for the user or to assign mailbox permissions to another user (Figure 7.14).
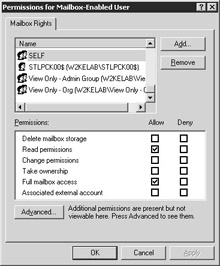
Figure 7.14: The Permissions for Mailbox-Enabled User dialog box -
In the Name window, select the user or group to which you want to assign permissions. If the user or group does not appear in the list, select Add to add users to the list.
The selected user or groups current permissions are indicated in the Permissions window. The permissions currently granted to this user have the Allow check box marked. Permissions that are denied to this user have the Deny check box marked. If the permissions for this object are inherited from parent objects, the check box is shaded. Inherited permissions can only be changed at the parent object where the permission is defined. You should only use the Deny check box with careful consideration since it can have an unintended and difficult to diagnoseeffect on inheritance of permissions.
-
If the permission is not inherited from a parent object, select or clear the Allow or Deny check boxes for the permissions you want to grant or deny this user or group.
-
If the permission is inherited, change the permission at the parent object where it is defined.
To change the permissions granted to the mailbox-enabled user (i.e., the owner of the mailbox), select SELF in the Name window. Then, select the Grant or Deny check box next to the permission you want to change.
To allow another user to access this users mailbox, select the other user or group in the Name window. Then, grant the appropriate permissions to allow the user to access the mailbox. For read-only access, select Read permissions permission. For full access, select Full mailbox access .
-
-
Select OK to return to the Exchange Advanced tab of the Properties dialog box.
-
Select the Exchange Features tab to enable or disable Exchange features, such as instant messaging, for mailbox-enabled users (Figure 7.15).
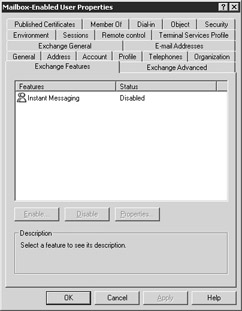
Figure 7.15: The Exchange Features tab -
To enable or disable Exchange features, select a feature, and then select either Enable or Disable.
-
The General, Address, Telephones, and Organization tabs include information that is useful for identifying the user in the Global Address List (GAL), for generating custom e-mail addresses, or creating custom address lists. Much of this information is optional (i.e., Windows 2000 and Exchange will not cease to operate if the information is not available). However, this optional information is very beneficial to users trying to differentiate between two users with similar names. The value of the GAL is directly related to the accuracy and completeness of the information entered by the administrator. Ideally, the information in the GAL should negate the need for any other form of employee address or telephone list.
-
If you plan to create custom address lists based on department, location, or other attributes, you must enter information into these fields in a consistent manner. For example, if you sometimes enter state information using a two-character abbreviation and sometimes enter the full state name, it will make generating location-based address lists very difficult. Similarly, you must determine the exact spelling for department names, city names, office names, and other potential selection criteria for address lists.
To assist your users, to facilitate generating e-mail addresses, and to facilitate creating address lists based on user attributes, you should always enter as much of the information shown in Table 7.1 as possible.
Table 7.1: General, Address, Telephones, and Organization Tabs Property Tab
Field
Description
General
First name
Enter the users first name.
Initials
Enter middle initials if any.
Last name
Enter the users last name.
Display name
This name will appear in the Exchange Global Address List. In some circumstances, you may wish to change or enhance the default display name to clearly identify the user. For users with similar names, it is often beneficial to append the users location or department to the default display name. For example,
Smith, John [Kentucky]
Smith, John [Missouri]
Description
This field can be used for any descriptive information about the user.
Office
Enter the users office.
Telephone number
Enter the users primary telephone number. You can use the Other button to enter additional telephone numbers for the user.
E-mail
This is the users e-mail address.
Web page
If the user has a personal Web page, the URL can be entered in this field.
Address
Street
Enter the users street address.
P.O. Box
This is the users post office box.
City
Enter the users city.
State/ province
Enter the users state. Be consistent; always use either full state name or always use abbreviations.
Zip/Postal Code
Enter the users postal code.
Country/region
Enter the users country. Be consistent; always use either full country name or always use ISO country codes.
Telephones
Home , Pager , Mobile , Fax , IP phone
Enter the users telephone numbers. These phone numbers are optional. However, if you maintain the information, the GAL can serve as a corporate telephone directory.
Organization
Title
Enter the users title.
Department
Enter the users department. Be consistent.
Company
Enter the users company. Be consistent.
Manager
Select the Change button to enter the users manager. This will also automatically add the user to the managers list of direct reports .
Direct reports
These are the users direct reports. Names are added to the list by modifying the Manager field for each of the managers direct reports.
7.1.4 Moving a mailbox
As your user base grows and as users move from one location to another, you may find it necessary to move an existing users mailbox to adjust server workload. You can use the following procedure to move an Exchange mailbox from one Exchange server to another or from one mailbox store to another:
-
Start the Active Directory Users and Computers from the Windows 2000 Start menu by selecting Programs Administrative Tools Active Directory Users and Computers.
-
Expand the Users section.
-
In the details pane, right-click the user you want to move, and select Exchange Tasks to start the Exchange Task wizard (Figure 7.16).
-
The Exchange Task wizard will display a list of Exchange-specific tasks that can be applied to the user account. Select Move Mailbox, and then select Next to continue.
-
The Exchange Task wizard will display the current location of the users mailbox, along with a possible new location for the mailbox. The Server and Mailbox Store fields list the Exchange server and mailbox store where the users mailbox will be moved. You can use the drop-down lists to select another Exchange server or another mailbox store.

Figure 7.16: The Move Mailbox wizard
When you are satisfied with the new mailbox location, select Next to continue. The Exchange Task wizard will immediately begin moving the mailbox and will display a Task In Progress window to show you the progress of the move. When the move has been completed, select Next to display the results of the move operation. Select Finish when you are done reviewing the summary information.
7.1.5 Deleting a mailbox-enabled user account
It is very difficult to restore a mailbox once it has been deleted. Therefore, you should carefully consider any request to delete a mailbox. In almost all cases, it is best to disable the account and hide the mailbox from the address lists for some extended length of time before permanently deleting it. The mailbox should be deleted only when you are certain that the information in the mailbox is no longer needed. Once you are satisfied that the mailbox is no longer needed, you can use the following procedure to delete the mailbox-enabled users account.
-
Start the Active Directory Users and Computers from the Windows 2000 Start menu by selecting Programs Administrative Tools Active Directory Users and Computers.
-
Expand the Users section.
-
In the details pane, right-click the user you want to delete, and select Delete.
-
The system will display a dialog box informing you that the Exchange mailbox will also be deleted and asking if you are sure you want to continue. Select Yes to delete the account and the associated mailbox.
| |
EAN: 2147483647
Pages: 113