| InDesign holds text in objects called frames. Before you can start typing text, you need to create a text frame. The easiest way to do this is with the Type tool. Tip You can resize or reshape text frames like you can other objects. (See Chapter 4, "Working with Objects," for more details on creating and working with objects.)
To create a text frame with the Type tool: 1. | Click the Type tool in the Toolbox  . .
Choose the Type tool in the Toolbox to work with text.  | 2. | Move the cursor to the page. The cursor changes to the Type tool cursor  . .
The cursor set to create a text frame.  | 3. | Drag diagonally to create the frame  . .
Drag diagonally with the Type tool to create a text frame. 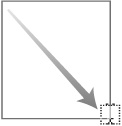 Tip The frame starts from the horizontal line that intersects the text frame cursor. | 4. | Release the mouse button. The text frame appears with an insertion point that indicates you can type in the frame.
|
The Type tool will always create rectangular frames. However, you can use the frame tools to create other geometric shapes such as ellipses and polygons to hold text. Tip The frame tools also let you use numerical settings to specify the exact dimensions of a frame (see page 52).
To draw an elliptical frame: 1. | Click the Ellipse tool in the Toolbox  . .
The Ellipse tool in the Toolbox.  | 2. | Drag diagonally to create the ellipse  . .
Drag diagonally to create an ellipse.  | 3. | Release the mouse button when the ellipse is the correct size.
| 4. | Click the Type tool inside the frame to convert it to a text frame.
|
Unassigned Frames The Ellipse, Polygon, and Rectangle tools create frames that are unassigned. This means they hold neither text nor graphics. But don't let the unassigned designation mislead you. It doesn't really matter if a frame is unassigned or not. You can convert unassigned frames to hold text (see page 52), or you can convert unassigned frames to hold graphics (see page 195). |
The Polygon tool also lets you draw stars as well as ordinary polygons. To draw a polygon frame: 1. | Double-click the Polygon tool in the Toolbox  . This opens the Polygon Settings dialog box . This opens the Polygon Settings dialog box  . .
The Polygon tool in the Toolbox. 
Use the Polygon Settings dialog box to change the shape and the number of sides of a polygon. 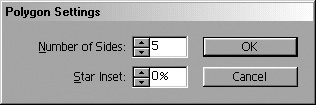 | 2. | Enter a number in the field for the number of sides.
| 3. | Leave the Star Inset amount as 0%. If you increase the star inset, you create a star. (See the next exercise.)
| 4. | Drag across the page to create the polygon  . .
Drag diagonally to create polygons or stars. 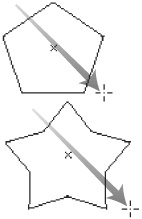 Tip Press the up or down arrow keys as you drag to increase or decrease the number of sides of the polygon. | 5. | Release the mouse button when the polygon is the correct size.
| 6. | Click the Type tool inside the frame to convert it to a text frame.
|
To create a star frame: 1. | Double-click the Polygon tool in the Toolbox to open the Polygon Settings dialog box .
| 2. | Enter a number in the Number of Sides field for the number of outer points.
| 3. | Enter a value for the Star Inset amount. The greater the amount, the sharper the points will be.
| 4. | Drag to create the star .
Tip Press the up or down arrow keys as you drag to increase or decrease the number of points of the star. Tip Press the left or right arrow keys as you drag to increase or decrease the star inset. | 5. | Release the mouse button when the star is the correct size.
| 6. | Click the Type tool inside the frame to convert it to a text frame.
|
You can also create rectangular frames using the Rectangle tool. To draw a rectangular frame: 1. | Click the Rectangle tool in the Toolbox  . .
The Rectangle tool in the Toolbox.  | 2. | Drag diagonally to create the rectangle  . .
Drag diagonally to create a rectangle.  | 3. | Release the mouse button when the rectangle is the correct size.
| 4. | Click the Type tool inside the frame to convert it to a text frame.
|
The Ellipse and Rectangle frame tools let you numerically specify the frame size. To set the size of a frame numerically: 1. | Choose the Ellipse or Rectangle tool from the Toolbox.
| 2. | Position the cursor where you want to create the frame.
| 3. | Click. A dialog box appears  . .
The Ellipse and Rectangle dialog boxes let you specify the width and height of a frame. 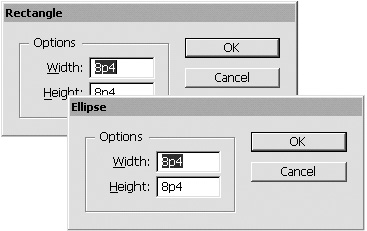 | 4. | Set the Width and Height of the frame.
| 5. | Click OK. The frame appears with its upper-left point where you first clicked.
Tip Hold the Opt/Alt key as you click to position the centerpoint of the frame at that point. |
Frames created with the Ellipse, Polygon, and Rectangle tools must be converted to use as text frames. To convert unassigned frames: 1. | Select the frame you want to convert.
| 2. | Choose the Type tool and click inside the frame.
or
Choose Object > Content > Text. An insertion point appears indicating that you can begin typing.
|
Tips for Drawing Frames There are several keyboard shortcuts you can press as you draw frames: Hold the Shift key to constrain the frame to a square, circle, or uniform polygon. Hold the Opt/Alt key to draw the frame from the center outward. Hold the Spacebar to reposition the frame as you draw.
|
|