Sharing Over the Internet
FileMaker Network sharing is the easiest way to share your database. Folks simply open the file, and it works exactly like a file on their hard drive. The catch is, they need a copy of FileMaker Pro on whatever computer they're using to connect. If you want to open up your database to people who don't have FileMakerand you're willing to live with a less elegant interfaceyou can use Instant Web Publishing. This feature turns your computer into its own Web server. Like magic, it turns all your layouts into Web pages and lets anybody with an up-to-date Web browser search, sort, and edit your data directly.
18.2.1. Turning on Web Sharing
Enabling Instant Web Publishing (IWP for short) is just as easy as turning on FileMaker Network sharing. First, choose File  Sharing
 images/U2192.jpg border=0> Instant Web Publishing (Windows) or FileMaker Pro
images/U2192.jpg border=0> Sharing
images/U2192.jpg border=0> Instant Web Publishing (Mac OS X), and then click On. Once IWP starts up, FileMaker shows you the URL by which people access your databases. (You also get to pick a language for your Web pages. This action doesnt translate the information in your database, though. Instead, it controls what language all of FileMaker's buttons, labels, and links use in the Web browser.)
| UP TO SPEED Favorite Hosts |
|
When you first visit the Open Remote File dialog box, FileMaker shows you local hosts. In general, FileMaker discovers only hosts that are on the same local network as the guest computer, but in the world of giant corporate networks, wireless nodes, and Internet connections everywhere, it's hard to guess where one network ends and the next one begins. If FileMaker doesn't show your host automatically, you have to add it to your Favorite Hosts list. From the Open Remote File dialog box's View pop-up menu, choose Favorite Hosts. FileMaker adds three new buttons below the Hosts list: Add, Edit, and Remove. Click Add to add a new host to the list. When you do, you see the Edit Favorite Host dialog box (shown here). In the Host's Internet Address box, type the TCP/IP Address or Host Name of the host computer. You can also give your host a nicer name (in the Favorite Host's Name box). Normally, FileMaker asks the host computer for a list of files and shows every available file. If your host often has lots of files, but you use only a few, you can turn on "Show only these files" and list the ones you want to see. When you're done, click Save. To remove an existing favorite, select its name and click Remove. If you have a large network with lots of hosts and databases, you can use a Lightweight Directory Access Protocol (LDAP) server, like the ones used for email addresses, to centralize host management. Refer to your LDAP server's documentation for details. 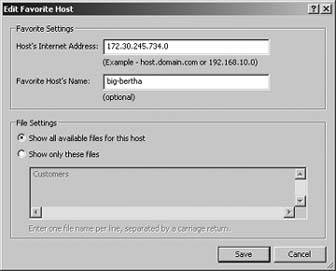 |
18.2.1.1. Advanced Web Publishing Options
The Advanced Web Publishing Options window lets you configure FileMaker's built-in Web server. You get to pick a port (more on that next) and restrict access to only certain computers, among other settings. Clicking Advanced Options in the Instant Web Publishing window opens the dialog box (Figure 18-3).
|
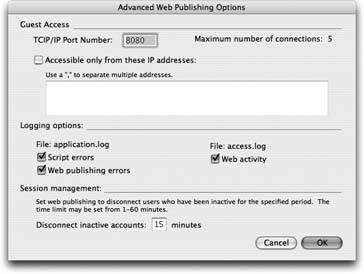
Network servers set up shop at a TCP/IP Port Number, and once you turn on IWP, your computer is a network server, too. The usual web publishing port is 80 and, if you have no other Web services running on your computer, that's the one you'll usually use. But if you do need to set up your Web server with multiple services, you can change FileMaker's port number to avoid a conflict. As you can see in the figure above, FileMaker has registered its very own port number just for Web publishing (591). If you stick with port 591, chances are no other program's using it and you'll avoid conflicts even if you need to add other services later on. When you assign any other port number than 80, FileMaker automatically adds the port number to the URL it displays in the Instant Web Publishing dialog box, as a reminder of the link your browser uses to connect to your site.
Note: When you use port 80, links to your links don't need to include the port number, but if you're using any other port number, you'll have to make sure that your links include the port.
If you don't want just anybody trying to connect to your databases, you can turn on "Accessible only from these IP addresses." You then have to list the network address of each computer you want to allow (with commas in between). If you have a large intranet, you don't have to type dozens of IP addresses, though. You can specify a range of addresses using an asterisk. For example, 192.168.15.* lets everyone whose IP address matches the first three sets of numbers access the file.
| UP TO SPEED Record Locking Revisited |
|
Back in Chapter 2, you learned about record locking. When you start editing a record, FileMaker locks it, so it can't be changed in another window until you commit it in the first. At the time, this scenario probably seemed like a pretty obscure situation: How often do you try to edit the same record in two different windows? But when several people start sharing the same database, record locking takes on a whole new meaning. Now, when you start editing a record, nobody else can edit it. If you type a few lines in the Notes field, and then go home sick without clicking out of the record, you keep it locked all day. When you try to edit a locked record, FileMaker shows a message like this one. It tells you the record's locked, and who has it locked (including the user name on their computer, and the account name they've logged in with). If you'd like to politely ask them to get out of the record, click Send Message. You see the Send Message to Conflicting Users window also shown here. Enter any message you want and click OK. The third window in this picture shows what the other user sees. While record locking can be a minor annoyance to the user, it can be a real problem for the database developer. If you've designed all your scripts with the mistaken notion that you'll always be able to edit any record you want, you might get an unpleasant surprise the first time a script tries to modify a locked record. Even worse, sometimes you build a process that simply doesn't work for multiple users. For example, suppose you expect people to flag a series of records, and then run a script that does something to all the ones they flagged. If the script finds the flagged records and loops through them, FileMaker gets utterly confused when two people try to use the same script at once. The script crashes, and it's anybody's guess how your poor records will wind up. In general, you should think about how the script you write works if a record can't be edited, or if several people are using it at the same time. Or, to avoid the issue altogether, make it so only one person can use certain scripts, and use privilege sets to keep everybody else away from them. 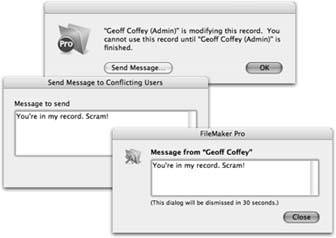 |
While IWP is running, it can keep track of activity and errors. FileMaker keeps this information in log files in its Web Logs folder. The "Web activity" log records each time someone interacts with the database. The log includes the network address of the user, and the URL she requested. The "Script errors" log records errors in your FileMaker scripts. The "Web publishing errors" log holds other errors that occur in IWP, like invalid requests and missing databases. You can use these logs to see if you need to fix your scripts, or to see who's been using the databases and what problems they've encountered. On the other hand, if you use IWP a lot, these logs can get large. Turn any or all of them off to keep FileMaker from recording this information.
Web browsers don't work exactly like FileMaker itself. Someone has to explicitly log out to tell FileMaker he's disconnecting. If he doesn'tfor example, if he just quits his browser or goes to a different Web site FileMaker doesn't know he's left your site. To keep people from tying up connections forever, FileMaker automatically disconnects anyone who hasn't requested a page in a while. You get to decide how long "a while" is. A smaller setting (like 15 minutes) ensures that people don't hold connections long if they forget to log out. On the other hand, if they spend more than 15 minutes looking at a single record (reading a long Notes field, for instance) then they're disconnected even though they're still using the database. If you have situations like this one, set the "Disconnect inactive accounts" value to something larger (the maximum is 60 minutes).
18.2.1.2. Configuring file access
Just like FileMaker Network Sharing, you get to decide which files are shared by IWP, and which privilege sets have Web access. In fact, the settings are identical: Select an open file, and then choose the appropriate access level. Manage IWP access using the [fmiwp] extended privilege.
18.2.2. Connecting from a Web Browser
Not all Web browsers are created equal. They aren't all good at showing you Web sites that use Cascading Style Sheets (CSS). And since FileMaker translates your layouts into CSS when you share them via IWP, you must have a browser that understands CSS to use databases on the Web, like one of the following:
- Microsoft Internet Explorer 6.0 or higher in Windows
- Safari 1.2 or higher in Mac OS X 10.3
- Safari 2.0 or higher in Mac OS X 10.4
- Firefox 1.0 in Mac or Windows
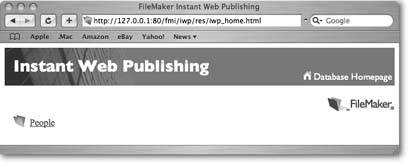
To connect to the database from a Web browser, you need to know the URL in the Instant Web Publishing dialog box. Type this URL into the Location box in your Web browser. The resulting Web page looks like the one in Figure 18-4.
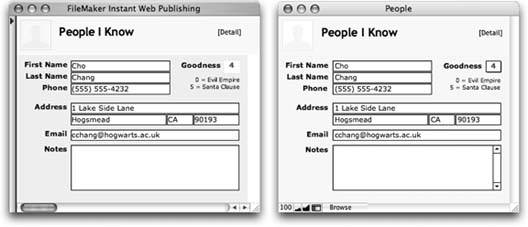
When you click a database link on the Web page, FileMaker asks you to log into the databaseeven if you haven't set up accounts on your database. If you've created accounts, enter a valid account name and password. Otherwise, enter Admin for the user name, and leave the password box blank. After you log in, you see what probably looks a lot like your real database displayed right inside the Web page (Figure 18-5).
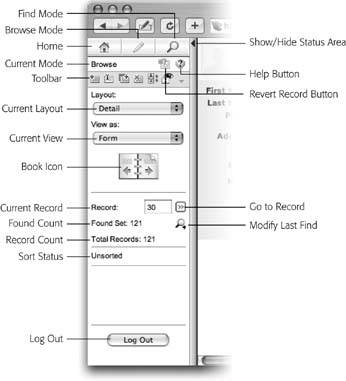
The most noticeable difference is the status area: It's bigger and has more options, as Figure 18-6 attests. When you view your data in List view or Table view, the Web page shows only a few records at a time. To see more, click the pages in the book icon or type a record number in the Current Record box and click the Go to Record button in the status area. Since you're working on the Web, you must click this button to reload the page with the desired record.
|
|
The process of editing records is also different in IWP. When you first click an editable field (or click the Edit Record button in the toolbar), FileMaker reloads the page in editable form. The status area also changes: Submit and Cancel buttons appear, while all other tools become unavailable. After you've made changes, you have to click Submit or FileMaker doesn't save them. If you don't want to keep your changes, click Cancel instead.
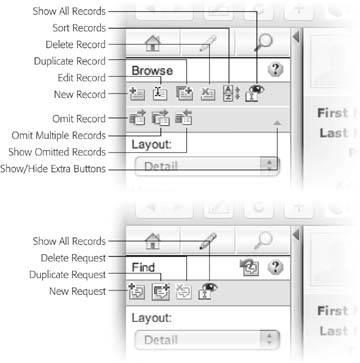
The toolbar in the status area has icons for common database activities. The icons change if you switch to Browse mode, and if you hold your mouse arrow over a button for a few seconds, a label pops up telling you what the button does. You can see the Browse mode and Find mode toolbars in Figure 18-7.
18.2.3. Custom Home Page
The IWP home page, shown in Figure 18-4, gets the job done, but it's not likely that it matches your corporate identity. And some users find it a bit confusing, since it doesn't provide them with a lot of clues about what your IWP database does. But you can make a Custom Home Page to replace it.
|
Your Custom Home Page will require a smidgeon of JavaScript to make sure the page loads properly. If you already have some JavaScript in your page, add this bit to the existing code:
If( window != window.top ) top.location = "/fmi/iwp/cgi?-home
If you don't have any existing JavaScript, add this:
And if you can't stand the thought of dealing with JavaScript at all, you can just edit the sample copy of the home page that comes with FileMaker Pro.
|
Save the file with the name iwp_home.html and place it in the Web folder inside the FileMaker Pro folder. Now your users will see this page when they first click to your site and every time they reconnect to it.
Part I: Introduction to FileMaker Pro
Your First Database
- Your First Database
- An Very Quick Database Tour
- Creating a New Database
- Opening and Closing Database Files
- Saving Your Databases
- Adding Records to Your Database
- Navigating Your Database
- Same Database, Multiple Windows
Organizing and Editing Records
- Organizing and Editing Records
- Views
- Advanced Find Mode
- Changing Multiple Records
- Sorting Records
- Editing Whats in Your Fields
- Paragraph Formatting
- Beyond Text: Container Fields
- Checking Spelling
- Printing and Preview Mode
Building a New Database
- Building a New Database
- Tables and Fields
- Defining Fields
- Advanced Field Options
- Bringing It All Together
Part II: Layout Basics
Layout Basics
Creating Layouts
Advanced Layouts and Reports
- Advanced Layouts and Reports
- Setting up Field Controls
- Adding Field Controls to Layouts
- Field Behavior
- Tab Order
- Print-Related Layout Options
- Format the Number/Date/Time/Graphic
- Adding Buttons
- Tab Panels
- Reports and Summary Fields
Part III: Multiple Tables and Relationships
Multiple Tables and Relationships
- Multiple Tables and Relationships
- Relational Databases Explained
- Modeling Your Database
- Creating a Relational Database
- Relational Databases
Advanced Relationship Techniques
- Advanced Relationship Techniques
- Creating Related Records
- Table Occurrences
- Managing Data with Data Tunneling
- Building a Data Tunneling Interface
- Connecting Databases
- Lookups
- Advanced Relationships
Part IV: Calculations
Introduction to Calculations
- Introduction to Calculations
- Understanding Calculations
- The Structure of a Calculation
- Creating a Calculation Field
- Auto-Enter Calculations
- Validate Data Entry with a Calculation
- Replacing Data Using a Calculation
- Comments
Calculations and Data Types
- Calculations and Data Types
- Number Crunching Calculations
- Going Beyond Basic Calculations
- Text Parsing Calculations
- Date and Time Calculations
- Containers in Calculations
Advanced Calculations
- Advanced Calculations
- Stored, Unstored, and Global Fields
- Logical Functions
- The Let Function and Variables
Extending Calculations
Part V: Scripting
Scripting Basics
- Scripting Basics
- Your First Script
- The Importance of the Layout
- Running Scripts
- Branching and Looping in Scripts
Script Steps
- Script Steps
- Go to Layout
- Scripting for Fields
- Working with Records
- Finding Records
- Sorting Records
- Working with Windows
- Working with Files
- Printing
- Other Script Steps
Advanced Scripting
- Advanced Scripting
- Commenting Scripts
- Asking and Telling the User
- Organizing Complex Scripts
- Handling Errors
- Putting a Complex Script Together
Part VI: Security and Integration
Security
Exporting and Importing
- Exporting and Importing
- Exporting a File
- Export Formats
- Importing Data
- Import Data Sources
- Importing and Exporting in a Script
Sharing Your Database
- Sharing Your Database
- FileMaker Network Sharing
- Sharing Over the Internet
- FileMaker Server
- Server Hardware
Developer Utilities
- Developer Utilities
- Script Debugger
- Disable Script Steps
- The Database Design Report
- Tooltips
- Copying Database Structure
- Custom Menus
- Developer Utilities
- File Maintenance
Part VII: Appendixes
Appendix A. Getting Help
EAN: 2147483647
Pages: 176
- Article 342 Intermediate Metal Conduit Type IMC
- Article 396 Messenger Supported Wiring
- Article 424: Fixed Electric Space Heating Equipment
- Example No. D2(a) Optional Calculation for One-Family Dwelling Heating Larger than Air Conditioning [See Section 220.82]
- Example No. D5(a) Multifamily Dwelling Served at 208Y/120 Volts, Three Phase
