Camera Blur
| Real cameras blur images in a particular way when areas of the image are out of focus. Plenty of camera operators in the history of filmmaking have regarded defocused areas of the frame as mistakes; Gregg Toland, visionary cinematographer of Citizen Kane, went to extraordinary lengths to keep items in the extreme foreground and background of that film in sharp focus, even devising (with Orson Welles) a customized camera for this purpose. Nowadays, however, good-looking camera blur is not typically seen as a flaw. It has a practical purpose, putting the audience's attention where the director wants it, which is why a rack focus shot, in which the focus changes from a figure in the background to one in the foreground, or vice versa, is part of the cinematographer's palette of storytelling tools. It also is often considered beautiful to behold, so much so that the Japanese coined a term for the quality of the out-of-focus image, boke (also spelled bokeh, which is closer to a phonetic spelling). So what's the big deal? Just blur the areas that should be out of focus, and you're done, right? Typically not, for a couple of reasons. First of all, as with lens flares, the design of the lens influences the look of the blurred image. Second, as is explored further in Chapter 11, if there are actual points of luminance in a blurred image. Be they lights or even specular highlights or glints reflected off of objects, they will retain their full brightness when blurred in a manner that images that simply have a blur applied to them do not. Before I get to these special case scenarios and a discussion of what, exactly, boke means to your shots, take a look at a setup where the 3D camera in After Effects can help you re-create the type of blur caused by focal limitations in a physical camera. Image Planes and Rack FocusIf your source footage can easily be divided into planes of depth, you can achieve a rack focus effect that matches the way this effect is achieved in a physical camera. The focal point passes from an object in the foreground to one in the background or vice versa, and the depth of field is narrow enough that only the immediate plane of focus is seen in sharp detail. With a physical camera, this type of shot requires a narrow depth of field, which is created by lowering the f-stop value. Doing so influences shutter angle and the amount of light passing through the aperture, so the color response and likelihood of motion blur in the shot are affected. Not so with the After Effects 3D camera, which has Aperture and F-Stop settings as well (Figure 9.20), but they affect only focal depth. The two settings are tied together; changing one in the Camera Settings dialog has an inverse effect on the other and the mathematical relationships are not linear. F-Stop is the setting more commonly referenced by camera operators, and yet only Aperture is available to be adjusted and keyframed in the timeline. Figure 9.20. By checking Enable Depth of Field in the Camera Settings dialog, you enable the settings associated with it, including Focus Distance (the distance in pixels that is in focus, which can be locked to the Zoom value using the check box just below it), as well as Aperture and F-Stop, which are different methods of controlling the same thing: the relative depth of field. A low F-Stop (or high Aperture) as shown here with a Blur Level of 100% will create a shallow depth of field. After Effects depth of field settings can be matched to a camera report, provided that you have the camera f-stop setting that was used when the footage was shot. If so, open up the Camera Settings dialog (Ctrl+Shift+Y/Cmd+Shift+Y, or click on the Camera in the Timeline window), check the box labeled Enable Depth of Field, and enter your value for F-Stop. The key to this effect is to offset at least one layer in Z space so that it is out of focal range. Now you can animate Focus Distance in the timeline; in the Top view, set the Focus Distance (under Options) to match the layer that will be in focus at the beginning of the shot, and keyframe it, then change the Focus Distance to match a second layer later in the shot (Figures 9.21a and b). Figure 9.21a and b. In the Top view it is easy to animate the Focus Distance, denoted by a red boundary line, to animate from the far plane (9.21a) to the near plane (9.21b).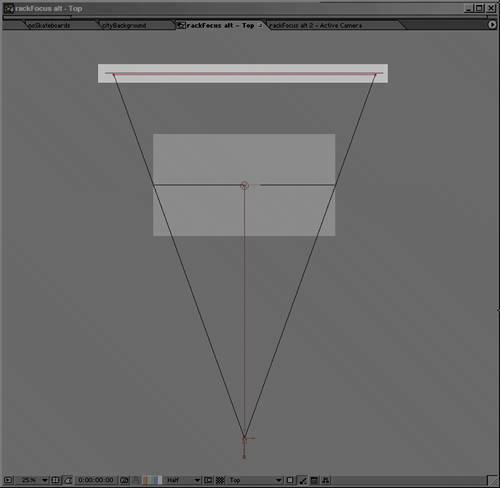  A static focus pull doesn't look quite right; changing focus on a real camera always alters the zoom slightly. To sell this shot, which starts on a view of the city and racks focus to reveal a sign in the foreground, I add a slight camera pull-back, which takes advantage of the nice shift in planes of motion that I get from my repositioned layers (Figure 9.22). Figure 9.22. The final shot is a rack focus combined with a gentle pull-back, with eases at the start and end of the Position and Focus Distance animations.
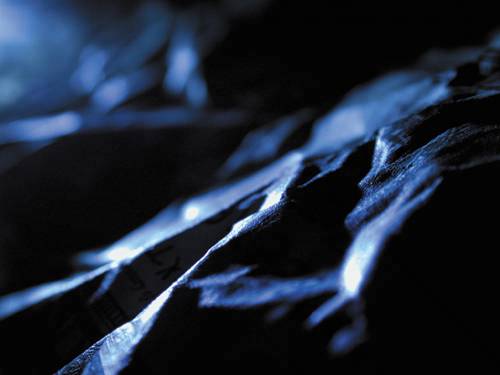
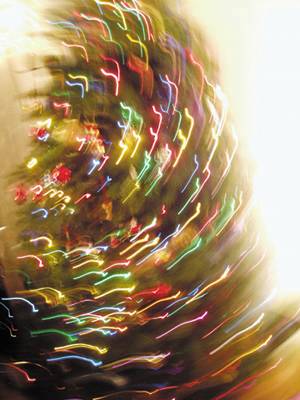
Boke BlurThe rack focus method generates camera blur that is realistic as far as moving and changing focus on a camera go, but the After Effects camera is not capable of generating the look of a truly defocused lens because of what happens to out-of-focus points of light that pass through a camera lens and aperture. Boke is meant to connote the look and feel of how points of light become discs of light (also called circles of confusion) that take on the character of the lens itself, as with lens flares (another effect that is the result of the lens interacting with light, covered in Chapter 12). This would seem to be rather obscure and arcane, except it produces beauty and suspense in a movie. How so? Shots create suspense by keeping elements out of focus. We may have a notion of what we are seeing, or we may not (Figure 9.23). We remain intrigued as viewers as the shot focuses in from a strange wash of color and light (Figure 9.24). Figure 9.23. Offered a dollar by Stu if I could guess what this image is, I guessed a beanbag chair. I was wrong. The correct answer is at the end of this section.
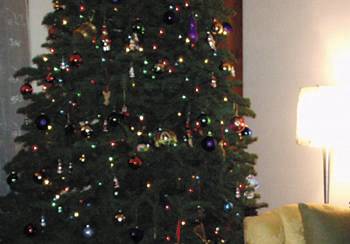
Figure 9.24. Even in the very first, most blurred frame of this shot pulling back from the lawn, you have a good idea what you're looking at, yet the appearance is strange and compelling. Note that a few blades of grass in the extreme foreground retain the quality of boke although most of the shot is in focus.
So what, exactly, causes this phenomenon, and how should you think about it? A perfect lens, photographing a point of light that is out of focus, creates a soft, spherical blur to represent that point. What was a bright point is now an equally bright, larger, softer area. If you tried to re-create this effect by simply blurring an image, the blur would have the effect of graying out toward the edges rather than retaining the brightness of the source. This is true not only of blurs that result from defocusing, but of motion blur as well (Figures 9.25a, b, and c). Figure 9.25a, b, and c. Motion blur generated the standard way (9.25a and b) literally pales in comparison to true motion blur on illuminated elements (9.25c).
Moreover, most camera lenses are not perfect, so you will not see perfect blurred spheres. The digital images in Figure 9.24 show spheres that are brighter toward the edges than in the middle; an anamorphic lens will show squashed spheres, and as with lens flares, the blades of the aperture diaphragm will sometimes be visible in the circles of confusion, making them hexagonal (or pentagonal, and so on, depending on the number of blades in the opening). Go for BokeOkay, let's say you're sold on the look of boke blur and want to incorporate its effect into your shots. What can you do in After Effects to recreate it? In Chapters 11 and 12, guest author Brendan Bolles and I look at ways in which working in true linear color space can help recreate at least one aspect of realistic camera blurthat the hotspots do not dim down as they are blurred, but retain their brightness. True linear color includes overhead for overbright pixels, and so you can build up a boke-like effect by building up (via Add mode) and blurring elements in the scene that should appear brighter than the surrounding scene. The re-lighting tutorial at the end of Chapter 12 includes creation of a sun sphere in just this manner. There are also third-party solutions out there to help you fake this effect. I don't mean the verb "fake" to connote that you should instead go for the "real" method. This phenomenon occurs only when a blurred or defocused element passes through a physical lens, so if you're recreating this in After Effects, faking it is your only option. The best tool on the market for creating good-looking lens blurs is probably Frischluft's Lenscare (for After Effects and Photoshop). The default settings are not reliable, but if you're willing to make some adjustments and use such optional additions as depth maps (for 3D footage), you can derive some lovely results with this plug-in (www.frischluft.com). You might not be able to recreate the look of that twenty-dollar bill in Figure 9.23 so easily, but if you pay attention to what happens in these surprising reference images, your camera blur will be that much closer to what you would get out of a real, defocused camera.
|


EAN: 2147483647
Pages: 156
- Understanding SQL Basics and Creating Database Files
- Working with Queries, Expressions, and Aggregate Functions
- Using Keys and Constraints to Maintain Database Integrity
- Understanding Transaction Isolation Levels and Concurrent Processing
- Writing External Applications to Query and Manipulate Database Data