The Role of Grain
| Beyond lens effects, you will need to consider another attribute of images shot with a real camera: grain. Grain is essentially high-frequency noise that occupies every channel of your shot to some degree. And grain is your friend, as long as you give it the proper amount of attention. Grain can give texture and life to images and help to conceal a multitude of small details, enabling compositors to get away with illusions. Just like depth of field and motion blur, grain can be a problem or the key to a whole cinematic look.
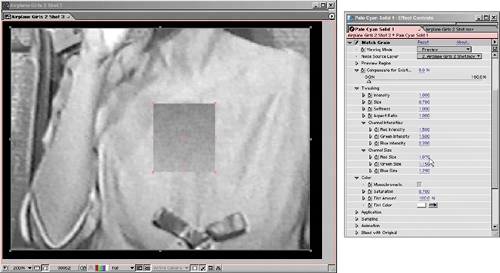
For compositors, perhaps the most important role of grain is its role integrating a flat, static layer with moving footage, adding life to an element that otherwise looks oddly suspended out of the time and place of the rest of the scene (Figure 9.26). Figure 9.26. Solid areas of color are always the best for examining grain, and it always appears, even on perfectly shot 2 K film plates (here zoomed in to 400%). Drop in a solid the same color as the plate, and you see that it fails to blend with its surroundings. The effect is even more pronounced with moving footage, especially at film resolution.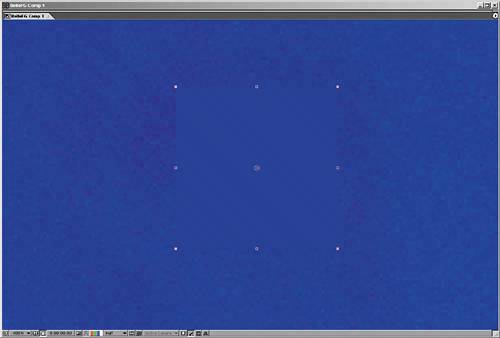 Proper grain is not simply switched on or off, however; it needs to be carefully adjusted. You can become quite theoretical about all this, but really you need to concern yourself with only two basic factors:
The trick is that these factors typically vary from channel to channel. Blue is almost universally the channel likeliest to have the most noise; happily the human eye is less sensitive to blue than red or green, but this can be bad news for blue-screen shoots. How much grain is enough? As with color in Chapter 5, "Color and Light: Adjusting and Matching," your goal is typically to match what's there already. If your shot has a background plate with the proper amount of grain in it, you match your foreground elements to that. In the case of a fully computer-generated scene, you might have to match surrounding shots that have plate reference, which you would match in the same manner.
Grain Management StrategiesAfter Effects 6.5 Professional includes a suite of three tools for automated grain sampling, grain reduction, and grain generation: Add Grain, Match Grain, and Remove Grain. Add Grain you adjust entirely manually, but Match Grain and Remove Grain sample a noise source layer to give you an initial result that you can then adjust. If you've been reading closely up to this point, you know I'm not a fan of using the automated solutions. Not so in this case. The Match Grain effect does not seem to be appreciably slower due to grain sampling than Add Grain, which does not perform any sampling and includes all of the same controls. Therefore, I recommend you see what Match Grain can come up with as a starting point, and then work from there. In either case, the steps are the same:
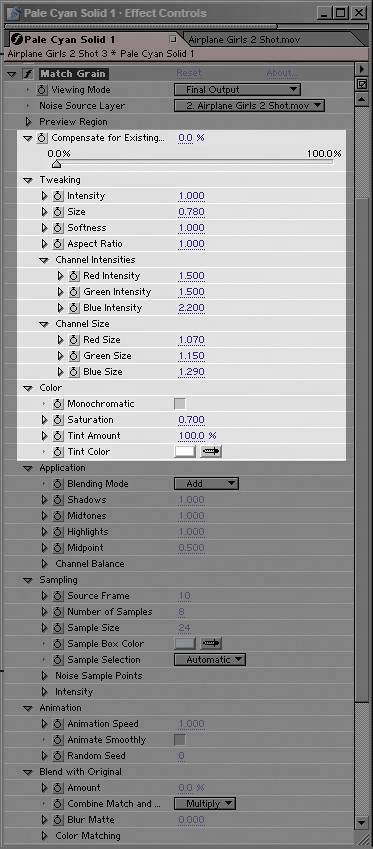
In most cases, this is all you need to do for a result that will work. You can copy the effect and paste it to any foreground layers that need grain. If the foreground layer already contains noise or grain, you may need to adjust the Compensate for Existing Noise percentage for that layer. Obviously, I left a lot of other controls alone (Figure 9.29); the Application category, for example, contains controls for how the grain is blended and how it affects shadows, midtones, and highlights individually. Typically these are overkill, as are the Sampling and Animation controls, but how far you go in matching grain before your eye is satisfied is, of course, up to you. This is one more case in which slamming the result can help ascertain its effectiveness (Figure 9.30). Figure 9.29. Match Grain clearly has a lot of controls, and yet the ones you will use most often are in the highlighted region, mostly under the Tweaking and Color categories. It is best to go top to bottom, first adjusting overall Intensity, Size, and Softness, then refining the individual Channel Intensities and Channel Size (as in Figure 9.28).
Figure 9.30. How good a match? As always, slam the resultwith an adjustment layer containing a Levels effect with its Gamma and Output Black raisedand behold. Adjust Match Grain as needed. Not bad in this case.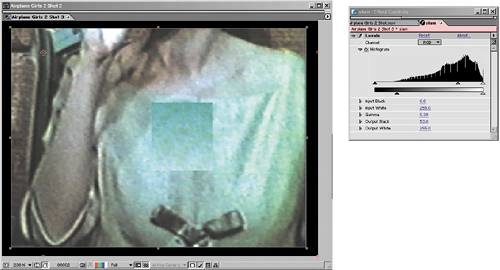 Grain Removal
Removing grain, or sharpening an image in general, is a completely different process from adding grain. Typically on a production that has been well shot, however, you'll rarely have a reason to reach for the Remove Grain tool. If you do, your reason will probably be unique to your particular footage. In such cases, you may very well find that Remove Grain at the default settings gives you a satisfactory result. If not, check into the Fine Tuning and Unsharp Mask settings to adjust it. Remove Grain is often most useful sort of "behind the scenes," in other words not across the whole final shot (Figure 9.31), or in combination with other effects. If you're using Remove Grain to improve the likelihood of a clean blue-screen or green-screen key, apply the resulting matte back to your source footage as an alpha track matte. That way you get the best of both worlds: a clean matte channel and realistic grain on the source color layer. Figure 9.31. Although it may look nice for a still figure in a book, the results of Remove Grain applied to the whole shot at the default settings are rarely what you want. The solid with the Ramp effect now matches quite well with no grain applied to it whatsoever, but in full motion the grain-reduced shot looks a bit strange and retains a certain soft lumpiness. Still, it's a powerful tool if you need it, and you can certainly dial it back.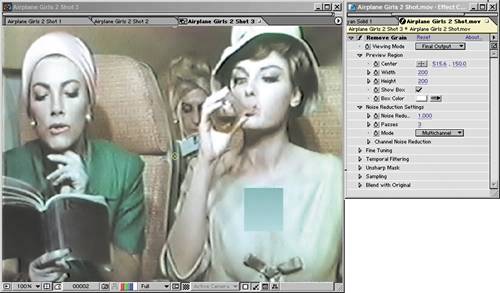 When to Employ Grain Strategies
The most obvious time to add grain to a layer is in cases where the layer is computer-generated or a still image. In either case, it will lack any of the moving grain that you would find in film or video footage. Pixar does not add grain to its final shots because they are internally consistent; none of the shots originated on film or video, so they all lack appreciable grain. As soon as your shot has to match anything that came from a camera, and particularly if it's going to be projected, you need to manage grain. You also may have to add grain to an element if it has blur applied to it. Blurry source shots can still contain quite a bit of grain over the blur because the grain is an artifact of the medium recording the image, not the subject itself. Elements that are scaled down in After Effects also have the grain scaled down, another case in which it may be necessary to restore it. Blue-screen footage that has been keyed may also need grain added. Remember, the blue channel contains more grain, typically, than red or green. Suppressing the blue channel in a color key operation, therefore, can also suppress grain too much for it to match other footage. Other compositing operations can enhance the grain of an element. Sharpening, if it is not done via the Remove Grain tool, can strongly emphasize grain contrast in an element, typically in a not-so-desirable manner. Sharpening also brings out any nasty compression artifacts that come with footage that uses JPEG-type compression, such as miniDV video. Lack of grain, however, is one of the big dead giveaways of a poorly composited shot. It is worth the effort to match the correct amount of grain into your shot even if the result isn't apparent as you preview it on your monitor. Especially when outputting to film, but even with video, elements with the wrong amount of grain stand out unpleasantly and fail to look natural. |
EAN: 2147483647
Pages: 156