Storytelling and the Camera
| A decision as simple as creeping the camera slowly forward can change the whole dramatic feel of your shot. The main limitation you face is the two-dimensionality of After Effects layers, but that's a huge step forward from the bad old days of optical compositing, when it was hardly possible to move the camera whatsoever. Nowadays, most directors aren't satisfied with a locked-off camera for effects shots, yet it's often simpler to shoot an effects plate that way and leave the camera movement to the compositor. That's no big deal, as long as you don't completely break the rules for what you can get away with. Keep in mind, moreover, where the audience is likely to be focusing their attentionevery once in a while you get away with something you shouldn't. Robert Rodríguez made his entire directing career possible with this realization when he made El Mariachi, in which the many continuity errors failed to disrupt an action-packed story. Specifically, I'm talking about not worrying about the effect of planes of motion and parallax for elements that are in the background, near the edges of the frame, appear for a few frames only, or otherwise won't be noticed by the viewer. The "Sky Replacement" section in Chapter 13, "Air, Water, Smoke, and Clouds," contains just such an example, in which a flat card stands in for a fully dimensional skyline; people aren't watching the skyline for shifts in perspective, they're watching the lead character walk through the lobby and wondering what he's got in his briefcase (Figure 9.13). Figure 9.13. Prominent though it may appear in this still image, the audience is only subliminally aware of what is going on with that skyline outside the window. As the camera pans and tracks to the right, the pyramid building should creep out from behind the foreground skyscraper. It doesn't, because the background skyline is a tracked still, and no one notices because they're wondering what that silhouetted character in the foreground is going to do. (Image courtesy of The Orphanage.)
Moving the Camera
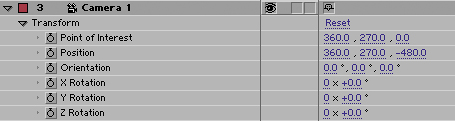
You may feel you know all about working with a 3D camera already, but the After Effects version is slightly different from the 3D camera in other applications. For example, the After Effects camera has Transform options that are unique from all other types of layers (Figure 9.14), and a couple of things about them are a little strange to people used to other types of layers in After Effects, or other 3D programs. Take a closer look. Figure 9.14. The Transform values for the camera include no anchor point and two sets of rotation data: the Orientation of the camera (its basic position), as well as separate X, Y, and Z rotation values. Separating these obviates the need for separate nulls to solve complex 3D rotations. The Point of Interest appears only with the default Orient Towards Point of Interest option (see Figure 9.15).
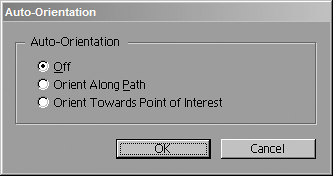
Camera OrientationCertainly the biggest confusion about the After Effects camera stems from the fact that by default, it includes a point of interest, a point in 3D space at which the camera always points, for auto-orientation. To clarify
So although the default camera in After Effects includes a point of interest, it's often useful to do without it if you want to maintain or control the direction of the camera as you translate it through space. This may not come up in normal visual effects use very often, however, because the camera is often put to more modest uses, such as a simple-camera push. Push versus ZoomKnowledgeable effects artists understand that there is a huge difference between a camera push, in which the camera moves closer to the subject, and a zoom, in which the camera stays in place and the lens lengthens. You must make a conscious decision which type of move you're doing and adhere to the rules. Figures 9.16a and b demonstrate the difference between pushing and zooming a real camera. Remember that zooming changes the actual lens angle, and has more of an effect on the immediate foreground and faraway background framing than a push. Figure 9.16a and b. The difference between a push in (9.16a) with a wide angle lens and a zoom (9.16b) from a distance is evident especially by what happens to the perspective of the orange ball in the background. With the zoom, its apparent scale is much greater, and it is much more prominent in shot. It seems to be closer to the foreground figures than in the image that was shot wider, but close-up.
Most of the time, you will animate a push; zooms, generally speaking, had their heyday in the era of Sergio Leone. That's a good thing because it is evidently easier to get away with a 2D push than a 2D zoom due to the static lens angle. The relationship and perspective of objects close up does not change with a push the way it does with a zoom.
Push it GoodWhy use a 3D camera for a simple push when you could instead scale up the contents of a comp in 2D? If you're traveling any significant distance at all, a scale is too linear to achieve the illusion of moving in Z space. Instead, pick up a 3D camera and move that. You can add eases, stops and starts, a little bit of destabilizationwhatever works for your shot. When you perform your 3D push, however, do it on a single pre-composed layer rather than individual coplanar 3D layers, unless you're separating your source layers into planes of varying depth. Why? Because coplanar 3D layers easily lose proper layer order as After Effects calculates their movement in floating point space. There's no reason it should work, and you should avoid even attempting it. Your camera move will look more natural if you add keyframe eases, giving the impression that there was a real camera operator behind the lens; if you're unclear about how to create an ease, check Chapter 2. You may even want to add a little extra hesitation or irregularity to the default ease curve to give it that feeling of a camera operator's personality (Figure 9.17). Figure 9.17. You can finesse a simple animation just by highlighting the keyframes and adding Easy Ease (F9 on your keyboard), but why stop there? Lengthening the Bezier handle for the first keyframe gives the camera that added realistic inertia moving from a static position. But waita move in or out of a 2D shotisn't that going to look wrong because it lacks any kind of parallax? It might, unless it's subtle. If you're dealing with enough of a move that planes of depth should change their relative perspective, 2D objects are probably not going to hold up. This goes doubly for tracking and panning shots, crane-ups, and other more elaborate and dimensional types of camera moves. Unless these moves are very small, you're going to blow the 2.5D gag. If in doubt, try it and ask neutral observers (or your effects supervisor) to tell you if they buy it. The exceptions to the 2D object limitation are soft, organic shapes, such as clouds, fog, smoke, and the like. With these, you can fool the eye into seeing 3D depth where there is none, and you can get away with staggering them; the parallax even helps sell the shot. (For more on this, see Chapter 13.)
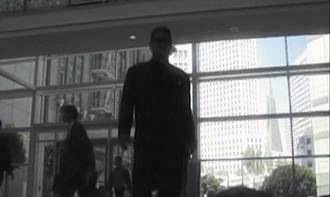
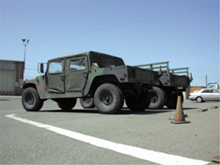
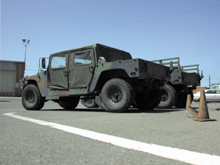
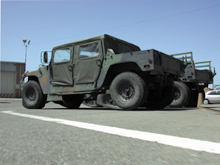
Camera ProjectionCamera projection (or camera mapping) is the process of taking a still photo, projecting it onto 3D objects that match the dimensions and placement of objects in the photo, and then moving the cameratypically only along the Z axisproviding the illusion that the photo is fully dimensional (right up until the camera move reveals some area of the image that wasn't part of the photograph). It has been used for some very elaborate visual effects sequences over the years and is often employed by matter painters as a way to keep 3D modeling simple and to focus efforts instead on painting. Figures 9.18a, b, and c show a camera projection that Stu Maschwitz set up, ambitiously featuring the shapes of two parked military vehicles. Typical camera projection examples consist of such cube-shaped items as crates and boxes. In this case, a dozen separate planes were created to form a crude 3D model, all white and ready to receive a projected image (Figures 9.19a, b, and c). This example shows both the magic of this techniquederiving perspective shifts from a flat, still imageand the associated problems of image tearing when an area of the frame is revealed that had previously been obscured in the source photo. Figure 9.18a, b, and c. The progression from the source image (9.18a) through the camera move. By the final frame, image warping and tearing are evident, but the perspective of the image is essentially correct for the new camera position. The tearing occurs simply because as the camera moves it reveals areas of the image that don't exist in the source.
Figure 9.19a, b, and c. The rather complicated setup for this effect: from the top (9.19a) and side (9.19b) views you can see the planes that stand in for the vehicles and orange cone. Once setup is complete, animating the camera is a relatively simple matter (9.19c).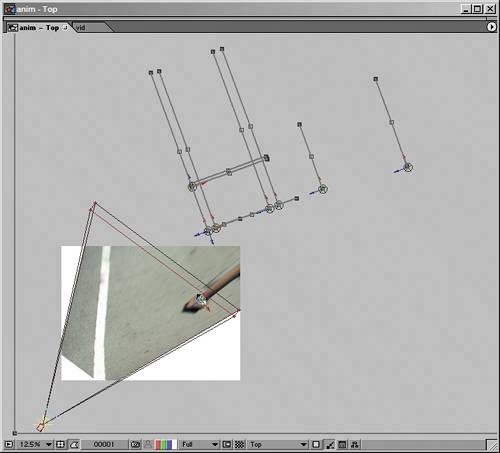 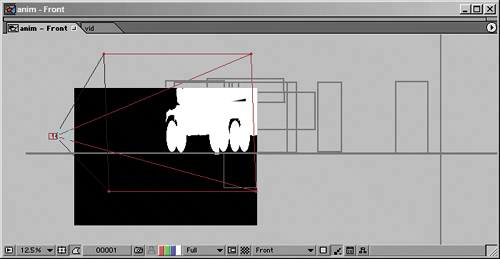 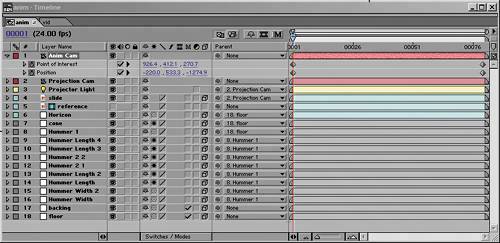 The key to pulling off an effect like this is obviously the setup: How is it that the one "texture" of the image (the photo) sticks to the 3D objects? The fundamental concept is actually relatively simple; getting it right is a question of managing details, and that part is fairly advanced and not for the faint of heart. The steps to projecting any still image into 3D space are as follows:
The number of variables that may come up as you employ this technique with your own images are many, and the result is likely to exhibit the problems shown in the figures, so if this sounds like more trouble than it's worth, it probably is. If, on the other hand, you're feeling daring and ready to try something tricky, take a look at the example file, and feel free to give it a whirl. |

EAN: 2147483647
Pages: 156