Section 33. Configure Adapter and Connect to the Wireless Router


33. Configure Adapter and Connect to the Wireless Router

BEFORE YOU BEGIN

SEE ALSO

About Configuring the Wireless Adapter

Create Configuration Profiles


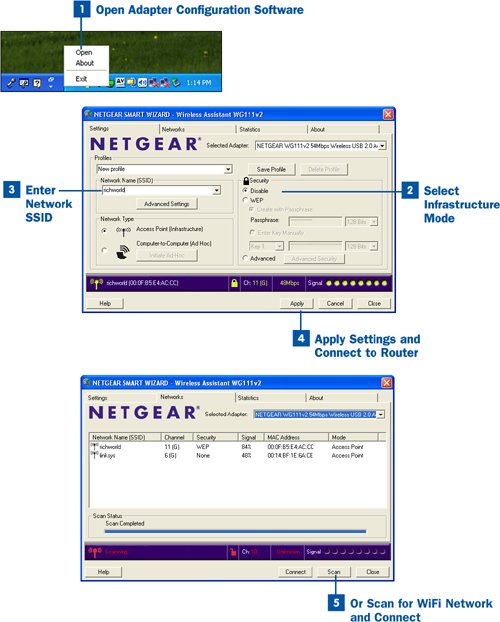
To access the local WiFi network and services such as a broadband Internet connection, you need to connect your computer to your WiFi router. Windows supplies a wireless network connection icon in the notification area (also known as the system tray, which is on the far right end of the taskbar). When you open the wireless network icon, you can view the status of your WiFi network adapter, scan for an available WiFi network, and connect to it. If you purchased a notebook computer or a desktop computer that was WiFi-ready out of the box (particularly notebooks that use Intel's Centrino technology), you can take advantage of the Windows Wireless Connection utility for monitoring your WiFi connection and connecting to available WiFi networks. To use it, right-click the notification area icon (a computer with radio signals).

However, the built-in Windows utility for connecting to wireless networks such as your own WiFi network is disabled when third-party WiFi adapter software is installed on your computer, meaning that you will use the software you installed with your add-on WiFi adapter to configure the adapter and connect to the network. Although you might feel "cheated" that you can't use the Wireless Connection utility provided by Windows XP, you will find that the utility software that came with your WiFi adapter typically provides more features and greater ease of use when you're configuring the WiFi adapter, particularly in cases where you are using security features on the WiFi router such as WEP or WPA that must also be configured on the WiFi adapter.

Whether you use the Windows Wireless Connection utility or the configuration software that came with your WiFi adapter, you must configure the WiFi adapter to connect to your WiFi network (specifically, to your WiFi router). Because we have not discussed securing the network with WEP or WPA at this point in our discussion of WiFi, the only real configuration items that must be set up on your WiFi network adapter are to select infrastructure mode and to enter the correct SSID for your WiFi network (as configured on the WiFi router). This configuration can be handled automatically by scanning for and then attaching to the WiFi router (since security has not yet been enabled) or by selecting the Infrastructure mode and then manually typing the SSID into the WiFi adapter's configuration (as outlined in this task).

Note

The steps for configuring your WiFi adapter depend on the software utility provided by your adapter's manufacturer. Bottom line: You must either scan for or identify your network by its SSID. You also must provide any security pass phrases or encryption keys that you configured on the router if the adapter is going to successfully connect to the WiFi router.


Configure Adapter and Connect to the Wireless Router


Open Adapter Configuration Software

Identify the icon for your WiFi adapter software utility in the notification area of the taskbar. Right-click the icon and select Open from the context menu. The configuration utility for your WiFi adapter opens.

Select Infrastructure Mode

Click the appropriate option button or check box (depending on your configuration software) to select Infrastructure mode. For example, for my Netgear WiFi adapter configuration utility, I select the Access Point (Infrastructure) option under the Network Type category.

Enter Network SSID

Type the SSID for your network (the SSID you specified when configuring the WiFi router, as explained in Configure Router Wireless Settings) in the appropriate text box in your configuration utility window.

Tip

If you don't remember the SSID, use the software utility's scan feature to scan for WiFi networks within range. You can then select your network from the list provided. If you configured any security settings on the router, you must provide the pass phrase or encryption keys to actually connect to the router. To get started with security on the WiFi router, see About Basic Network Security.


Apply Settings and Connect to Router

Click the Apply button to apply the settings to your WiFi adapter and to connect to the WiFi network using your router/access point. If you cannot connect to the network, proceed to step 5.

Or Scan for WiFi Network and Connect

If you do not want to manually configure the WiFi adapter, you can scan for your WiFi network and connect automatically. After you enable security features on your router (such as WEP or WPA), any attempt to automatically connect requires that you enter the passkey for the security option enabled on the router. After you enable security features on the WiFi router, manually configuring the WiFi adapter and saving the configuration as a profile is your best bet.

Select the Scan option for your WiFi adapter's configuration software; for example, the Netgear utility software requires that I click the Networks tab on the software window and then select Scan. A list of available WiFi networks appears; select your WiFi network (if you see more than one network listed, it means that other WiFi networks are in operation nearby) and then click Connect. You should be connected to your WiFi network.

Tip

If you don't see your WiFi network when you use the Scan feature, you might not have the WiFi router configured correctly. Check your router configuration to make sure that you have SSID broadcasts turned on and that the router is enabled for WiFi networking. If you are still having connectivity problems, check out About Network Connection Problems


Home Wireless Networking in a Snap
ISBN: 0672327023
EAN: 2147483647
Year: 2007
Pages: 158
Authors: Joe Habraken

flylib.com © 2008-2017.
If you may any questions please contact us: flylib@qtcs.net