Section 1.2. DESKTOP
1.2. DESKTOP1.2.1. Show the Desktop Without Closing WindowsTHE ANNOYANCE: I usually have a lot of application windows open, and it's a pain to have to shove windows out of the way to get to a file on the desktop. THE FIX: There are a bunch of ways to get to your desktop in a flash. First, hold the Windows logo key (which we'll call Winkey, just to be cute) and press D to quickly minimize all open windows. Press Winkey-D again to restore them. Do this many times to give yourself a headache. But what if your keyboard havey no Winkey? No problemo; just click the Show Desktop button on the Quick Launch toolbar (the little row of tiny buttons on the far left of your Taskbar). Give the button another click to restore the windows. Want to free up some Taskbar real estate? Eliminate the Quick Launch toolbar buttons you don't use by right-clicking each one and selecting Delete. To really save space, you can banish all the buttons except Show Desktop, and place the shrunken Quick Launch toolbar next to the Windows System Tray on the far right, as shown in Figure 1-7. Figure 1-7. Use this handy button to show the Windows desktop without minimizing all your windows.Note: If you can't move or resize the Quick Launch toolbar, right-click an empty area in the Taskbar and deselect the "Lock the Taskbar" option. When you have things the way you like them, turn "Lock the Taskbar" back on. Note: If you don't see the Quick Launch toolbar, right-click an empty area on your Taskbar, and go to Toolbars  Quick Launch. And if the Quick Launch toolbar is missing its Show Desktop button? See the "Make a Show Desktop Button sidebar for instructions on how to add one. Quick Launch. And if the Quick Launch toolbar is missing its Show Desktop button? See the "Make a Show Desktop Button sidebar for instructions on how to add one.If these tricks don't do it for you, right-click an empty area of the Taskbar, and select "Show the Desktop." It'll look like all your windows have been minimized, but they're just hidden; to bring them back, repeat the procedure but select Show Open Windows instead. Alternatively, to access any files or icons on your desktop (without disturbing your open applications), you can simply open Windows Explorer and highlight the Desktop folder at the top of the folder tree.
1.2.2. From Keyboard to DesktopTHE ANNOYANCE: I'm using a computer without a mouse, and I need to open a file on the desktop. How do I get to it via the keyboard? THE FIX: If you're already at the desktop, press the Windows logo key (or press Ctrl-Esc if you don't have one), and then press Esc to close the Start menu. Then, press Tab and watch the dotted rectangle move from the Quick Launch toolbar to, eventually, the System Tray. Press Tab one more time, and an icon on the desktop (such as My Computer) will be selected. (You may not see the selection but it's there; use the arrow keys to get to your file.) When it's highlighted, press Enter and it'll open. If you're not at the desktop, first press Ctrl-Esc, then press Esc and tab to the Quick Launch toolbar. Use the arrow keys to highlight the Show Desktop button, and press the spacebar. When the desktop appears, follow the steps above. If you don't want to go to all this trouble, just open Windows Explorer, press Tab to move to the folder tree, and then press the Home key to jump to the top of the folder tree, which happens to be the desktop. Tab over to the right window, and use the arrow keys to scoot down to the file you want. When it's highlighted, press Enter to open the file. 1.2.3. Save Your Desktop LayoutTHE ANNOYANCE: All I have to do is sneeze, and Windows rearranges my desktop icons. How do I lock them in place? THE FIX: This reshuffling can happen for a variety of reasons, such as changing screen resolution (typically for a game) or updating Windows settings (e.g., display settings, screensaver, mouse cursors). To save your desktop layout, you'll need a program like the free WinTidy (http://www.pcmag.com/article2/0,4149,17748,00.asp) or Desktop Icon Save and Restore (http://www.midiox.com/html/desktop.htm; XP users, download the Windows 2000 version). If Windows isn't spontaneously rearranging your desktop icons but refuses to let you put them where you want them, there's a fix for that, too. This problem is caused by one of two mechanisms designed to help keep your desktop icons tidy, and you'll have to turn off at least one of them if you want to more freely place your desktop icons. Right-click an empty area of the desktop, select Arrange Icons By, and turn off the Auto Arrange option. If you leave the "Align to Grid" option on, your icons will always appear lined up in rows and columns; turn it off to have complete flexibility when dragging your desktop icons. 1.2.4. Make Icon Labels See-ThroughTHE ANNOYANCE: The captions under my desktop icons have ugly blocks of solid color behind them, obscuring my pretty, pretty wallpaper. THE FIX: I know what you mean; you've just got to see as much as possible of that kitten playing with the ball of yarn. The color Windows uses for the blocks behind icon captions is the default desktop colorwhat you'd see if you had no wallpaper. You can change this color by right-clicking an empty area of the desktop and selecting Properties. Choose the Appearance tab, then click the Advanced button. Choose Desktop from the Item menu, and open the color picker under "Color 1" to change it. Pick a color that closely matches the background in your desktop wallpaper, and click OK and Apply to see the results. An even better option is to open the System control panel, click the Advanced tab, and in the Performance section, click the Settings button. Scroll down and check the "Use drop shadows for icon labels on the desktop" box, and click OK. The caption backgrounds will vanish, and the text will have shadows so you can distinguish the captions from your desktop wallpaper, as shown in Figure 1-8. Figure 1-8. You can choose how you want to outline desktop icon captions.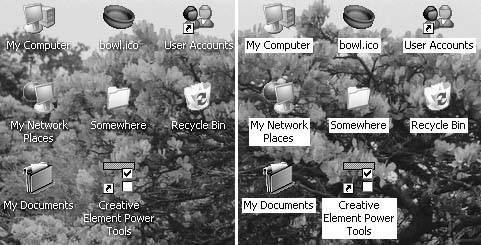 1.2.5. Control the Space Between Desktop IconsTHE ANNOYANCE: There's an awful lot of wasted space between the rows of icons on my desktop; there's got to be a more efficient way to line them up. THE FIX: As any greengrocer will tell you, the most efficient way to stack oranges is the face-centered cubic arrangement, wherein each piece of fruit is placed in the cavity formed by three adjacent oranges in the lower plane. (For more information, Google "Kepler Conjecture.") Sadly, Windows XP doesn't have this option, but you can fine-tune the row and column spacing on the desktop. Right-click an empty area of the desktop, choose Properties, click the Appearance tab, and then click the Advanced button. From the Item drop-down menu, choose Icon Spacing (Horizontal), and adjust the spacingthe number of pixels between the edges of adjacent iconsby changing the Size value. A good value is approximately 1.3 to 1.5 times the width of an icon (typically 32 pixels); specify 40 to pack them pretty closely, or 50 to spread them apart. You can likewise change the Icon Spacing (Vertical) value; use the same number for both the horizontal and vertical measurements, and the result will look balanced. |
EAN: 2147483647
Pages: 69