Section 1.1. GENERAL INTERFACE
1.1. GENERAL INTERFACE1.1.1. Snappy ScrollingTHE ANNOYANCE: When I scroll a folder in Windows Explorer or a web page in Internet Explorer, it acts "sticky," as though it needs oiling. I presume oiling my monitor is out of the question, but there's got to be a way to make scrolling snappier. THE FIX: Microsoft calls this behavior "smooth scrolling," and fortunately, you can turn it off. For this, you'll need a Microsoft program called TweakUI (free, http://www.microsoft.com/windowsxp/downloads/powertoys/xppowertoys.mspx). Click the Explorer category on the left side of the window (Figure 1-1), and on the right side, uncheck the "Enable smooth scrolling" box. Click Apply when you're done. To turn off smooth scrolling in web pages, in Internet Explorer select Tools Figure 1-1. Turn off smooth scrolling to make scrolling windows more responsive.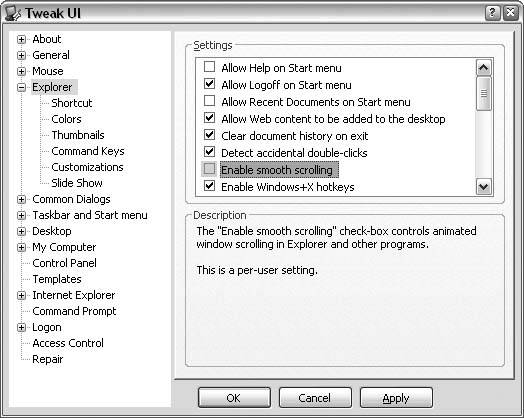 1.1.2. Sharpen Blurry TextTHE ANNOYANCE: The text on my screen is blurry. Do I need glasses? THE FIX: If the manufacturer's logo on your monitor is also blurry, glasses might be a good idea. Otherwise, there are two things that can cause blurry text in Windows XP. If everything on your screen is blurry, as opposed to just the text, your display may be set to the wrong resolution. If you have a flat-panel LCD monitor, it has a native resolution, which matches the number of the monitor's physical pixels. If your monitor's native resolution is 1024x768, for instance, and Windows is set to 800x600, your screen will have to interpolate that lower resolution, and the display will appear blurry. To fix the problem, right-click an empty area of your desktop, click Properties, and then click the Settings tab. Slide the "Screen resolution" slider until the numbers match your screen's native resolution, and then click OK. (See the next annoyance if this setting makes icons and text too small.) Note: If you don't know your screen's native resolution, it's usuallybut not alwaysthe rightmost (highest) setting. Since an LCD's native resolution is also the highest it can display, you know you've gone too far if you lose the edges of your desktop and Windows scrolls the display as you move the mouse. When in doubt, see the documentation. If text is the only thing on the screen that's blurry, you're suffering from the "benefits" of anti-aliasing, illustrated in Figure 1-2. Windows "smoothes" screen fonts to reduce their jagged edges, but this doesn't always look so hot. Figure 1-2. Anti-aliasing smoothes jaggy screen fonts, but it can make them look blurry.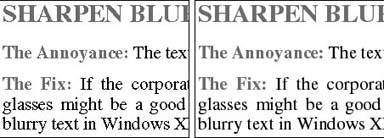 Note: If you like font smoothing but aren't happy with the way Windows does it, try Microsoft's free ClearType Tuner PowerToy, available at: http://www.microsoft.com/windowsxp/downloads/powertoys/xppowertoys.mspx.Among other things, it walks you through the settings, allowing you to adjust the feature to suit your taste. It even lets you change the contrast to help minimize the drawbacks inherent in anti-aliasing. To turn off font smoothing, right-click an empty area of the desktop, click Properties, click the Appearance tab, and then click the Effects button. There are two kinds of font smoothing (Standard or ClearType), but odds are you won't be able to tell the difference. Just uncheck the "Use the following method to smooth edges of screen fonts" box and click OK to disable the feature altogether. 1.1.3. Make Things Big on High-Res ScreensTHE ANNOYANCE: I spent a lot of cash for the best, highest-resolution flat-panel LCD display on the market, but everything on the screen is too small. Did I waste my money? THE FIX: Depends on how much you spent! But the good news is that you can make most things on your screen bigger to compensate for the tiny pixels. To make text bigger, right-click an empty area of your desktop, click Properties, and then click the Appearance tab. From the "Font size" drop-down, you can choose either Large or Extra Large, but for better results, click the Advanced button to enlarge specific elements (title bar, menus, tooltips, etc.) to your taste. Start by clicking Active Window in the little preview window at the top of the dialog box shown in Figure 1-3 (or selecting Active Title Bar from the Item list), and then choosing a larger number in the Size list in the second row (next to the Font list). Do the same for Inactive Title Bar, Menu, Message Box, Palette Title, and Tooltip. Figure 1-3. Enlarge the various elements on your screen to compensate for a high-resolution setting.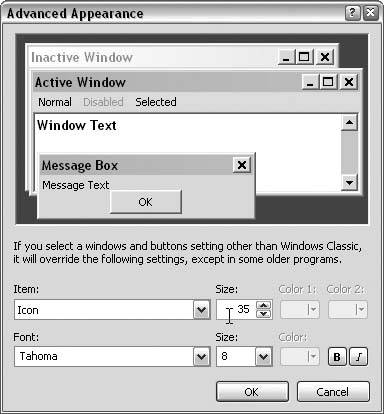 While you're here, you'll probably want to make your desktop icons bigger. By default, they're 32x32 pixels, but if you choose Icon from the Item menu, you can specify any size you like. For best results, restrict your choice to multiples of 16, such as 48 or 64. Finally, adjust the Icon Spacing (Horizontal and Vertical) to accommodate the new, larger icons. 1.1.4. Drag Windows IntactTHE ANNOYANCE: My coworker can see her application windows while she's dragging them around her screen, but on my computer, all I see is outlines. How can I get this much more obvious instant feedback? THE FIX: Right-click an empty area of your desktop, click Properties, click the Appearance tab, and then click the Effects button. Check the "Show window contents while dragging" box, and then click OK.
1.1.5. Make Windows Translucent While DraggingTHE ANNOYANCE: When I have a lot of windows open, it's hard to find just the one I want. How can I quickly cut through the clutter? THE FIX: One of the new features Microsoft is promoting in the successor to Windows XP (Windows Vista) is a so-called 3-D interface that allows you to more easily see what's behind a window while you're dragging it. Windows XP doesn't have anything like this, although most video card makers supply drivers that offer something similar. For example, recent versions of the nVidia drivers (available at http://www.nvidia.com; use these only if you have a display adapter with an nVidia graphics processor) can create a transparent window effect, as illustrated in Figure 1-4. Note: Contact the manufacturer of your display adapter (video card) for appropriate drivers for your hardware; see Chapter 6 for more details on installing new drivers and reverting to earlier versions if the new drivers don't work properly. Figure 1-4. You can see what's behind this semi-transparent window while you're dragging it.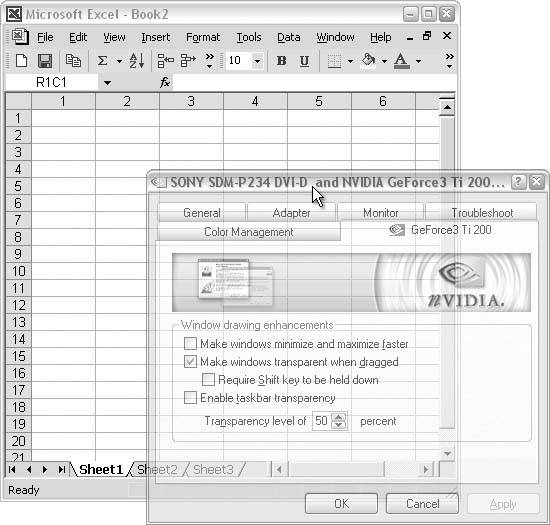 If your display adapter driver doesn't offer this feature, you can use a program such as Actual Transparent Window ($19.95, http://www.actualtools.com/transparentwindow/). 1.1.6. Un-Animate Windows ControlsTHE ANNOYANCE: Windows takes forever to open menus and drop-down list-boxes and to scroll lists. How can I give it a kick in the proverbial pants? THE FIX: To make Windows XP appear fancier and more advanced than the competition (I know, what competition?), Microsoft added animation to several parts of the interface. But waiting (and waiting) while Windows slowly cranks open a menu can be a real drag. To speed things up, open the System control panel, click the Advanced tab, and click the Settings button in the Performance section. Uncheck the boxes for "Fade or slide menus into view," "Slide open combo boxes," and any other animations that annoy you (see Figure 1-5). Click Apply to try out your new settings. Figure 1-5. Turn off some of these "features" to make Windows XP more responsive.
1.1.7. Customize the Windows Look and FeelTHE ANNOYANCE: I'm tired of the "Windows XP" and "Windows Classic" styles, the only two choices in Display Properties. Can't I add my own styles? THE FIX: Yes, but you'll need a third-party program such as WindowBlinds (free and $19.95 versions are available at http://www.stardock.com/products/windowblinds/). With WindowBlinds, not only can you choose from a bunch of interesting, preconfigured "skins" like the one shown in Figure 1-6, but, if you're particularly adventurous, you can design your own. Once you have WindowBlinds, you can download new skins from any of several online libraries, including http://skinbase.org, http://www.deviantart.com, and http://www.deskmod.modblog.com. Figure 1-6. Choose your own style for Windows windows. 1.1.8. Simplify the Control PanelTHE ANNOYANCE: I use the Windows Control Panel frequently, but I find the categories confusing and cumbersome. How can I get to Control Panel icons more directly? THE FIX: You're right; the categories add an extra (and mostly unnecessary) step every time you need to change a setting. To turn off categories in the Control Panel, simply click the "Switch to Classic View" link in the top-left corner. If you don't see this link, click the "Appearance and Themes" category and open Folder Options. On the General tab, select "Show common tasks in folders," and click OK. For even quicker access, open the Taskbar and Start Menu control panel, click the Start Menu tab, and click the Customize button. If you're using the XP-style Start menu, click the Advanced tab, find Control Panel in the list, select "Display as a menu," and click OK. If you're using the Classic Start menu, check the Expand Control Panel box, and click OK. Now, to open a Control Panel icon, just select Start
|
 Internet Options, and click the Advanced tab. Scroll down to the bottom of the Browsing section, uncheck the "Use smooth scrolling box, and click OK.
 Control Panel or Start
 EAN: 2147483647
Pages: 69
- Software Engineering Case Study: Introduction to Object Technology and the UML
- (Optional) Software Engineering Case Study: Identifying the Classes in the ATM Requirements Document
- Logical Operators
- (Optional) Software Engineering Case Study: Starting to Program the Classes of the ATM System
- Establishing a Simple TCP Client (Using Stream Sockets)