Section 1.3. START MENU
1.3. START MENU1.3.1. Pick a New UsernameTHE ANNOYANCE: How do I change the name and icon at the top of the Start menu? I don't like being called "AJAX70761." Warning: The name you choose is your username, which is particularly important if you share files with others on your network (Chapter 5) or if you type your username to log into your computer. See the "Welcome Screen" section later in this chapter for more login tips. THE FIX: Don't take it personally; Windows doesn't really care what you're called. You can choose a new name pretty easily by opening the User Accounts control panel. Choose your account from the list in the lower part of this window, and then click "Change my name." While you're here, click "Change my picture" to choose a new icon to appear at the top of your Start menu (unless you're using the "Classic" Start menu) and on the Welcome screen. Note that your choices aren't limited to the generic icons Windows shows you; click "Browse for more pictures" to choose any .bmp, .jpg, or .png file on your system. 1.3.2. Clean Up the Start MenuTHE ANNOYANCE: There's too much junk in the Start menu. How can I strip out the clutter so I can more easily find the programs I need? THE FIX: There are three "zones" in the Windows XPstyle Start menu (Figure 1-9), and following typical Microsoft logic, each one works in a completely different way. Figure 1-9. Items in each of the Start menu zones get removed and customized in different ways.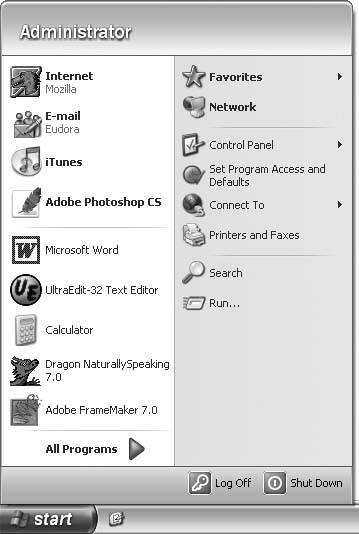 The two items at the top of the left column (above the line) are fixed entries devoted to opening your web browser and email program. To change or hide these entries, right-click the Start button, select Properties, click the Start Menu tab, and click Customize. On the General tab, change the settings in the Show on Start Menu section. The "zone" immediately below is the somewhat-dynamic list of recently used applications. Back on the General tab, in the Programs section, you can choose how many icons can appear here at once; choose zero to hide the list completely. (You can delete any particular item directly in the Start menu by right-clicking it and selecting "Remove from This List.") Next, click the Advanced tab to customize some of the entries in the top-right column of the Start menu, such as Control Panel, Favorites, My Computer, My Music, My Network Places, Network Connections, Printers and Faxes, Run, and Search. (To find out how to hide the My Recent Documents menu, see "Hide the My Recent Documents Menu.") Click OK when you're done. Note: If you're running Windows XP Professional, you can use the Group Policy Editor to remove any unwanted items from your Start menu. Go to Start  Run, type gpedit.msc, and click OK. Then expand the branches on the left to User Configuration\Administrative Templates\Start Menu and Taskbar. Doubleclick any item on the right and click the Disabled radio button in the Setting tab; then click Apply, then OK. Here, you can remove the All Programs menu, Network Connections, Favorites, Search, Help, Run, and all of the "My folders (Pictures, Music, etc.). When you're done, you may have to log out and then log back in for the changes to take effect. Run, type gpedit.msc, and click OK. Then expand the branches on the left to User Configuration\Administrative Templates\Start Menu and Taskbar. Doubleclick any item on the right and click the Disabled radio button in the Setting tab; then click Apply, then OK. Here, you can remove the All Programs menu, Network Connections, Favorites, Search, Help, Run, and all of the "My folders (Pictures, Music, etc.). When you're done, you may have to log out and then log back in for the changes to take effect.Finally, you can add programs to the top-left zone. One way to do this is to drag any program or shortcut over the Start button and hold it for at least a second. The Start menu will open, and you can then drop the item in the top-left zone. The easier way is to right-click a shortcut or program executable (.exe file) and select "Pin to Start menu." To delete any "pinned" item from this list, right-click the entry and select "Unpin from Start menu." 1.3.3. Block Recent Programs from Appearing in Your Start MenuTHE ANNOYANCE: I don't want every program I've run lately to be listed in my Start menu. Is there a way to keep this list tidy? THE FIX: Yes, but you'll have to manually exclude each program you don't want to automatically appear in the Start menu's recently used programs list. In some cases, this may require messing with the Registry. First, open TweakUI (free, http://www.microsoft.com/windowsxp/downloads/powertoys/xppowertoys.mspx). Expand the Taskbar & Start Menu branch on the left, and select the Start Menu category. In the list on the right, uncheck the box next to any program you don't want to ever appear in your Start menu, and click OK when you're done. If the program you want to exclude isn't in the list, you must edit an entry in the Registry. Open the Registry Editor (go to Start Right-click the newly created key, and select New Note: If you don't know the executable filename, find the application's shortcut in your Start menu, right-click it, click Properties, and choose the Shortcut tab. The filename should be in the Target field at the end of a path statement, such as c:\Program Files\Adobe\Adobe Photoshop CS\Photoshop.exe. 1.3.4. Hide the My Recent Documents MenuTHE ANNOYANCE: The Documents list on my Start menu shows some of my recently opened documents. Since other people sometimes use this computer, I'd rather not have the names of my private documents appear in such a public place. I looked for a setting in the Taskbar and Start Menu Properties window to turn it off, but I can't find one. How do I hide this list? THE FIX: There are several ways to hide this list (and/or its contents). If you're using the XP-style Start menu, right-click the Start button, select Properties, click the Customize button, and go to the Advanced tab. In the scrolling list, under My Documents, select "Don't display this item," and click OK to confirm your choice. While you're at it, on the Advanced tab, click the "Clear list" button and uncheck the "List my most recently opened documents" box. If you're using the "Classic"-style menu, you'll need to use TweakUI (free, http://www.microsoft.com/windowsxp/downloads/powertoys/xppowertoys.mspx) to hide this list, as shown in Figure 1-10. Open TweakUI, expand the Explorer category on the left, and uncheck the "Show My Documents on classic Start Menu" box. Click Apply, then OK. (You can also hide the list for the XP-style Start menu with TweakUIjust uncheck the "Allow Recent Documents on Start Menu" box.) Figure 1-10. You can use TweakUI to hide the Documents menu.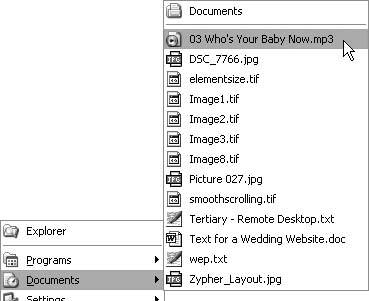 Note: Unfortunately, when you add new programs to your PC, they're appended to the bottom of the list, rather than being inserted into their alphabetic places. You may want to re-sort the list each time you install a new program, as described next. 1.3.5. Sort Your Start Menu AlphabeticallyTHE ANNOYANCE: At first, I didn't notice that everything in my All Programs menu was out of order; I thought I was going crazy because I couldn't find anything. Is there any way to make Start menu programs appear in alphabetical order? THE FIX: You can organize the items in your All Programs menu (or Programs if you're using the Classic Start menu) and its submenus by dragging and dropping. To sort entries alphabetically, right-click any menu item and select "Sort by Name." 1.3.6. Solve the Mystery of Disappearing Start Menu ItemsTHE ANNOYANCE: To simplify the Start menu I decided to use the "Classic" version, but when I opened it I found that most of the icons in the Programs list were missing. After a few fits of frustration, I eventually stumbled upon the tiny arrow at the bottom of the menu (Figure 1-11) that, when clicked, shows the rest of my programs. Why won't the Classic Start menu show all my programs at once? Figure 1-11. If you see this arrow at the bottom of your Programs list, you're using a feature called "Personalized Menus."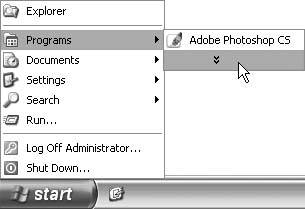 THE FIX: Believe it or not, this is a feature, not a bug. The theory is that you're supposed to be interested only in programs you've used recently. Applications you haven't opened in a while are thus hidden from view until you click that little arrow or wait awhile for the complete list to unfurl. Fortunately, this feature is easy to turn off: right-click the Start button, select Properties, click the Start Menu tab and then the Customize button, and uncheck the Use Personalized Menus checkbox. 1.3.7. Stop Windows from Highlighting New ProgramsTHE ANNOYANCE: Why are some items in my All Programs list grayed out? It looks like they're disabled, but they open when I click them. THE FIX: By default, Windows XP highlights newly installed programs to make them easier to find, presumably because you are not yet accustomed to seeing them. The problem is that they don't look so much "highlighted" as grayed out (Figure 1-12). To turn off this feature, right-click the Start button, go to Properties, click the Start Menu tab, and then click the Customize button. On the Advanced tab, uncheck the "Highlight newly installed programs" box. Figure 1-12. Newly installed programs are highlighted in the All Programs list.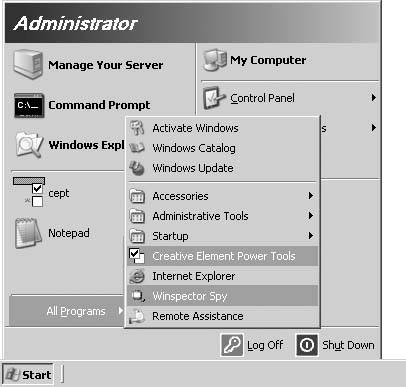 1.3.8. Show Start Menu Programs in Multiple ColumnsTHE ANNOYANCE: I have so many icons in my All Programs menu that they run off the screen. I have to wait while Windows slowly scrolls the list to the one I want. THE FIX: You have a few options here: you can either reduce the size of the menu by deleting unwanted items or organizing them into subfolders, or you can display the icons in multiple columns, as shown in Figure 1-13. For this trick, right-click the Start button, go to Properties, click the Start Menu tab, and then click the Customize button. On the Advanced tab, scroll down the "Start menu items" area and uncheck the Scroll Programs checkbox. Figure 1-13. If you don't like the way Windows displays long menus, you can configure your menus to look like this.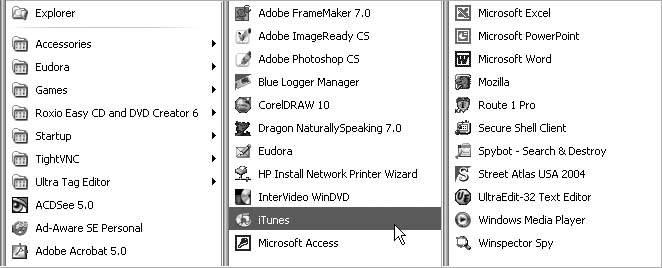 |
 Key, type the executable filename of the program you want to exclude, and click OK.
EAN: 2147483647
Pages: 69