Section 12.2. Navigation
Web sites are becoming larger and more complex. Consequently, developers are called upon to provide navigational hints and menus to keep visitors from "getting lost," and to enable them to find all the features of the site.
The ASP.NET toolset now includes a number of new controls that facilitate this assistance. There are controls for creating both "bread crumbs" (how did I get to this page?) and site maps (how do I find that other page?).
Most of the time you will want these features to be present on every page, and thus master pages are a great asset. If you change the site map or the control, you only have to update the master and all the other pages are "updated" automatically.
12.2.1. Getting Started with Site Navigation
The most common way to create a site navigation data source is to create an XML file. You can use a database, multiple XML files, and other sources, but for now let's keep things simple.
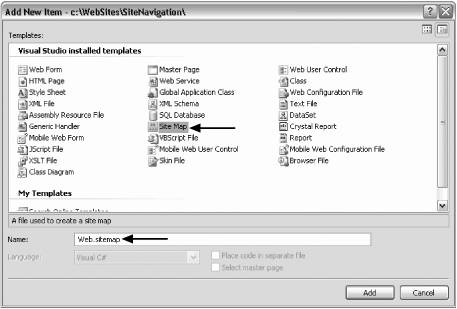
To begin, create a new web site called SiteNavigation . Right-click the web site in Solution Explorer and choose Add New Item. The Add New Item dialog box appears. Choose Site map and verify that the name provided is Web.sitemap , as shown in Figure 12-13.
When you click Add, Web.sitemap is added to your web site, and the skeleton of a site map is provided for you, as shown in Example 12-4.
Figure 12-13. Creating the site map
Example 12-4. Web.sitemap skeleton
<?xml version="1.0" encoding="utf-8" ?> <siteMap xmlns="http://schemas.microsoft.com/AspNet/SiteMap-File-1.0" > <siteMapNode url="" title="" description=""> <siteMapNode url="" title="" description="" /> <siteMapNode url="" title="" description="" /> </siteMapNode> </siteMap>
The title attribute defines the text that is (usually) used as the link, and the description attribute is used in the tool tip.
|

Replace the contents of Web.sitemap with the site map XML shown in Example 12-5.
Example 12-5. Web.sitemap
<?xml version="1.0" encoding="utf-8" ?> <siteMap xmlns="http://schemas.microsoft.com/AspNet/SiteMap-File-1.0" > <siteMapNode title="Welcome" description="Welcome" url="~/welcome.aspx"> <siteMapNode title="Writing" description="Writing" url="~/Writing.aspx"> <siteMapNode title="Books" description="Books" url="~/Books.aspx"> <siteMapNode title="In Print Books" description="Books in Print" url="~/BooksInPrint.aspx" /> <siteMapNode title="Out Of Print Books" description="Books no longer in Print" url="~/OutOfPrintBooks.aspx" /> </siteMapNode> <siteMapNode title="Articles" description="Articles" url="~/Articles.aspx" /> </siteMapNode> <siteMapNode title="Programming" description="Contract Programming" url="~/Programming.aspx"> <siteMapNode title="On-Site Programming" description="On-site contract programming" url="~/OnSiteProgramming.aspx" /> <siteMapNode title="Off-Site Programming" description="Off-site contract programming" url="~/OffSiteProgramming.aspx" /> </siteMapNode> <siteMapNode title="Training" description="On-Site Training" url="~/OnSiteTraining.aspx"> <siteMapNode title="C# Training" description="C# Training" url="~/TrainCSharp.aspx" /> <siteMapNode title="ASP.NET Training" description="ASP.NET Training" url="~/TrainASPNET.aspx" /> <siteMapNode title="Windows Forms Training" description="Windows Forms Training" url="~/TrainWinForms.aspx" /> </siteMapNode> <siteMapNode title="Consulting" description="Consulting" url="~/Consulting.aspx"> <siteMapNode title="Application Analysis" description="Analysis" url="~/ApplicationAnalysis.aspx" /> <siteMapNode title="Application Design" description="Design" url="~/ApplicationDesign.aspx" /> <siteMapNode title="Mentoring" description="Team Mentoring" url="~/Mentoring.aspx" /> </siteMapNode> </siteMapNode> </siteMap>
The site map file has a single <sitemap> element that defines the namespace:
<siteMap xmlns="http://schemas.microsoft.com/AspNet/SiteMap-File-1.0" >
Within the siteMap element is nested exactly one <SiteMapNode> (in this case, Welcome). Nested within that first <SiteMapNode> , however, is any number of children <SiteMapNode> elements.
In Example 12-5, there are four such children: Writing, Programming, Training and Consulting. Nested within each of these <SiteMapNode> elements can be more nodes. For example, Writing has Books and Articles. You may nest the nodes arbitrarily deep. The Books node has nested within it nodes for Books in print and books no longer in print.
|
12.2.2. Setting Up the Pages
To experiment with the site map, create a master page called MasterPage.master (the default name offered by VS2005).
|
From the toolbox, drag a SiteMapDataSource control from the Data tab onto the master page. By default, the SiteMapDataSource control will look for and use the file named Web.sitemap .
To create a robust example of navigation, you'll want to create a site map as well as bread crumbs. (Bread crumbs are links, often at the top of a page, that show how the user got to the current pagefor example, "MainPage  Books Programming ASP.NET).
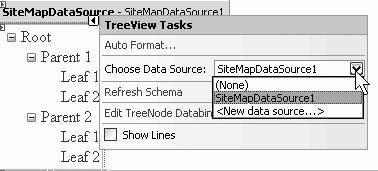
To get started, switch to Design view and drag a treeView control from the Navigation tab of the Toolbox onto the form, outside of the Content area. In Design view, click its smart tag and set the data source to the SiteMapDataSource control you just created, as shown in Figure 12-14.
Figure 12-14. Creating the Tree view
To take control of the layout of the various elements on the master page, drag a table control into Source view and set its width to 100%. Drag the treeView you just created into the first cell ; it will act as the site map navigation control, as shown in Figure 12-15.
Figure 12-15. Site Map Tree view
Drag a SiteMapPath control into a second cell, which will act as your bread crumbs, as shown in Figure 12-16.
Figure 12-16. Site Map Path control
|
Add two <br/> elements after the SiteMapPath and then drag the ContentPlaceHolder control on the master page into the same cell, as shown in Example 12-6.
Example 12-6. MasterPage.master
<%@ Master Language="C#" AutoEventWireup="true" CodeFile="MasterPage.master.cs" Inherits="MasterPage" %> <!DOCTYPE html PUBLIC "-//W3C//DTD XHTML 1.1//EN" "http://www.w3.org/TR/xhtml11/DTD/xhtml11.dtd"> <html xmlns="http://www.w3.org/1999/xhtml" > <head runat="server"> <title>Liberty Associates, Inc.</title> </head> <body> <form id="form1" runat="server"> <div> <asp:SiteMapDataSource ID="SiteMapDataSource1" runat="server" /> <asp:Table ID="Table1" runat="server" Width="100%" > <asp:TableRow> <asp:TableCell> <asp:TreeView ID="TreeView1" runat="server" DataSourceID="SiteMapDataSource1" /> </asp:TableCell> <asp:TableCell VerticalAlign="Top"> <asp:SiteMapPath ID="SiteMapPath1" runat="server" /> <br /><br /> <asp:contentplaceholder id="ContentPlaceHolder1" runat="server"> </asp:contentplaceholder> </asp:TableCell> </asp:TableRow> </asp:Table> </div> </form> </body> </html>
To test this master page, you'll need to create at least a few of the pages defined in the site map. Delete the Default page from the web site and create a new page named Welcome.aspx . Check the Select master page checkbox and set the master page to MasterPage.master . Within the content control, add the line of code shown in bold below:
<asp:Content ID="Content1" ContentPlaceHolderID="ContentPlaceHolder1" Runat="Server"> <h1>Welcome</h1> </asp:Content> Create each of the other pages, providing whatever stubbed out data you want as long as you can tell what page you are on. When you are done, your solution explorer should look more or less like Figure 12-17. Set Welcome.aspx as the start page.
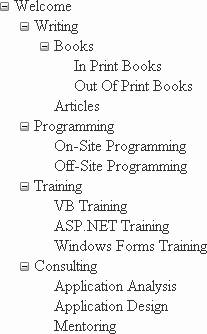
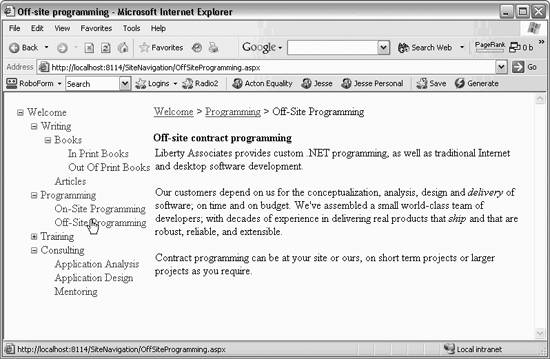
Start the application and navigate from the Welcome page to another page, such as Programming, as shown in Figure 12-18.
There are a few things to notice about this page. The tree view was built for you by reading the XML file through the SiteMapDataSource control. You can see that each node can be collapsed (see Training) or expanded (see Writing). When you click on a node (in this case Off-Site Programming), you are brought directly to that page. The bread crumbs, put in place by the SiteMapPath , show you how you got here and how to get back to home.
Figure 12-17. Solution Explorer with site navigation pages
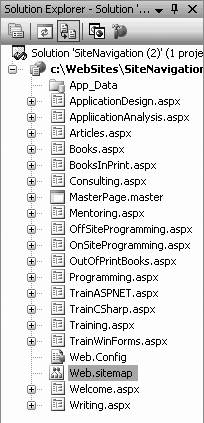
Figure 12-18. Off-site programming
|
12.2.3. Customizing the Look and Feel
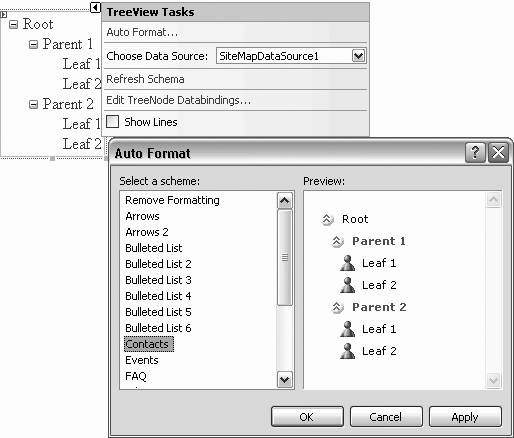
You can set a number of properties for the TReeView . To begin with, you may click the Smart Tag and choose Auto Format... to bring up the Auto Format dialog, which offers a series of preset formats for the tree, as shown in Figure 12-19.
Figure 12-19. Treeview Auto Format
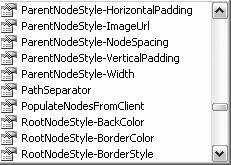
In addition, you can click the treeView control and then set its properties through the Properties window. Most of the TReeView 's properties have to do with the styles used for the various nodes. Some of the most important properties are shown in Figure 12-20.
Figure 12-20. Tree view node styles
There are a large number of other properties, many of which are listed in Table 12-1.
Table 12-1. Tree View properties
| Property | Description |
|---|---|
| AutoGenerateDataBindings | If set to true , the default lets you manually set the bindings between data and tree nodes. |
| CheckedNodes | Returns a collection of treeNode objects that contains only those nodes whose checkbox was selected. |
| CollapseImageToolTip | The tool tip to display when the node is collapsed. |
| CollapseImageUrl | The URL for the image to display when the node is collapsed. |
| ExpandDepth | The number of levels to which the tree should be expanded when it is first displayed. |
| ExpandImageToolTip | The tool tip to display when the node is expanded. |
| ExpandImageUrl | The URL for the image to display when the node is expanded. |
| HoverNodeStyle | The TReeNodeStyle object to set the appearance of a node when the mouse pointer is hovering over it. |
| NodeIndent | The number of pixels that child nodes are indented from their parent. |
| NodeStyle | The treeNodeStyle object to set the default appearance of a node. |
| NodeWrap | If true , the text of a node wraps if it runs out of space. The default is false . |
| PathSeparator | The character used to delimit the node values. |
| SelectedNode | Returns the selected treeNode object. |
| SelectedNodeStyle | The TReeNodeStyle object to set the appearance of the selected node. |
| ShowCheckBoxes | A bitwise combination of treeNodeTypes to indicate which types of nodes will display with checkboxes. In this example, none of the nodes has checkboxes; in other applications, you might open a TReeView control to display, for example, directories, and allow the user to check which directories are to be acted on (e.g., deleted). |
| ShowExpandCollapse | If true , the default, the expand/collapse indicators will be displayed . |
| ShowLines | If true , lines connecting the nodes will be displayed. The default is false . |
The treeView has a number of public methods that allow you to poke into the control and pick out specific nodes or to programmatically change, expand, and contract nodes. The most important methods are shown in Table 12-2.
Table 12-2. Tree view methods
| Method | Description |
|---|---|
| CollapseAll | Collapses the entire tree |
| ExpandAll | Expands the entire tree |
| FindNode | Retrieves the designated treeNode |
Finally, there are a number of events that the treeView control raises that allow you to hook into the user's interaction with the treeView and modify the results. The most important events are shown in Table 12-3.
Table 12-3. Tree view events
| Event | Description |
|---|---|
| SelectedNodeChanged | Raised when a node is selected in the treeView |
| TReeNodeCheckChanged | Raised when the checkbox status of a node is changed |
| TReeNodeCollapsed | Raised when a node is collapsed |
| TReeNodeExpanded | Raised when a node is expanded |
| treeNodePopulate | Raised when a node whose PopulateOnDemand property is set to true is expanded in the treeView (gives you an opportunity to fill in the subnodes for that node) |
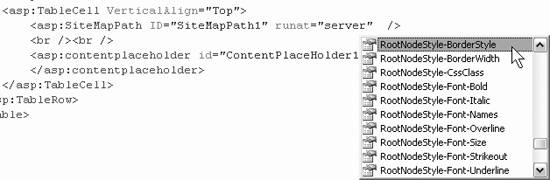
Similarly, the SiteMapPath control can be modified by using the smart tag to set AutoFormatting or by setting properties on the control. Some common tasks include customizing the link style properties (such as RootNodeStyle-Font- Names and RootNodeStyle-BorderWidth ). These can be set declaratively in the declaration of the control itself. Intellisense will help; when you press the spacebar while within the declaration of the control, a list of its properties, methods, and events will pop up, as shown in Figure 12-21.
Figure 12-21. Setting SiteMapPath properties
|
In the previous example, the bread crumbs separated the various pages with the greater-than symbol (>). Adding the PathSeparator property is easy to change that to, for example, an arrow:
<asp:SiteMapPath ID="SiteMapPath1" runat="server" PathSeparator="->" />
The result is shown in Figure 12-22.
Figure 12-22. Arrow Path separator
For "deep" web sites, the bread crumbs may become unwieldy. You have the option to limit the number of levels shown by setting the ParentLevelDisplayed property:
<asp:SiteMapPath ID="SiteMapPath1" runat="server" ParentLevelDisplayed="3" />
12.2.4. Populating on Demand
You may decide you would like your tree view to populate on demand. That is, rather than loading all the contents of each node when the tree is first shown and displaying the full tree, you can display (for example) the first node, and as each node is clicked on, it will populate the next level.
To do this, you'll make some simple changes to the master page. First, modify the treeView not to be a self-closing element; you'll be adding content between the opening and closing tags. Add an ExpandDepth attribute to the treeView , which you will set to (or whatever level, zero-based , you want the tree to expand to when loaded).
Within the treeview , you'll add a DataBindings element, and within that , you'll add a treeNodeBinding control, as shown in Example 12-7.
Example 12-7. Adding Tree node bindings for Populate On Demand
<asp:TreeView ID="TreeView1" runat="server" DataSourceID="SiteMapDataSource1" ExpandDepth="0"> <DataBindings> <asp:TreeNodeBinding DataMember="SiteMapNode" NavigateUrlField="URL" PopulateOnDemand="true" TextField="Title" /> </DataBindings> </asp:TreeView> Run the application with Welcome.aspx as the start page. The tree is fully closed. Expand the treeView to choose Off-Site Programming. When you get to the page, again the tree is fully closed, as shown in Figure 12-23.
The nodes will be loaded as you click on each level of the menu.
12.2.5. Using a Menu for Navigation
Open MasterPage.master in source mode and locate the treeView control. Comment it out and replace it with a menu:
<!-- <asp:TreeView ID="TreeView1" runat="server" DataSourceID="SiteMapDataSource1" /> --> <asp:Menu ID="Menu1" runat="server" DataSourceID="SiteMapDataSource1" />
Run the application. Presto! A menu control for navigation, as shown in Figure 12-24.
In this case, I hovered over welcome (opening the next level) and then hovered over Programming (opening the third level).
Figure 12-23. Menu fully closed
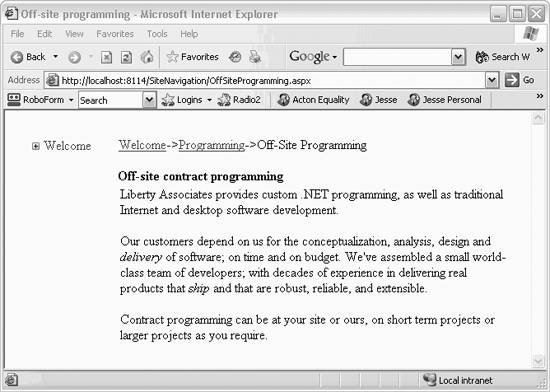
Figure 12-24. Using a menu for navigation

If the menus start to eat into your content, you can set their Orientation property to Horizontal (the default is Vertical) and rearrange your table to make room for them.
12.2.6. Enumerate Site Map Nodes Programatically
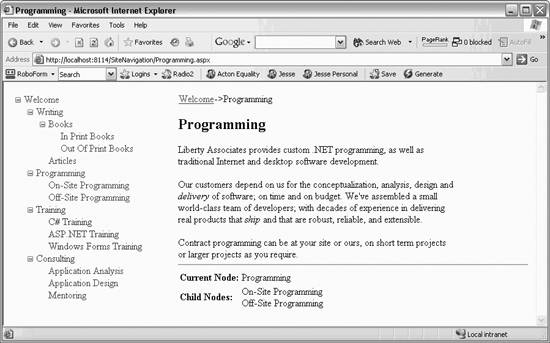
There are times when you may want access to the current node and its subnodes so you can manipulate them programmatically. You can add code to a page to get that information. In the next example, you will display the name of the current node in the Programming.aspx page, and you will also display its subnodes. Add the code in Example 12-8 inside the Content tags in programming.aspx .
Example 12-8. Programming.aspx with Site Map controls
<hr /> <table> <tr> <td> <b>Current Node:</b> </td> <td> <asp:Label ID="lblCurrentNode" runat="server" /> </td> </tr> <tr> <td> <b>Child Nodes:</b> </td> <td> <asp:Label ID="lblChildNodes" runat="server" /> </td> </tr> </table>
You have added two labels: lblCurrentNode and lblChildNodes
Open the code-behind for this page and modify the Page_Load method, as shown in Example 12-9.
Example 12-9. Modifed Page_Load method
protected void Page_Load(object sender, EventArgs e) { try { this.lblCurrentNode.Text = SiteMap.CurrentNode.Title; if (SiteMap.CurrentNode.HasChildNodes) { foreach (SiteMapNode childNode in SiteMap.CurrentNode.ChildNodes) { lblChildNodes.Text += childNode.Title + "<br/>"; } } } catch (System.NullReferenceException) { lblCurrentNode.Text = "The xml file is not in the site map!"; } catch (Exception ex) { lblCurrentNode.Text = "Exception! " + ex.Message; } } In this code, you are setting the text of lblCurrentNode to reflect the SiteMap 's CurrentNode . The SiteMap is an in-memory representation of a site's navigational structure. The SiteMap object itself is created by the site map provider (in this case, by the SiteMapDataSource ).
The CurrentNode property returns an object of type SiteMapNode , and the Text property of that SiteMapNode returns that SiteMapNode 's title.
The SiteMapNode 's property HasChildNodes returns a Boolean, true if there are sub-nodes to the SiteMapNode . If this is the case, you can iterate through the SiteMapNodeCollection returned by the ChildNodes property.
When you view this page, the labels display the name of the current node and all its child nodes, as shown in Figure 12-25.
Figure 12-25. Accessing the current node
EAN: 2147483647
Pages: 173