Section 12.3. Filtering Based on Security
In Chapter 11, we covered the creation of login accounts and roles. In the next example, we'll use that information combined with the navigation tools covered to make aspects of the navigation aids visible and accessible to users in specific roles.
To get started, you will create a new web site called SecureNavigation with an IIS virtual directory. When the New Web Site dialog box appears, click Browse next to the location. The Choose Location dialog box appears. On the left are four buttons ; click Local IIS and select the default web site. Then click the New Web Application icon in the upper-right corner of the dialog box, as shown in Figure 12-26.
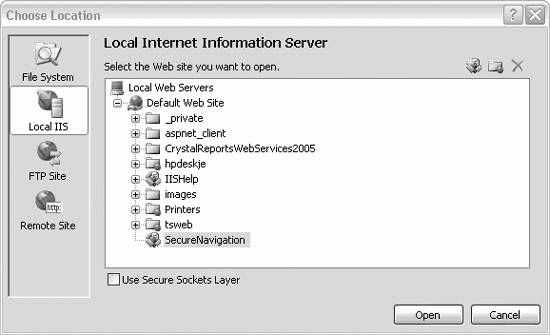
A new web site will appear under Default Web Site; name it SecureNavigation , as shown in Figure 12-27.
Clicking Open will return you to the New Web Site dialog box with the location set to HTTP and the site name http://localhost/SecureNavigation. Click OK.
Figure 12-26. Choose Location: Local IIS
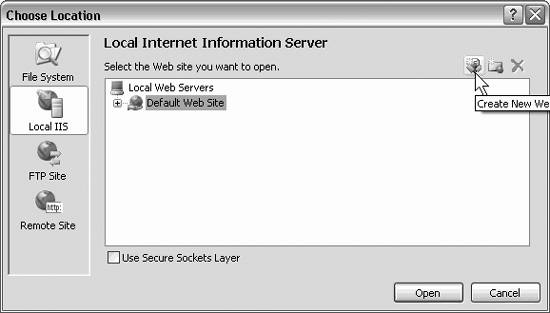
Figure 12-27. Creating new web site
12.3.1. Enable Membership
Select the menu choice Website  ASP.NET Configuration. This opens the Web Site Administration Tool. Click the Security tab. Under Users, click the link "Select authentication type," choose From the Internet and then click Done. This will set the authentication type to Forms.
In the same Users section, click Create User Fill in the form to create three user accounts. By default, you must use a strong password , one that includes all of the following:
-
Uppercase letters
-
Lowercase letters
-
Punctuation
-
A minimum of eight characters
To make things easy to remember, use the following password: Liberty! (that's an exclamation point at the end):
The Create user dialog box is shown in Figure 12-28.
Figure 12-28. Create user
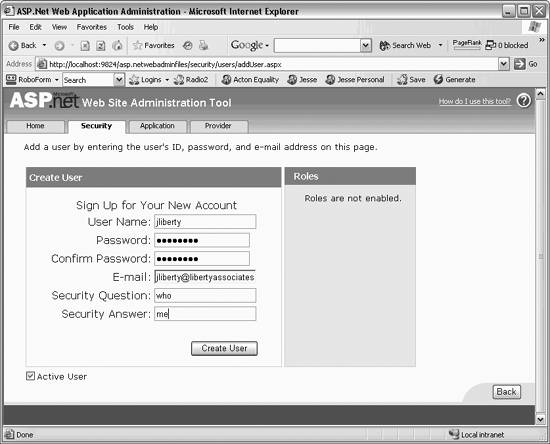
The three users I'll create for this application are jliberty , milo , and allegra . Make sure you check the Active User checkbox in the lower left and click Create User to create each in turn . After you've created all three, click the Back button in the lower right to return to the Security tab.
12.3.2. Adding Roles
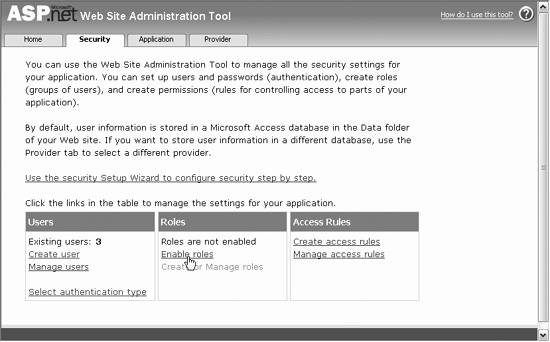
Under the Roles box, click Enable roles, as shown in Figure 12-29.
Create two roles, Authors and Customers, by clicking Create or Manage Roles. Once the two roles are created, click Manage for Authors. This brings you to a search page. Click on the first letter of the first user's name (e.g., jliberty ) and that user will appear with a checkbox (not yet checked). Check the box to add that user to the role.
Click Back, click Manage next to Customers, and add your second user to that role. You now have one user in each role and one user who is not in any roles.
Figure 12-29. Enable roles
12.3.3. Add a Login Page
Before you go much further, you will need a page for your three users to log in. Close the Web Site Administration Tool and open Default.aspx . Drag a Login Status control onto the page, as described in Chapter 11. Type the word "Hello" followed by a space and drag a LoginName control onto the page.
You now need a page for users to log in to. Create a new page named Login.aspx and switch to Design view and drag a Login control onto the new page. Click your new Login control and set its DestinationPageURL to ~/default.aspx .
Your goal is to create pages that are accessible to users who are in the Authors role and other pages accessible only to users in the Customers role. To do this, you must create a pair of folders. Right-click on the solution and create two new regular folders by selecting Add Folder Regular Folder. Name them Authors and Customers.
In the Authors folder, create a page named AuthorInfo.aspx . Similarly, in the Customers folder, create a page named CustomerInfo.aspx.
Add two more aspx pages to the root of your site: Books and Articles. To keep life simple, open each of the four pages you've just created and add an <h1> header with the name of the file (so when you view it in the browser you'll know immediately which page you are on), like this:
<form id="form1" runat="server"> <div> <h1>Books</h1> </div> </form>
|

12.3.4. Create Access Rules
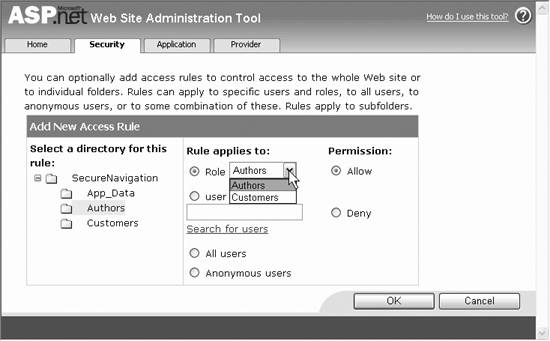
Once again, open the Web Site Administration Tool (by clicking Website ASP.NET Configuration). Click the Security tab, and under Access Rules click Create access rules . Click first on the Authors folder. In the second column, set the rule to apply to a specific role and choose Authors from the drop-down. In the third column, click the Allow radio button, as shown in Figure 12-30.
Figure 12-30. Create access rule for authors
Click OK and you are returned to the Web Site Administration Tool home page. Repeat the same steps to create an access rule for the Customers folder, granting permission only to the Customers role.
Return to the Web Site Administration Tool home page and click Manage Access Rules. Click the Authors Folder and click Add new access rule. This time, with the Authors folder highlighted, click the radio button All Users and set the permission to Deny, then click OK. Do the same for Customers.
You've now created four rules. The Author rules say that users in the role of Authors are allowed access and all others are denied . The same is true for the Customers page: only Customers have access.
By highlighting a rule and clicking the Move Up or Move Down button, you can move the rule up or down. This is important because rules are checked in the order of their appearance. If the Deny All rule is at the top and an author tries to access that page she will be denied. On the other hand, if you set the order Allow Authors, then Deny All, you'll have the results you expect: Authors will be granted access, and all other roles (including users who are not identified or not in a role) will be denied access to the page.
Close the Web Site Administration Tool.
12.3.5. Creating a Permission-Driven Site Map
The goal is to limit which parts of the SiteMap are displayed to the user based on which groups (or roles) the user is a member of. To get started, create a site map as described above. Right-click the web site root in the Solution Explorer and select Add New Item, and choose SiteMap. Accept the default name, Web.sitemap , and copy the SiteMap shown in Example 12-10.
Example 12-10. web.sitemap
<?xml version="1.0" encoding="utf-8" ?> <siteMap xmlns="http://schemas.microsoft.com/AspNet/SiteMap-File-1.0" > <siteMapNode url="~/Default.aspx" title="Home" description="Home" > <siteMapNode url="~/Books.aspx" title="Books" description="Books" /> <siteMapNode url="~/Articles.aspx" title="Articles" description="Articles" /> <siteMapNode url="~/Authors/AuthorInfo.aspx" title="Author Info" description="Author Information" /> <siteMapNode url="Customers/CustomerInfo.aspx" title="customer information" description ="customer information" /> <siteMapNode url="~/Login.aspx" title="login" description="login" /> </siteMapNode> </siteMap>
At this point, you have three users, two roles, a default page, a login page, and a SiteMap. You are all set to add security trimming to your SiteMap navigation so that which parts of the SiteMap are displayed will be controlled by which role the user is in.
|
To do this, you'll need to make an entry in your web.config file, as shown in Example 12-11.
Example 12-11. Web.config for Security Trimming
<?xml version="1.0"?> <configuration xmlns="http://schemas.microsoft.com/.NetConfiguration/v2.0"> <system.web> <roleManager enabled="true"/> <authentication mode="Forms"/> <compilation debug="true"/> <siteMap defaultProvider="XmlSiteMapProvider" enabled="true"> <providers> <add name="XmlSiteMapProvider" type="System.Web.XmlSiteMapProvider " description="Default SiteMap provider." siteMapFile="Web.sitemap" securityTrimmingEnabled="true" /> </providers> </siteMap> </system.web> </configuration> You've put some pages into secured folders and established which roles should have access to those folders. When you turn security trimming on, ASP.NET checks if the page is available to the current user and, if not, the page will not be displayed in any representation of the site map.
You can see this by logging in as jliberty . This user is in the group Authors and should have access to the AuthorInfo page along with the unsecured pages: Articles, Books, Default and Login, which is exactly what we see in Figure 12-31.
Figure 12-31. Security Trimming at work

In Figure 12-31, we see that user jliberty has logged in and does have access to Author Info but does not have access to Customer Info.
EAN: 2147483647
Pages: 173