Section 3.2. ASP.NET Server Controls
The primary control type used in ASP.NET is the ASP.NET server control . Server controls may have methods and event handlers associated with them, and this code is processed on the server. (Some server controls provide client-side script as well, but even then the processing is done, again, on the server.)
If the control has a visual component (e.g., labels, buttons , and tables), ASP.NET renders classic HTML to the browser, taking the target browser capabilities into account. If the ASP.NET server control requires client-side script to implement its functionality as, for example, with the validation controls described in Chapter 8, then browser-appropriate script is generated and sent to the browser. However, server-side validation will be performed as well.
|

ASP.NET server controls offer a consistent programming model. For example, in HTML, the input tag ( <input> ) is used for buttons, single-line text fields, checkboxes, hidden fields, and passwords. For multiline text fields, you must use the <textarea> tag. With ASP.NET server controls, each different type of functionality corresponds to a specific control. For example, all text is entered using the TextBox control; the number of lines is specified using a property. In fact, for ASP.NET server controls in general, all the declared attributes correspond to properties of the class that represents the control.
The ASP.NET server controls include all the functionality provided by HTML controls and much more. This includes basic controls such as buttons, labels, checkboxes, and tables, advanced data controls (such as data sources, lists, data grids, and grid views), validation controls, security and login controls, and rich controls (such as the Calendar , AdRotator , Menu and DynamicImage controls).
In the content file, the syntax used to implement ASP.NET server controls is of this form:
<asp:controlType id="ControlID" runat="server" thisProperty="this value" thatProperty="that value"/>
|
Here, the control tag always begins with asp: , known as the tag prefix . The controlType is the type, or class, of the control, such as Button , CheckBoxList , or GridView . An id attribute allows you to refer to this instance of the control programmatically. The runat attribute tells the server this control is to be processed on the server.
|
You can declare additional attributes within the angle brackets. For example, you can declare Text and Width attributes for a TextBox like this:
<asp:TextBox ID="txtBookName" runat="server" Width="250px" Text="Enter a book name." /> ASP.NET server controls use well-formed XHTML syntax, though ASP.NET is tolerant of missing quotation marks around attribute values. (See the sidebar for a description of well- formed XHTML.) Specifically, the angle brackets must be self-closing, as shown above, or have closing elements. So, the above TextBox could equivalently be written this way:
<asp:TextBox ID="txtBookName" runat="server" Width="250px" Text="Enter a book name."></asp:TextBox>
In addition, many ASP.NET server controls can make use of inner HTML , which is content between the opening tag and the closing tag. In the case of a TextBox control, for example, the Text property can be specified as inner HTML rather than an attribute of the opening element. So, the above control could again be equivalently written this way:
<asp:TextBox ID="txtBookName" runat="server" Width="250px">Enter a book name.</asp:TextBox>
Well-Formed XHTMLXHTML is a World Wide Web Consortium (W3C) standard, of which the current version is 1.1. It defines HTML as a well-formed XML document. Many web browsers are very forgiving , and ill-formed HTML will work fine, but the world is moving toward a stricter syntax to increase the robustness of the Web. Well-formed code has a huge benefit for authoring tools and is worthwhile when hand coding since it decreases confusion and ambiguity. Among the rules of well-formed HTML are these:
If any of these characters are used in script, then it must be "escaped" by using the above character entity or by enclosing the entire script block in a CDATA section. (CDATA is an XML type.) HTML controls are divided into two categories: input and container . HTML input controls do not require a closing tag (though to be well formed, they should be made self-closing with a trailing / ) and have Name , Value , and Type attributes, which may be accessed and controlled programmatically. HTML container controls, on the other hand, must have a trailing / or a closing tag. They do not have Name , Value , or Type attributes. Instead, the content found between opening and closing tags may be accessed programmatically using the InnerHtml or InnerText property. The difference between these two properties is that InnerText provides automatic HTML encoding and decoding of special characters, such as < or > . If you use the InnerHtml property, these characters will be interpreted as being part of the HTML and will not display in the final output. |
You implement ASP.NET server control attributes as properties of the server control class, and you can access them programmatically. Once a control has been declared, or otherwise instantiated in code, you can retrieve or set its properties programmatically. Using this example, your code could set or change the Text property with the following line of code:
txtBookName.Text = "Programming ASP.NET";
Most ASP.NET server controls expose events. Event handling in general is explained previously in this chapter, and each control's events are covered in the chapter where that control is discussed.
The following example will demonstrate many of the features provided by VS2005 to minimize typing and errors when using controls, including:
-
Dragging and dropping controls onto either the Design or Source views of the web page
-
Intellisense to display and auto-complete properties declaratively in Source view of the web page
-
Using a Properties window for entering properties in either the Design or Source view of the web page
Open VS2005 and click New Web Site. Click ASP.NET Web Site, ensuring the language is set to C#. Call the new web site ASPNETServerControls .
This will create a new web application with a page called Default.aspx . The IDE will show the Source view of Default.aspx on the work surface, with the Toolbox on the left side of the screen and the Solution Explorer and Properties windows on the right. The code shown in Example 3-1 (reformatted slightly for better readability on this page) will be inserted by default.
Example 3-1. Default boilerplate code
<%@ Page Language="C#" AutoEventWireup="true" CodeFile="Default.aspx.cs" Inherits="_Default" %> <!DOCTYPE html PUBLIC "-//W3C//DTD XHTML 1.1//EN" "http://www.w3.org/TR/xhtml11/DTD/xhtml11.dtd"> <html xmlns="http://www.w3.org/1999/xhtml" > <head runat="server"> <title>Untitled Page</title> </head> <body> <form id="form1" runat="server"> <div> </div> </form> </body> </html>
Replace the default title text with something more meaningful, such as ASP.NET Server Controls. Inside the <div> element, type in a header element:
<h1>ASP.NET Server Controls</h1>
|
Immediately following the first header, enter a second header control, as follows :
<h2>The date and time is <% =DateTime.Now.ToString( ) %>.</h2>
Intellisense is continually helpful here. It automatically provides the closing h2 element, and as soon as you enter the <% characters, indicating the beginning of server-side code, it automatically provides the closing %> characters. As soon as you enter each successive period in the DateTime expression, it provides a drop-down with all the possible members available next .
|
You can place server-side code in-line (without being wrapped within a <script> block) in a content file by enclosing the code within the <% %> characters as was done in the previous code snippet. This works because the browser ignores anything between the script block characters, not rendering it to the page. The ASP.NET runtime, however, recognizes that content as it processes the page. When the runtime sees valid Framework code, it processes it. In this case, that code returns a text string containing the current date and time, which then gets incorporated directly into the rendered output.
Switch to the Design view of the page by clicking the Design button at the bottom of the work surface. The cursor should be at the end of the h2 header you entered. That header will display the following:
The date and time is .
It does this since the script that provides the date and time will not run until the page is run.
Commenting Your CodeCommenting ASP.NET is particularly difficult. As an ASP.NET developer, you may be working with HTML, C#, VS2005, JavaScript, VBScript, and TransactSQL, among others. Each language has its own unique syntax for comments, and one language can overlap another. Here is a summary of the different ways to comment:
ASP.NET controls: There is no comment within an ASP.NET control. Since any unrecognized attributes are ignored, some developers prepend any attributes they wish to comment out with XX. |
Ensure the cursor is at the end of that header line and press the Enter key a few times to space out the content. Drag a TextBox control from the Toolbox (under the Standard category) onto the form. A TextBox control will appear on the work surface.
In the Properties window on the right side of the window, change the ID property from the default value, TextBox1 , to txtBookName . At the same time, change the Text property from the blank default to Enter a book name. , and change the Width property to 250. The Width property will display 250px , for pixels.
|
Before proceeding any further, click the Source button at the bottom of the work surface to see the code generated by VS2005. Between the div tags, you should see something similar to the following (reformatted to fit on this page):
<h1>ASP.NET Server Controls</h1> <h2>The date and time is <% =DateTime.Now.ToString( ) %>.</h2> <p> </p> <p> <asp:TextBox ID="txtBookName" runat="server" Width="250px"> Enter a book name.</asp:TextBox> </p>
VS2005 inserted paragraph elements with enclosed non-breaking spaces where you pressed the Enter key. More significantly, it inserted a TextBox ASP.NET server control with the Width property set and the Text property contained in the inner HTML.
You can edit the generated HTML and ASP.NET server control declarations directly in the Source window, edit the design in the Design window, or change the properties in the Properties window. In any case, all other views of the page will immediately reflect those changes.
Moving on, drag a Button control from the Toolbox (again, under the Standard category) onto the work surface after the TextBox , either in the Design or Source view. Change its ID to btnBookName and its Text property to Book Name .
If you're on the Design view, press Enter after the button to insert a new line. If you're in Source view, enter a <p> HTML element after the button control. Then drag a Label control onto the page in either case. Change its ID to lblBookName and set its Text property to blank.
The goal here is to enable the user to type a book name into the text box, click the button, and have that book name display as the Text property of the label.
To accomplish this, you need to hook up the click event of the button to an event handler as described previously in this chapter. Switch to the Design view of the page and double-click the button. Double-clicking a control tells VS2005 you want to implement the "default" event for that control; for buttons, the default event is Click .
The code-behind file, Default.aspx.cs , will open with a code snippet for the click event handler method in place and the cursor inside the method, ready to accept your typing. Enter the highlighted line of code below:
protected void btnBookName_Click(object sender, EventArgs e) { lblBookName.Text = txtBookName.Text; } Switch back to the content file, Default.aspx , by clicking on the tab at the top of the work surface. Go to Source view by clicking the Source button at the bottom of the work surface. The OnClick attribute has been added to the button control, with its value set to the name of the event handler method to which you added the line of text.
Run your web page by pressing F5 or clicking the Debug  Start menu item. If this is the first time you have run the page, you will be prompted to create a configuration file to enable debugging. Click Yes in that dialog box.
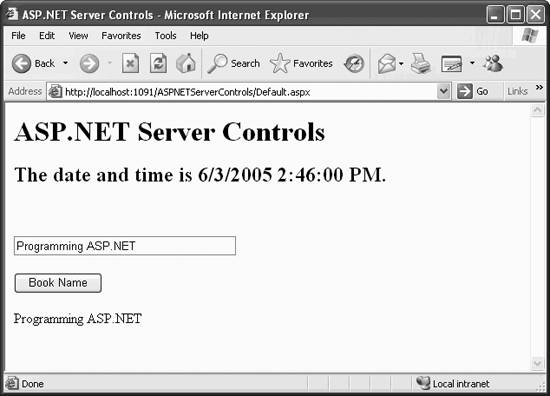
The page will appear in a browser with the current date and time displayed in the second header you entered. Change the text in the text box and click the button. The text you entered will display in the label below the button. The page will look something like that shown in Figure 3-3.
Figure 3-3. ASP.NET server controls
3.2.1. ASP.NET and Browsers
Let's say it just one more time: The browser never sees the ASP.NET server control . The server processes the ASP.NET server control and sends standard HTML to the browser.
ASP.NET considers browsers to be either uplevel or downlevel . Uplevel browsers support script Versions 1.2 (ECMA Script, JavaScript, JScript), Cascading Style Sheets (CSS) and HTML 4.0; typical uplevel browsers would include Internet Explorer 4.0 and later releases. Downlevel browsers, on the other hand, support only HTML 3.2.
ASP.NET can tell you which browser is being used to display the page. This information is made available via the HttpRequest.Browser property. HttpRequest.Browser returns a HttpBrowserCapabilities object whose many properties include a number of Booleans, such as whether the browser supports cookies, frames , and so forth.
You will find that you don't often need to check the HttpBrowserCapabilities object because the server will automatically convert your HTML to reflect the capabilities of the client browser. For example, validation controls ( considered in Chapter 8) can be used to validate customer data entry. If the user's browser supports client-side JavaScript, the validation will happen on the client (and then again on the server to prevent spoofing). However, if the browser does not support client-side scripting, the validation will be done server side only.
From within your browser, view the source for the web page displayed in Figure 3-3. This source is shown in Example 3-2. No server controls exist; all the controls have been converted to traditional HTML tags, and a hidden field with the name _ _VIEWSTATE has been inserted into the output. This is how ASP.NET maintains the state of the controls. When a page is submitted to the server and then redisplayed, the controls are not reset to their default values. Chapter 6discusses state .
Example 3-2. Output HTML from WebServerControls.aspx
<!DOCTYPE html PUBLIC "-//W3C//DTD XHTML 1.1//EN" "http://www.w3.org/TR/xhtml11/DTD/xhtml11.dtd"> <html xmlns="http://www.w3.org/1999/xhtml" > <head><title> ASP.NET Server Controls </title></head> <body> <form method="post" action="Default.aspx" id="form1"> <div> <input type="hidden" name="_ _VIEWSTATE" value="/wEPDwUKLTk1NTc5MjE0OQ9kFgICAw9kFgICAg8PFgIeBFRleHQFE1Byb2dy YW1taW5nIEFTUC5ORVRkZGT09m86wvDVg2RbAlz0/3UYSr36Yg==" /> </div> <div> <h1>ASP.NET Server Controls</h1> <h2>The date and time is 6/3/2005 2:46:00 PM.</h2> <p> </p> <p> <input name="txtBookName" type="text" value="Programming ASP.NET" id="txtBookName" style="width:250px;" /> </p> <p> <input type="submit" name="btnBookName" value="Book Name" id="btnBookName" /> </p> <p> <span id="lblBookName">Programming ASP.NET</span> </p> </div> </form> </body> </html>
3.2.2. ASP.NET Server Control Class Hierarchy
All the ASP.NET server controls that have a visual aspect when rendered to the browser are derived from the WebControl class. This class provides the properties, methods, and events common to all these controls. Among these are common properties, such as BorderColor , BorderStyle , and BorderWidth , and the RenderBeginTag and RenderEndTag methods.
The WebControl class and several other ASP.NET server controls (e.g., Literal , PlaceHolder , Repeater , and XML ) derive from System.Web.UI.Control , which derives from System.Object . The Control class provides base properties such as ID , EnableViewState , Parent , and Visible ; base methods such as Dispose , Focus , and RenderControl ; and life cycle events such as Init , Load , PreRender , and Unload .
The WebControl class and the controls derived from Control are in the System.Web.UI.WebControls namespace. These relationships are shown in Figures 3-4a and 3-4b.
Figure 3-4a. Relationships of controls in the System.Web.UI.WebControls namespace
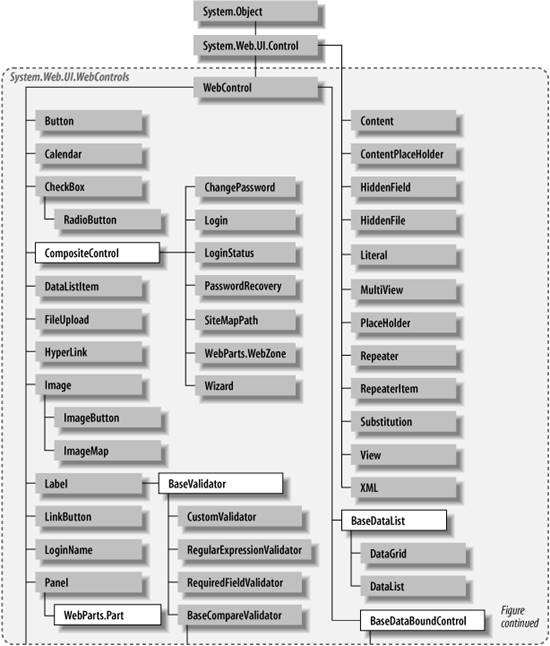
Figure 3-4b. Relationships of controls in the System.Web.UI.WebControls namespace ( continued )
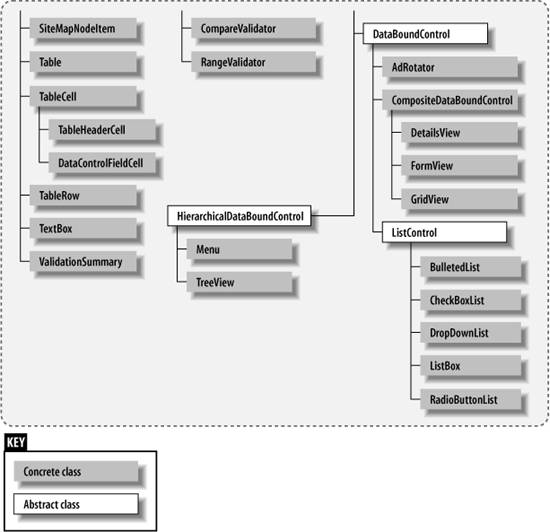
All of the properties, events, and methods of WebControl and System.Web.UI.Control are inherited by the ASP.NET server controls . Table 3-4 lists many of the commonly used properties inherited by all the ASP.NET server controls from the Control or the WebControl classes. Where applicable , default values are indicated.
Table 3-4. Commonly used properties inherited by all ASP.NET server controls
| Name | Type | Get | Set | Values | Description |
|---|---|---|---|---|---|
| AccessKey | String | | | Single-character string | Pressing the Alt key in combination with this value moves focus to the control. |
| BackColor | Color | | | Azure , Green , Blue , and so on | Background color. |
| BorderColor | Color | | | Fuchsia , Aqua , Coral , and so on | Border color. |
| BorderStyle | BorderStyle | | | Dashed , Dotted , Double , NotSet , and so on | Border style. Default is NotSet . |
| BorderWidth | Unit | | | nn , nnpt | Width of the border. If of the form nn , where nn is an integer, then in units of pixels. If of the form nnpt , where nn is an integer, then in units of points. |
| CausesValidation | Boolean | | | true , false | Indicates if entering control causes validation for controls that require validation. Default is true . |
| Controls | ControlCollection | | A collection of all the control objects contained by this control. | ||
| CssClass | String | | | CSS class. See the "CSS Styles" section that follows. | |
| Enabled | Boolean | | | true , false | If disabled, control is visible but grayed out and not operative . Contents are still selectable for copy and paste. Default is true . |
| EnableTheming | Boolean | | | true , false | Indicates if theming applies to this control. |
| EnableViewState | Boolean | | | true , false | Indicates if this control persists its view state. Default is true . |
| Font | FontInfo | | | See Table 4-1. | |
| ForeColor | Color | | | Lavender , LightBlue , Blue , and so on | Foreground color. |
| Height | Unit | | | nn , nn % | If of the form nn , where nn is an integer, then in units of pixels. If of the form nn % , then it is a percentage of the height of the container. For downlevel browsers, will not render for Label , HyperLink , LinkButton , any validator controls, or for CheckBoxList , RadioButtonList , or DataList when their RepeatLayout property is Flow . |
| ID | String | | | Programmatic identifier for the control. | |
| Parent | Control | | Control on the page | Returns a reference to this control's parent control in the page control hierarchy. | |
| SkinID | String | | | Skin filename | Specifies which skin file from a theme directory to apply to this control. |
| ToolTip | String | | | Text string displayed when the mouse hovers over the control; not rendered in downlevel browsers. | |
| Visible | Boolean | | | TRue , false | If false , then control is not rendered; the default is true . |
| Width | Unit | | | nn , nn % | If of the form nn , where nn is an integer, then in units of pixels. If of the form nn % , where nn is an integer, then it is a percentage of the width of the container. For downlevel browsers, will not render for Label , HyperLink , LinkButton , any validator controls, or for CheckBoxList , RadioButtonList , or DataList when their RepeatLayout property is Flow . |

3.2.3. CSS Styles
Cascading Style Sheets (CSS) provide a means to apply uniform and consistent styles across an entire web site. It is a World Wide Web Consortium (W3C) standard, first supported in IE 4.0 and Netscape 4.0.
|
To see how ASP.NET and VS2005 support CSS, create a new web site called Styles. Right-click on the application root in the Solution Explorer and click Add New Item. Select Style Sheet from the list of templates and leave the default name. (You could change the name if you want.)
This will add the new stylesheet file to the web site and display the contents on the work surface, including two lines of boilerplate code:
body { } Replace that code with the contents of Example 3-3. No period precedes the body class name, but a period is before the other two class names, indicating they are generic classes.
Example 3-3. StyleSheet.css
body { FONT-SIZE: 12px; COLOR: blue; FONT-FAMILY: arial, helvetica, verdana, sans-serif; TEXT-DECORATION: underline } .button { FONT-WEIGHT: bold; FONT-SIZE: 14px; COLOR: red; background-color:Yellow; FONT-FAMILY: arial, helvetica, verdana, sans-serif; TEXT-DECORATION: none } .label { FONT-WEIGHT: bold; FONT-SIZE: 11px; COLOR: black; FONT-FAMILY: arial, helvetica, verdana, sans-serif; TEXT-DECORATION: none } Go to the Source view of the page file. Add the following <style> element inside the <head> element.
<style>@import url(StyleSheet.css ); </style>
Now add two ASP.NET server controls to the page: a Button and a Label. Set the CssClass property of the Button to button and of the Label to body . (They are case-sensitive.) Add some text to the Label control. The declaration of the two controls within the page file should look something like that listed in Example 3-4.
Example 3-4. CssStyles demonstration
<asp:Button ID="Button1" runat="server" Text="Button" CssClass="button"></asp:Button> <asp:Label ID="Label1" runat="server" CssClass="body"> This is some sample text. </asp:Label>
When the page displays, the two controls will reflect the styles set in the stylesheet file, StyleSheet.css.
EAN: 2147483647
Pages: 173