Section 3.3. HTML Server Controls
This book focuses on using ASP.NET server controls . However, understanding and using HTML and HTML server controls can be useful in real-life applications.
Normal HTML controls such as <h1> , <a> , and <input> are not processed by the server but are sent directly to the browser for display. Standard HTML controls can be exposed to the server and made available for server-side processing by turning them into HTML server controls.
To convert an HTML control to an HTML server control, simply add the attribute runat ="server" . In addition, you will probably want to add an id attribute, so the control contents can be accessed and controlled programmatically. For example, start with a simple input control:
<input type="text" size="40">
You can convert it to an HTML server control by adding the id and runat attributes, as follows :
<input type="text" id="BookTitle" size="40" runat="server">
There are two main reasons for using HTML server controls rather than ASP.NET server controls:
-
Converting existing HTML pages to run under ASP.NET
-
To convert an HTML file to run under ASP.NET, all you need to do is change the extension of the file to .aspx . However, the HTML controls will run client side, not server side. To take advantage of server-side processing, including automatic maintenance of state (see Chapter 6), you must add the runat attribute.
-
Using HTML tables for page layout
-
Server-side controls consume server resources. For static tables commonly used to lay out the page, server-side processing is unnecessary unless you need to refer to one or more of the table elements in your code. The following example illustrates this point.
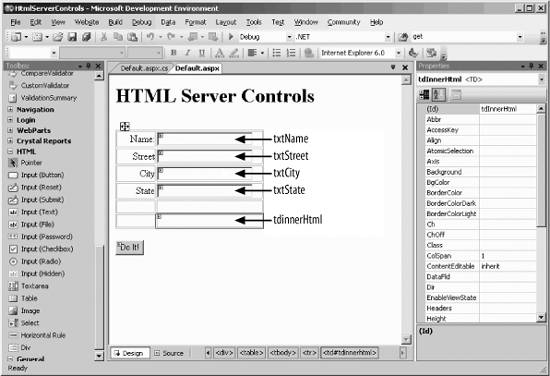
Create a new web site in VS2005. Call it HtmlServerControls . Drag an HTML table control from the Toolbox onto the Design surface. Give it two columns and six rows. Drag an HTML button onto the page below the table. Give the button ID and runat="server" attributes.
For the first row in the table, enter the text string Name in the first column and an Input (text) control in the second column. Give that input control an ID of txtName . The next three rows should be similar, with input controls named txtStreet , txtCity , and txtState . Leave the fifth row in the table as an empty spacer. Leave the second column in the last row empty but give it an ID of TDInnerHtml . The design should look something like that shown in Figure 3-5, where the controls are named as indicated.
Figure 3-5. HTML control page layout

Be certain that all the named controls also have the runat="server" attribute as well. However, all the other table elements on the page need neither an ID nor a runat attribute since they are used for static display and will not be processed on the server.
Double-click the button in Design view to bring up the event handler method in the code-behind page. Enter the following highlighted lines of code:
protected void btnDoIt_ServerClick(object sender, EventArgs e) { string strHtml = ""; strHtml += txtName.Value + "<br/>"; strHtml += txtStreet.Value + "<br/>"; strHtml += txtCity.Value + ", " + txtState.Value; tdInnerHtml.InnerHtml = strHtml; } If you look at the HTML for the button on the Source view of Default.aspx , you will see that rather than the traditional onClick attribute used in conventional HTML or ASP pages, the button has an onServerClick attribute, telling the server what function to call when the Click event occurs:
onServerClick="btnDoIt_ServerClick"
|
If you take a look at the Click event handler, which is executed every time the Do It! button is clicked, you'll see that an HTML string is constructed containing the values of the input text fields, interspersed with some HTML to control line breaks. This string is then assigned to the InnerHtml property of the table cell with the tdInnerHtml id attribute:
tdInnerHtml.InnerHtml = strHtml
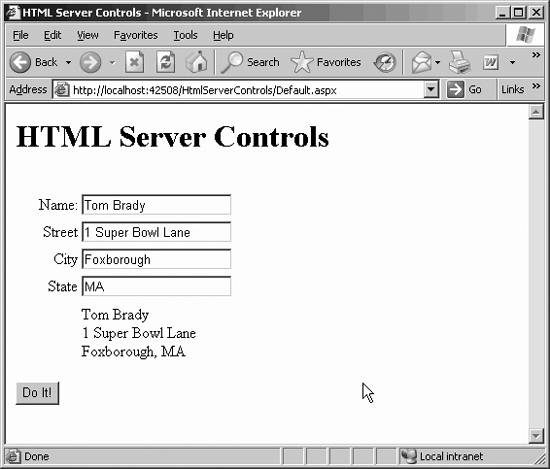
If you use the InnerText property instead of the InnerHtml property, then the resulting page would display the < and > symbols. As written, however, the resulting page will look something like Figure 3-6, after values are entered in the text fields and the button is clicked.
Figure 3-6. HTML Server Controls with InnerHtml populated

Table 3-5 lists HTML tags and the category to which they belong. In the example shown in Figures 3-5 and 3-6, the two types of input controls are text fields and a button. Both happen to use the <input> HTML tag, though as you can see in Table 3-5, other input controls do not use those tags.
Table 3-5. HTML tags and their categories
| HTML tag | Category | HTML server control name | Description |
|---|---|---|---|
| <head> | Container | HtmlHead | <head> element. Other elements can be added to its Controls collection. |
| <input> | Input | HtmlInputButton HtmlInputCheckbox HtmlInputFile HtmlInputHidden HtmlInputImage HtmlInputPassword HtmlInputRadioButton HtmlInputReset HtmlInputSubmit HtmlInputText | <input type=button submit reset> <input type=checkbox> <input type=file> <input type=hidden> <input type=image> <input type=password> <input type=radio> <input type=reset> <input type=submit> <input type=text password> |
| <img> | n.a. | HtmlImage | Image. |
| <link> | n.a. | HtmlLink | Href property gets/sets the URL target. |
| <textarea> | Input | HtmlTextArea | Multiline text entry. |
| <a> | Container | HtmlAnchor | Anchor. |
| <button> | Container | HtmlButton | Customizable output format, usable with IE 4.0 and above browsers. |
| <form> | Container | HtmlForm | Maximum of one HtmlForm control per page; default method is POST. |
| <table> | Container | HtmlTable | Table, which can contain rows, which can contain cells . |
| <td> <th> | Container | HtmlTableCell | Table cell; Table header cell. |
| <tr> | Container | HtmlTableRow | Table row. |
| <title> | Container | HtmlTitle | Title element. |
| <select> | Container | HtmlSelect | Pull-down menu of choices. |
| Container | HtmlGenericControl | Any HTML control not listed here. |
|
Any HTML control can be converted to server-side processing with the addition of the runat="server" attribute. Those not listed in Table 3-5 will be treated as an HtmlGenericControl . As with any other container control, this allows programmatic access to the control's inner HTML.
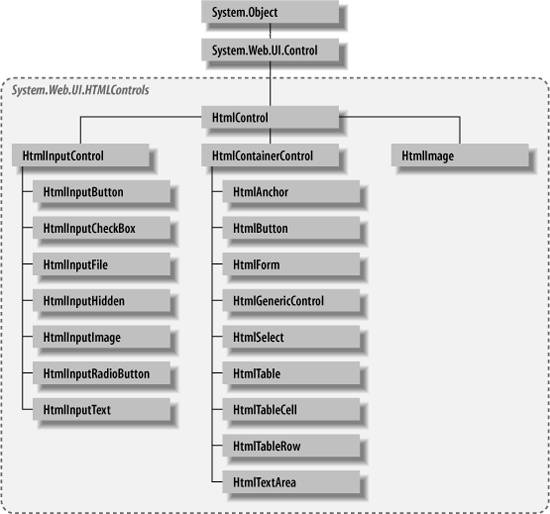
All the HTML server controls derive from the System.Web.UI.Control class and are contained in the System.Web.UI.HTMLControls namespace. Figure 3-7 shows the HTML server control hierarchy.
Figure 3-7. The HTML server control object hierarchy

EAN: 2147483647
Pages: 173
