| Whether you are building a new network with NetWare 6.5 or installing it into an existing network, there are certain preparations you should make so that the installation goes as smoothly as possible. For those rare few of you creating a new network from the ground up, you have the opportunity to do all the little things that will make that network easier to manage down the road. Carefully consider your choices of cabling, protocols, addressing, naming schemes, and access methods , and so forth. As the technical foundation of your network, these are very difficult to change midstream. Consider business factors such as potential company growth, mergers or acquisitions, reorganizations, and all the other business considerations of the 21st century. If you don't, your network might lack the flexibility necessary to adapt to changes at the organizational level. Unfortunately, the results of all this planning will then have to be weighed against the realities of your budget. There will be inevitable compromises, but this type of advanced planning will make sure those compromises don't come back to haunt you once the network is running. Server Hardware Planning Consider the following as you prepare your server hardware for the NetWare 6.5 installation: -
Processor speed: The server must have an Intel Pentium II or AMD K7 processor or higher. Novell recommends Pentium III 700MHz or higher processors for multi-processor servers. -
CD-ROM drive: The server must have an ISO9660-compatible CD-ROM drive. Novell also recommends using a bootable CD-ROM drive compatible with the El Torito specification for booting directly from the CD. -
Server memory: A NetWare 6.5 server must have a minimum of 512MB of system memory (RAM). -
The NetWare 6.5 installation routine will properly detect most storage adapters and devices, but you should be familiar with brand and type of your server's storage controllers (SCSI board, IDE controller, and so on), as well as the brand, type, capacity, and so on, of the storage devices (hard disks, CD-ROM/DVD drives , tape drive, and so on) attached to those controllers. -
Size of hard disks: There are two considerations when determining the appropriate size of your server hard disk(s): the DOS partition and the NetWare partition. The DOS partition is a portion of the hard disk reserved for DOS system files, server startup files, and any other DOS utilities you want to store on the server. NetWare 6.5 recommends a DOS partition of at least 1GB, but a good rule of thumb is to start with the minimum and then add 1MB for every MB of server RAM installed. That way you will be able to do a core dump to the DOS partition if necessary. Similarly, NetWare 6.5 recommends at least 4GB for the NetWare partition. This same amount is recommended for the SYS: volume, so the space needs of additional volumes should be added to this minimum amount. -
Network adapters: Know the type of network adapters installed in the server and have a copy of the latest LAN drivers available. Note the adapter's settings and the frame type(s) associated with each board. The default frame type for TCP/IP is Ethernet II and the default frame type for IPX is Ethernet 802.2. NOTE Even though NetWare 6.5 is new in many respects, older drivers from NetWare 5.1 or NetWare 6 may still work just fine with NetWare 6.5. If you have an older adapter for which NetWare 6.5 doesn't include drivers, try the older drivers first before spending the money on a new adapter.
-
Display and input devices: NetWare 6.5 requires an SVGA or better video adapter and monitor along with a standard keyboard and mouse for direct console operation. However, with the powerful Web-based administrative tools available with NetWare 6.5, it is now possible to operate a "headless" NetWare server without any direct input or output devices. This also removes one of the primary sources of mischief in the NetWare environment. -
Server name : If you haven't already done so, you should define a naming convention for your network resources, and determine an appropriate name for this server within those conventions. The server name can be between 2 and 47 characters in length and can include alphanumeric characters, hyphens, and underscores. -
Special hardware configuration: If your server supports any special hardware configurations, such as HotPlug PCI or multiple processors, make sure to have current drivers available in case they are needed during the installation. Remember that installing a new network operating system is a significant undertaking. All hardware configurations should be tested in a lab environment before introducing them to a new version of NetWare in your production network. Volume Planning Consider the following as you plan the volumes to be created within your server's NetWare partition: -
SYS volume: The SYS volume is the storage location for all NetWare system files and products. As such, it is absolutely critical that your SYS volume not run out of space. You should plan a minimum of 4GB for the SYS volume in order to have room for the many additional products and services available with NetWare 6.5. -
Additional volumes: It is usually a good idea to reserve the SYS volume for NetWare files and create additional volumes for network applications and data. NSS provides disk pools that can span physical drives. Multiple volumes can reside inside each disk pool. Once created, these additional volumes can be used in any way you see fit. You can organize data in volumes based on who needs access, on the type of namespace required for the files, or on how you want the data distributed across the network. Remember to keep volume names consistent with your global naming strategy. -
File compression: You can choose to implement file compression at any time, but once installed it cannot be removed without re-creating the volume. Remember that the SYS volume should be reserved exclusively for system files and nonvolatile files that won't be changing a lot or growing significantly over time. Create as many other pools and volumes as you need to support your non-NetWare applications and data, but try not to mix them into the SYS volume. Protocol Planning Your biggest considerations as you decide which protocols to run on the NetWare 6.5 server are IP has already been selected as the world's network standard, due to its exclusive use on the Web. However, NetWare's original IPX is still in limited use, supporting legacy applications and queue-based printing for the most part. You will almost certainly be implementing IP in your network, but it's still a good idea to understand the advantages and disadvantages of both protocols, along with some other common protocols and protocol configurations prior to implementing your network. -
Internet Protocol (IP): Novell made the move to IP as its default protocol with the release of NetWare 5, and if your network is connected with any external network or the Internet, you will be using IP to make that connection. An IP network requires some advanced planning in order to be sure that all devices can communicate, particularly if you are connecting your network to the outside world (see Table 1.1). Table 1.1. IP Considerations | CONSIDERATION | DESCRIPTION | | Server IP address | Each device on an IP network must have a unique address. If you are connecting to the Internet, you can reserve a unique address, or block of addresses, through the Internet Network Information Center (InterNIC). | | Server subnet mask | The subnet mask identifies a portion of the network. Subnet masks allow you to divide your network into more manageable segments. | | Default router address | Also called the gateway, this entry determines where packets with an unknown network address are sent. The default router is often that which connects your network to the Internet. If you want to specify a specific default router, make sure you have that information prior to the NetWare 6.5 installation. | | DNS information | If you want to use domain name services on your network, you need to know your network's domain name as well as the addresses of any name servers you want to use. Configuring DNS on NetWare 6.5 is covered in Chapter 4, "NetWare 6.5 Server Management." | -
Internet Packet Exchange (IPX): IPX is a Novell proprietary protocol that became a de facto standard due to NetWare's market acceptance. It's very easy to install and configure, but the Internet has relegated it to a legacy role. NOTE Each server on an IPX network must have a unique internal net number. This number can be randomly generated during installation or you can specify it manually.
NOTE You can choose to install both IP and IPX protocol stacks on your NetWare 6.5 server in order to support both legacy applications and external connectivity. However, this solution adds significant administrative overhead because both environments have to be managed separately. Furthermore, because IP and IPX services cannot interact, you can run into trouble accessing IPX services from an IP segment and vice versa.
-
Compatibility Mode: If you are still making the move from IPX to IP, Compatibility Mode (CM) can help you make the transition more seamlessly by letting IPX-dependent applications receive the information they need in IPX format, even though the network is running IP. Table 1.2 lists some considerations for Compatibility Mode. Table 1.2. Compatibility Mode Considerations | CONSIDERATION | DESCRIPTION | | Compatibility Mode (CM) driver | The CM driver acts as a virtual network adapter to which IPX can be bound. The CM driver can then internally route IPX packets and deliver IPX-based information to IPX applications running on the server. IPX services reach IPX clients by being encapsulated within IP packets. | | SLP | In order to properly handle IPX-based routing and service advertisement, CM relies on the IP-equivalent Service Location Protocol (SLP). Make sure SLP is configured on your network if you want to use CM. | | Migration agent | The migration agent makes it possible for external systems to interact with the internal IPX network created by the CM driver. The migration agent tunnels IPX packets through the IP network so that IP and IPX systems can interact, or so that IPX segments can communicate across an IP backbone. | NOTE NetWare 6.5 doesn't install Compatibility Mode by default. If you need to configure Compatibility Mode on your network, see the NetWare 6.5 online documentation for more information.
eDirectory Planning There are some basic pieces of eDirectory information you have to supply in order to complete the NetWare 6.5 installation. eDirectory design concepts are presented in Chapter 5, "Novell eDirectory Management." Additional eDirectory reference material is available in Appendix D. -
Tree name: You need to know the name of the eDirectory tree into which the NetWare 6.5 server will be installed. -
Server location within the eDirectory tree: Prior to installing the server, make sure you are familiar with the organization of your eDirectory tree. You need to specify the context within which the server will reside. This consists of the name of the organization or organizational unit to which this server will belong. -
Administrator name and password: If you are installing the first server in a new tree, an Admin account will be created and you will specify the Admin password. If you are installing the server into an existing eDirectory tree, you will need to provide the name, including context, and password of the existing Admin user . -
Server's time zone: You need to specify the server's time zone and whether that time zone supports daylight savings time. -
Time synchronization: NetWare provides its own proprietary time synchronization service that is largely self-configuring . The first NetWare server in a network is created as a Single Reference timeserver. Subsequent servers, even if they are installed in a new eDirectory tree, will default to secondary timeservers. If your eDirectory tree will span geographic locations or manages a heterogeneous server environmentincluding Unix, Linux, or Windows serversyou will probably want to implement a time synchronization scheme based on the standard Network Time Protocol (NTP). For more information on time synchronization, see in Chapter 4. NetWare 6.5 includes Novell eDirectory v8.7.1. In order to support this version of eDirectory in your existing network, you should have the latest eDirectory service packs installed on your existing servers. You can get the latest eDirectory service packs from Novell at support.novell.com. Print Planning NetWare 6.5 continues the evolution of NetWare printing, which has relied on Novell Distributed Print Services (NDPS) since the release of NetWare 5. iPrint, first released with NetWare 6, leverages NDPS to deliver print from anywhere , extremely simple printer configuration, and robust Internet printing options based on the Internet Printing Protocol (IPP). For more information on iPrint and NDPS, see Chapter 7, "NetWare Printing Servicer." To plan for an NDPS printing environment, consider the following: -
Will NDPS be installed: If this server will function as part of the NDPS environment, remember to install NDPS as part of the NetWare 6.5 installation. -
Will an NDPS broker be installed: The NDPS broker provides the management framework within which all NetWare print activities occur. The NDPS installation routine will install an NDPS broker on a server only if there is no other broker within three network hops of the server. If necessary, you can override this setting and specify whether to install a broker on this server. -
Disable any broker services: The NDPS broker provides three principal services: Service Registry, Event Notification, and Resource Management. Depending on how you choose to configure your NDPS environment, one or more of these services might not be needed on the server. Network Preparation Before you install NetWare 6.5 into an existing network, there are a few things you should do to make sure the network is ready for the introduction of NetWare 6.5. Novell includes Deployment Manager (see Figure 1.1) to help identify and automate these tasks . You can run Deployment Manager from any Windows workstation by executing NWDEPLOY.EXE from the root of the NetWare 6.5 Operating System CD. Figure 1.1. Deployment Manager installation/upgrade options screen. 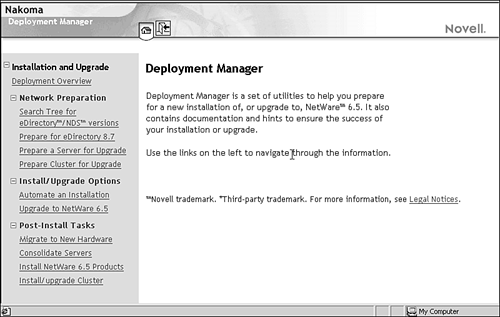 Deployment Manager is organized into three main categories: Network Preparation, Install/Upgrade Options, and Post-Install Tasks. To prepare your network for NetWare 6.5, you will focus on the tasks listed under Network Preparation. You can run Deployment Manager and review its overviews and checklists from any workstation. However, to actually perform the network checks and updates necessary to prepare your network for the NetWare 6.5 installation, you need to have the latest NetWare client installed. See Chapter 2 for information on installing the NetWare client. WARNING Before performing any significant work on your network, it is always a good idea to back up your network data. Use your preferred data archive utility, such as NetWare's own Storage Management Services ( SMS ), to back up eDirectory and server data that might be affected by installation and upgrade processes. For more information on backing up your network data, see Chapter 8, " File Storage and Management ."
NOTE Because preparations for NetWare 6.5 will make changes to your servers, install the latest NetWare support packs on the servers that will be associated with the NetWare 6.5 server that you are preparing to install. Failure to do so could result in instability in your network environment. Support packs can be found at http://support.novell.com/filefinder/6385.
Search Tree for eDirectory/NDS Version Selecting this option lets you search your network for existing versions of eDirectory to determine whether any existing versions need to be updated prior to installing or upgrading to NetWare 6.5. To do this, complete the following steps: -
From Deployment Manager, select Search Tree for eDirectory/NDS Versions. -
Select View and Update NDS. -
Browse to the eDirectory tree or container you want to search for NetWare servers and click Next . Select Include Subordinate Containers to search the entire tree or tree branch you have specified. -
Deployment Manager will show you the version of eDirectory installed on each server it finds and will indicate whether or not it needs to be updated. If no server needs to be updated, click Exit to return to the Deployment Manager main menu. -
Click Next to perform the eDirectory update on those servers that require it. -
Click Next to restart eDirectory on that server. -
Click Exit to return to the Deployment Manager main menu. This is an important step because failure to upgrade eDirectory can result in schema corruption and other nastiness. Prepare for NDS eDirectory 8.7 If you are installing NetWare 6.5 into an existing eDirectory environment, Deployment Manager will review the existing eDirectory schema and prepare it for the installation of eDirectory 8.7. For more information on the eDirectory schema, see Chapter 5. To review the current schema configuration on your network with Deployment Manager, complete the following steps: -
From the left pane of Deployment Manager, select Prepare for New eDirectory. -
Select Extend Core Schema in the right pane. -
Browse to the eDirectory tree you want to review and click Next. -
Select one of the servers from the list of servers with Read/Write partitions of the Root partition and click Next. The schema will be extended, as necessary, to support eDirectory 8.7 features and functionality. -
Click Exit to return to the Deployment Manager main menu. With the schema updates in place, you can be certain that NetWare 6.5 servers will be able to communicate effectively with the existing eDirectory servers on your network. Installing a New Server After you have gathered all the information you need and made the necessary decisions with regards to installation and configuration, you are ready to perform the NetWare 6.5 installation. This section explains how to install a new server. If you are upgrading from a previous version of NetWare or from a different network operating system, skip to "Upgrading an Existing Server to NetWare 6.5" later in this chapter. There are three main steps to the NetWare 6.5 installation: -
(Conditional) Configure a DOS partition -
Install startup files and create the SYS volume -
NetWare 6.5 Installation Wizard The first step is occasionally necessary to prepare the server for the installation process. The second step takes you through the hardware setup and creates the SYS volume on which the NetWare 6.5 system files will be stored. This portion of the installation is text-based and runs under DOS on the server. This is the "blue screen" installation for which NetWare has become famous over the years . Throughout this portion of the installation, you will be prompted to review the default configuration and to choose Modify or Continue at each screen. Choose Modify to make changes to the default values that the installation routine offers. Choose Continue to accept values and proceed with the installation. In some cases, you will need to press F10 to save your changes before continuing. The final step sets up the server's environment and switches to a graphical format called the NetWare 6.5 Installation Wizard. The Installation Wizard is a Java-based application that allows you to use a mouse during the rest of the installation. Configure a DOS Partition If your server hardware is capable of booting from a CD-ROM, the NetWare 6.5 bootable CD will kick you right into the server installation process. If, for some reason, this option does not work, complete the following steps to create a bootable partition: -
If there is an existing operating system, make sure that any data you want to save has been backed up, along with CONFIG.SYS, AUTOEXEC.BAT, and any device drivers. -
Boot the server with the NetWare 6.5 License/Cryptography disk. It is a bootable DR-DOS disk, and has all the utilities you need to set up the DOS partition. -
Load FDISK /X . From there you can delete any existing partitions on your server's hard disk(s). Then create a primary DOS partition of at least 1GB plus 1MB for each MB of RAM in your server. -
Reboot the server from floppy, and use FORMAT C: /S/X to format the partition you have created and transfer DR-DOS system files. -
Transfer the CONFIG.SYS, AUTOEXEC.BAT, and any required device drivers to your newly formatted C:\ drive. This should enable you to boot directly from the C: drive and access the CD-ROM as drive D: . With the bootable partition in place, you are ready to start the actual NetWare installation. Install Startup Files and Create SYS Volume Complete the following steps to install NetWare 6.5 startup files and create the SYS volume. If you boot directly from the NetWare 6.5 OS CD-ROM, you will see a few questions before the actual installation starts. There are default answers for each question, which will work for most situations: -
Default option: Install a new server. Alternatively, you can create a boot floppy for your server. -
Default option: Search for CD-ROM drivers. This will choose an appropriate CD-ROM driver automatically. Alternatively, you can select the type of CD-ROM driver (IDE or SCSI) and then select a specific driver. -
Default option: Switch A: and B: drives. This option seeks to ensure that drive letters are properly assigned once the initial boot sequence is finished. -
Default option: Execute INSTALL.BAT automatically. Alternatively, you can launch it manually if you want to specify some optional parameters. Typing INSTALL /? will show you a list of the available load parameters for the installation. Now you are ready to get into the installation proper. If you booted from a C:\ drive, simply execute INSTALL.BAT from the root of the NetWare 6.5 OS CD-ROM and continue with the installation routine. -
At the Languages screen, select the language in which you want the server installed and press Enter. -
At the Regional Settings screen, make your desired selections and click Continue. The Country, Code Page, and Keyboard settings ensure that NetWare correctly processes keyboard input and extended characters. -
Review the NetWare license agreement and the GNU General Public License (GPL), and press F10 to accept it. -
Review the JInfonet license agreement and press F10 to accept it. -
At the Installation Type screen, choose Default or Manual install and click Continue. If you choose the default install, you can skip ahead to the "NetWare 6.5 Installation Wizard" section, which follows . The default install detects drivers and installs the NetWare server with default settings and default software programs. The manual installation walks you through each step of the server installation and allows you to customize and explore your selections more closely. Default settings include the following: -
4GB SYS volume (with remaining disk space left as free space) -
LAN and disk drivers auto- discovered and loaded -
Country Code is 1 and Codepage is 437 -
Video mode: SVGA Plug N Play -
Keyboard: United States -
Mouse: Auto-discovered and loaded TIP If you want to automate the installation with a response file, press F3 and specify the path to the appropriate file. The NetWare 6.5 installation automatically creates a response file during any NetWare 6.5 installation and saves it to SYS:NI\DATA\RESPONSE.NI . By making minor modifications to this file, such as changing the server name or IP address, you can use the response file from one server to automatically create another with the same characteristics. For more information on using response files, see the NetWare 6.5 online documentation. -
At the Prepare Boot Partition screen, make your desired selections and click Continue. Here you can delete any pre-existing partitions in order to make more room for the NetWare partition. You can even delete the DOS partition and re-create one of another size. -
At the Server Settings screen, make your desired selections as follows, and click Continue. -
Server ID number: This is a random number for identifying the server on the network. It needs to be changed only if you are filtering addresses or if you have a pre-defined addressing scheme for your servers. -
Load server at reboot: Specify whether you want NetWare to restart automatically when the server is rebooted. This adds two lines to your AUTOEXEC.BAT to load SERVER.EXE from the NWSERVER folder. -
Server SET parameters: If your server devices, such as network or storage adapters, require any special load parameters, they can be entered here and stored in the STARTUP.NCF file, which is located in the NWSERVER directory on your DOS partition. -
Video: Specify the graphics mode for your monitor. The default plug-and-play option will typically work. At this point, the installation program copies startup files and drivers to the C:\NWSERVER folder on the DOS partition. -
At the Adapters screen, make your desired selections and click Continue. -
Platform Support Module and HotPlug Support Module: NetWare 6.5 will auto-detect whether you need Platform Support Modules (for improved multiprocessor support) or HotPlug Support Modules (for HotPlug PCI support). If nothing is listed here, you shouldn't need them. -
Storage adapters: NetWare 6.5 will auto-detect the appropriate Host Adapter Module (HAM) for your storage adapters. If it is not detected , you can choose the appropriate HAM from the drop-down menu or install one that has been supplied by the hardware vendor. -
In the Device screen, make your desired selections and click Continue. -
Storage Devices: NetWare 6.5 will auto-detect the appropriate Custom Device Module (CDM) for your attached storage devices (HDD, CD-ROM, and so on). If the CDM is not detected, you can choose the appropriate CDM from the drop-down menu or install one that has been supplied by the hardware vendor. -
Network Boards : NetWare 6.5 will auto-detect the appropriate driver for your network board. If it is not detected, you can choose the appropriate network board driver from the drop-down menu or install one that has been supplied by the hardware vendor. -
NetWare Loadable Modules: Some server and network configurations require you to load special NetWare Loadable Modules (NLM) before completing the server installation. One example is ROUTE.NLM , which is necessary for installing a server into a token ring network. -
At the NSS Management Utility (NSSMU.NLM), specify the size of your SYS: volume and select Create. -
At the NSS Management Utility main menu, click Continue Installation. From this menu, you can see the NSS statistics for your current storage configuration. At this point, the operating system CD is mounted, and the installation program mounts the SYS volume and copies all the necessary system files to it. Then the installation program launches the NetWare 6.5 Installation Wizarda graphical program that will take you through the rest of the installation. NetWare 6.5 Installation Wizard Continue with the following steps to set up the NetWare 6.5 server environment. The Choose a Pattern screen is new with NetWare 6.5. Patterned Deployment is the ability to automatically configure a NetWare server for a specific purpose and avoid additional setup and configuration that might be required for extraneous services that will never be used. Novell has included several patterns with NetWare 6.5. Clicking each pattern in the list opens a description of the purpose of each pattern. -
At the Choose a Pattern screen, select Customized NetWare Server and click Next. -
At the Components screen, select the optional NetWare components you want to install on your server, and click Next. Because of the number of optional products with NetWare 6.5, the specific installation steps for each will not be presented here, but will be provided as each product is introduced later in this book. NOTE The following required components are installed on every NetWare server, and so are not included in the optional components list: Novell eDirectory, Java Virtual Machine ( JVM ), Novell International Cryptographic Infrastructure ( NICI ), Storage Management Services ( SMS ), NetWare Remote Manager (NoRM), and Novell Certificate Server . -
At the Summary screen, review your component selections and click Copy Files. At this point, you will be required to insert the NetWare 6.5 Products CD-ROM in order to install NetWare 6.5 components and any additional products you have selected. -
Enter a name for this server and then click Next. -
At the Encryption screen make your desired selections and click Next. Insert the NetWare 6.5 License/Cryptography disk, or browse to the path where your NetWare Crypto License file (.NFK) is located. -
At the Protocols screen, make your desired selections and click Next. Highlight a listed network board and choose the protocols that will be bound to that board. You can choose IP, IPX, or both. If you choose IP, specify the server's IP address and subnet mask. You can also specify a default router/gateway. (Leave this field blank to have the server locate it automatically.) If you have multiple network boards installed, repeat this process for each board. Similarly, you can select the IPX frame type and specify appropriate network numbers if you are using the IPX protocol on your network. NOTE The Advanced button opens a page with four tabs: -
Protocols lets you configure your IPX frame types. -
IPX Compatibility lets you configure Compatibility Mode ( CM ) to permit legacy IPX applications to run on your IP network. -
SNMP lets you set some basic information that will accompany SNMP traps. -
SLP lets you define an SLP Directory Agent ( DA ) for your network, if one is defined. -
At the Domain Name Service screen, make your desired selections and click Next. If you are using DNS on your network, specify a hostname for the server, your organization's domain, and then enter the address(es) of the nearest DNS name servers. You can find more information on DNS/DHCP in Chapter 5. -
At the Time Zone screen, make your desired selections and click Next. Select the time zone in which the server will reside. If this time zone uses daylight saving time, make sure the daylight saving time box is checked. NOTE The Advanced button opens a page that lets you configure the server as a specific type of NetWare timeserver. Alternatively, you can choose to use NetWare Time Protocol ( NTP ) for managing time synchronization between servers. For more information on time synchronization and NTP , see Chapter 4 . -
At the eDirectory Installation screen, make your desired selections and click Next. Choose whether this server is being installed into a new eDirectory tree or an existing eDirectory tree. For a new tree, you will specify a tree name, server context, Admin object name, context, and password. For an existing tree, click the Browse button and select the container into which you want the server installed. You can click Add to create a new container, if desired. You will be required to log in as a user with administrative rights in order to complete this process. -
At the eDirectory Summary screen, click Next. -
At the Licenses screen, make your desired selections and click Next. Insert the NetWare 6.5 License/Cryptography disk, or specify the path to your NetWare license files (.NLF). You can also select the Install Without Licenses check box. This option allows you only two user connections to the server. Licenses can be installed after the server installation, if desired. More information on NetWare licensing is provided later in this chapter. -
At the License Certificate Context screen, make your selection and click Next. NetWare 6.5 uses a User licensing scheme that links a license unit directly to a user object so that users can log in from any workstation at any location without fear of not having a licensed connection available. License certificates should be installed at or above the users' context in the eDirectory so they are readily available. -
At the LDAP Configuration screen, make your desired selections and click Next. Default LDAP ports are port 389 for unencrypted communications and port 637 for encrypted communications. Uncheck the Require TLS for Simple Bind with Password check box if you want LDAP clients to be able to log in with unencrypted passwords. This option is not recommended if you believe there is any chance of on-the-wire packet snooping. -
At the Novell Modular Authentication Service (NMAS) screen, make your desired selections and click Next. You can choose among a variety of password and certificate-based authentication techniques available through NMAS. You can find more information on each of these authentication methods in Chapter 6. -
At the Installation Complete window, click Yes to restart your new NetWare 6.5 server. When the computer reboots, the server will automatically restart if you made this selection during the installation. Otherwise, change to the NWSERVER directory in DOS and run SERVER.EXE to start NetWare 6.5. Once the server is running, you will see a graphical screen within which NetWare utilities can be displayed. To bring up ConsoleOne, the primary NetWare management utility, select the Novell button at the bottom of the screen and select ConsoleOne. There are also icons at the bottom of the screen for the Server Console, Editor, File Browser, Console Log, and NetWare Remote Manager (NoRM). To toggle out of the graphical environment and access the various text-based server screens, press Alt+Esc. Upgrading an Existing Server There are multiple upgrade options with NetWare 6.5 depending on your current Network Operating System (NOS) and your goals for the upgrade. There are three types of upgrades available with NetWare 6.5: in-place upgrade, server consolidation, and server migration. Not every upgrade option is available for every NOS. Table 1.3 outlines the upgrade options and NOS versions with which they are compatible. Table 1.3. NetWare 6.5 Upgrade Options for Different NOS Versions | UPGRADE TYPE | SUPPORTED NOS | DESCRIPTION | | In-Place | NetWare 6.0 NetWare 5.1 | Traditional upgrade method in which the server is upgraded directly from the server console. | | Server Consolidation | NetWare 6, 5, and 4 Windows NT 4 | Uses the NetWare Server Consolidation Utility to transfer volumes, directories, users, printers, and printer agents from a source server to a previously installed NetWare 6.5 destination server. | | Server Migration | NetWare 5, 4, and 3 | Uses the NetWare Migration Wizard from a workstation to move server data from an existing source server to a new destination server. NetWare 6.5 must be previously installed on the destination server. | Windows NT The NetWare Server Consolidation Utility migrates NT domain users and local and global groups from a Windows NT v3.51 or v4 server to a destination eDirectory tree. During the migration, the NT users and groups are converted to eDirectory objects and placed in the destination eDirectory tree. Server consolidation also migrates NT shared folders to a NetWare file system while migrating and converting Windows NT permissions to NetWare trustee rights. NOTE There isn't a direct upgrade or migration path for Windows 2000 at this time.
NetWare 3.x The Migration Wizard copies the NetWare 3 file system and bindery objects to a destination Novell eDirectory tree. When the bindery objects are copied to the destination eDirectory tree, they are automatically converted to eDirectory objects. In-Place Upgrade This is the simplest and most straightforward way to upgrade to NetWare 6.5. The in-place upgrade is available only for the following versions of NetWare. NetWare support packs are available online at http://support.novell.com/filefinder/6385. The in-place upgrade will update the operating system, eDirectory, and additional NetWare components that have been installed on the server, such as Apache Web Server, Certificate Server, and so on. You should also review and complete the minimum requirements described in this section prior to performing the upgrade. The server hardware must meet the minimum requirements for NetWare 6.5 as described in the "Server Hardware Planning" section earlier in this chapter. The server to be upgraded should also be in good general health. To check the health of a server, you can use Deployment Manager: -
Launch Deployment Manager and select Prepare a Server for Upgrade in the left pane. -
Select Server Health Utility from the right pane. -
Browse to the server on which you want to run the health check and click Next. -
Log in as a user with Administrator rights and click OK. A series of tests will be run on the target server. -
At the Health Check Summary dialog, click Next to continue. This screen shows the results of the tests and will indicate any areas where your server might be lacking, or is in need of attention (see Figure 1.2). Figure 1.2. Deployment Manager server health check results. 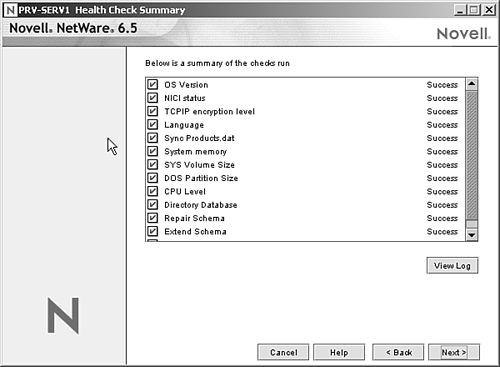 A few other odds and ends you should think about before the upgrade: -
NetWare maintains deleted files in a salvageable state. Make sure there are no deleted files you want to salvage prior to the upgrade. All deleted files will be purged as part of the upgrade. -
Make disk copies of LAN drivers, storage drivers, and the AUTOEXEC.NCF from the server's SYS volume. -
If you are running a NetWare cluster, you can also use Deployment Manager to prepare a cluster server for the upgrade to NetWare 6.5. For more information on NetWare clustering, see Chapter 11, "Multiprocessor Support and Clustering." NetWare 6.5 offers a remote upgrade option for the first time in NetWare. You can run a remote upgrade from either Deployment Manager or iManager 2.0. However, once the upgrade is started the process is the same, whether it is run remotely or not. No matter how you plan on performing the upgrade, remember that your existing NetWare server must have a DOS partition large enough to support NetWare 6.5. If your DOS partition is smaller than 1GB, you should create a new DOS partition and perform a new server installation as described previously, or consider a server migration, which will be discussed later in this chapter. In-Place Upgrade from the Server Console If you are doing the upgrade from the server console, complete the following steps: -
Insert the NetWare 6.5 Operating System CD-ROM into the server CD-ROM drive. -
From the system console (the server command line), mount the NetWare 6.5 CD-ROM as a NetWare volume by typing CDROM at the server console. You can then type VOLUMES to confirm that the CD-ROM has been mounted. -
Switch to the GUI console and choose Novell >> Install. This is a change from previous versions of NetWare where the upgrade was performed from the system console. -
At the Installed Products page, click Add. -
At the Source Path screen, browse to the root of the NetWare 6.5 CD-ROM. The volume name should be NW65OS: . You should see the PRODUCT.NI file in the right pane. Highlight PRODUCT.NI. -
Click OK to return to the Source Path screen and click OK to continue. From here, you will continue with the standard upgrade process. See the "Finishing the Upgrade" section that follows. In-Place Upgrade from Deployment Manager Deployment Manager now offers the ability to upgrade a server to NetWare 6.5 without ever visiting the console. To upgrade a server through Deployment Manager, complete the following steps: -
(Conditional) You can use a Windows 95/98 or Windows NT/2000/XP workstation to run Deployment Manager. Make sure the workstation has the latest Novell client installed, and that you are logged in as the Admin user to the eDirectory tree where the server to be upgraded is located. For more information on installing the Novell client, see Chapter 2. -
On your selected workstation, insert the NetWare 6.5 Operating System CD-ROM. Launch NWDEPLOY.EXE from the root of the CD to start Deployment Manager. -
Select Upgrade to NetWare 6.5 in the left pane. -
Select Upgrade a Server Remotely in the right pane. From here, you continue with the standard upgrade process. See the "Finishing the Upgrade" section that follows. In-Place Upgrade from iManager 2.0 Novell iManager was introduced with NetWare 6 as a Web-based administration tool. Novell has steadily expanded its feature set since the release of NetWare 6 to make it ever more complete. For information on installing and configuring iManager, see Chapter 3. To upgrade a server through iManager, complete the following steps: -
Launch iManager and select Install and Upgrade in the left pane. -
Select Upgrade to NetWare 6.5. -
Select Upgrade a Server Remotely in the right pane. -
Browse to the root of the NetWare 6.5 Operating System CD-ROM and click OK. From here you continue with the standard upgrade process. See "Finishing the Upgrade." Finishing the Upgrade By moving the upgrade routine to the Java-based GUI, Novell has made both remote and console-based upgrades largely identical. There is ever less reason to visit your server directly because the Java tools now let you do most anything remotely from any workstation with a network connection. To complete the in-place upgrade, complete the following steps: -
Review the NetWare license agreement and the GNU General Public License (GPL), and click I Accept. -
Review the JInfonet license agreement and click I Accept. -
(ConditionalRemote Upgrade) At the Target Server screen, specify or browse to the name of the server you want to upgrade. You will be asked to confirm authentication to the target server before proceeding. -
At the Backup Server Files screen, make your selections and click Next. You can choose to back up your existing server files, and restart the server automatically when the upgrade is finished. -
At the Components screen, make your selections and click Next. Check all those components you want to install and/or upgrade during the server upgrade. By default, iManager 2.0 is selected, which requires Apache Web Server, so it is best to select Apache Web Server and iManager at the minimum. -
At the Summary screen, review your selections and click Copy Files. The NetWare 6.5 upgrade process will now copy the new server files. During remote upgrades, the server will reboot and go through an automated upgrade process. Once completed, Deployment Manager will reconnect to the server. NOTE If you are performing a remote upgrade, remember that all the installation files will be moving across the network. The data transfer will slow things down significantly. -
When prompted, log in as the Admin user to complete the eDirectory installation. -
At the eDirectory Summary screen, review the eDirectory information and click Next. -
At the Licenses screen, make your desired selections and click Next. Insert the NetWare 6.5 License/Cryptography disk, or specify the path to your NetWare license files (.NLF). You can also select the Install Without Licenses check box. This option allows you only two user connections to the server. Licenses can be installed after the server installation, if desired. More information on NetWare licensing is provided later in this chapter. -
At the License Certificate Context screen, make your selection and click Next. NetWare 6.5 uses a user licensing scheme that links a license unit directly to a User object so users can log in from any workstation at any location without fear of not having a licensed connection available. License certificates should be installed at or above the users' context in the eDirectory so they are readily available. -
At the Novell Modular Authentication Service (NMAS) screen, make your desired selections and click Next. You can choose among a variety of password and certificate-based authentication techniques available through NMAS. You can find more information on each of these authentication methods in Chapter 6. -
At the Installation Complete window, click Yes to restart your new NetWare 6.5 server. When the computer reboots, the server will automatically restart if you made this selection during the installation. Otherwise, change to the NWSERVER directory in DOS and run SERVER.EXE to start NetWare 6.5. The NetWare 6.5 installation is now complete. The new server will start participating in eDirectory activities immediately. You can start configuring the server for the specific purposes that you might have in mind. Server Consolidation Utility With the changes in server hardware over the last years, lots of RAM, and huge drive arrays and network-attached storage (NAS) options, the Server Consolidation Utility 2.5 (SCU) lets you consolidate data from redundant servers into a smaller number of more easily managed NetWare 6.5 servers. Originally released following NetWare 6.0, the latest SCU lets you copy entire volumes and/or specific directories from NetWare 4, 5, 6, or Windows NT source servers to NetWare 5.1 or later destination servers. The accompanying rights, trustees, ownership, namespace information, and even printers and printer agents can be copied along with the files to the destination server. For many consolidation operations, the servers can even be in different eDirectory trees. Installing the Server Consolidation Utility SCU requires a Windows workstation with the following characteristics: -
The SCU workstation should be a Windows NT 4, Windows 2000 (support pack 2 or later), or Windows XP Professional workstation with at least 50MB available disk space. -
Install the Novell client that ships with NetWare 6.5 or run a minimum of Novell client for Windows NT/2000 version 4.83 or later. You will need supervisor rights to both the source and destination servers. -
Microsoft Data Access Components (MDAC) 2.7 or later installed on the workstation. For information on MDAC, and to install the latest version of MDAC, see http://msdn.microsoft.com/library/default.asp?url=/downloads/list/dataaccess.asp. -
If the source server is running NetWare 4.x, configure the Novell client for IPX or IPX and the IP protocols. -
For best performance, the source server, destination server, and client workstation should be located on a common network segment. Once the workstation prerequisites have been met, you can complete the SCU installation. SCU files are located on the NetWare 6.5 Operating System CD-ROM, in the \PRODUCTS\SERVCONS directory. To complete the installation, follow these steps: -
Launch the SCU installation by executing NWSC.EXE. -
At the Choose Setup Language screen, specify the language for the utility installation and click OK. -
At the Welcome screen, click Next. -
At the License Agreement screen, click Yes. -
At the Choose Destination Location screen, specify the path into which you want to install SCU. The default location is C:\Program Files\Novell Server Consolidation Utility\ . -
At the Setup Complete screen, click Finish. Check the box next to Yes, I Would Like to Run Server Consolidation Utility Now to use SCU immediately. With the SCU installed, you can now perform server consolidations in your network. This is described in the following section. Using Server Consolidation Utility Before starting the actual consolidation process, make sure your servers are prepared for the consolidation by reviewing the following checklist: -
The destination server must be running NetWare 5.1 or later. -
The source server must be running NetWare 4.1 or later, or Windows NT. -
Make sure that the latest support packs are installed on both the source and destination servers. -
(Conditional) If you are migrating data from NetWare 4, make sure the source server's volumes are running long namespace support on all volumes to be copied. To add long namespace support to a NetWare 4.11 or NetWare 4.2 volume, enter the following at the server console: LOAD LONG and then ADD NAME SPACE LONG TO volumename . -
Have a current backup of eDirectory files from both source and destination eDirectory trees, if applicable . -
Both the source and destination servers must be using the same code page in order to avoid data corruption. If the code pages do not match, Novell only recommends converting an English code page server to a non-English code page. Converting from non-English to English, or from non-English to another non-English, can cause file corruption. For information on converting an English server to a non-English code page, see the NetWare 6.5 online documentation. -
(Conditional) If there are compressed files on the source server, set Convert Compressed to Uncompressed=0. This will prevent the files from decompressing because of the consolidation process. -
Make sure that the latest SMDR.NLM and TSA.NLM files are loaded on the source and destination server. -
(Conditional) If you are consolidating from a NetWare 4 source server, make sure the source and destination servers can communicate via IPX. To do this, use the IPXPING utility from the console of both source and destination server to ping the internal IPX number of the other server. There are also some general consolidation issues that you should consider as you plan your server consolidation: -
Open files cannot be copied. However, if you are copying from an NSS volume, you can enable File Copy on Write, which permits an open file to be accessed in the same state as it was in when it was last closed by all processes. You can set this volume attribute from ConsoleOne or from the server console by typing NSS /filecopyonwritesnapshot=< volume name > . -
If a failover occurs on a NetWare cluster involved in a server consolidation, SCU will stop. The server consolidation will have to be repeated. -
NDPS printer agents can be moved as part of a server consolidation, but only within the same eDirectory tree. Print queues cannot be moved. Printer agents that are moved still use the same print broker. -
Print Services Managers must be operational during the server consolidation. After moving the printer agents, unload the Print Services Manager on the source server so that the migrated printer agents can establish a connection to the destination Print Services Manager. Once these pre-conditions are met, use the SCU to perform a server consolidation. You can consolidate from NDS/eDirectory or from a Windows NT domain. The following describes the process for consolidating a NetWare server to NetWare 6.5. For other consolidation options, see the NetWare 6.5 online documentation. Consolidation from NDS/eDirectory An SCU project file records your consolidation plan. The details of the consolidation are recorded, letting you run them immediately or save them to run at a later time. To create an SCU project, complete the following steps: -
Launch SCU. Once installed, it is available in Windows by selecting Start >> Program Files >> Novell Server Consolidation Utility. The executable file is FC.EXE. You can also launch SCU from Deployment Manager by selecting Consolidate Servers in the left pane, and then selecting Run the Server Consolidation Utility from the right pane. -
Click OK at the opening splash screen. At the Startup screen, choose Create a New Project and click OK. -
At the Project Type screen, make your selection and click OK. For a consolidation from a NetWare server, choose NetWare NDS/eDir Tree; for a Windows NT consolidation, choose Microsoft Windows Domain. -
At the Setup Tasks screen, click Next. -
Choose a name and location for the project file, and click Next. -
Choose the source and destination tree for the consolidation and click Next. You must be logged in to a tree to see it in the drop-down list. If necessary you can authenticate to the desired trees by selecting the Login button. -
Click Create to finish creating the project file. Once the new project file has been created, you will be taken to the project window (see Figure 1.3). From this window, you model the consolidation as you want it to take place. You select the volumes, directories, and printer objects to move, and drag them to the desired location in the new tree. The source tree is shown in the left pane, and the destination tree is shown in the right pane. Drag objects from the left pane to the right pane. -
Click Do the Consolidation once you have modeled the consolidation in the project window. There are several conventions you should be aware of as you model the server consolidation in the project window. At any time you can save your project, in progress, by selecting File >> Save As. -
When moving Volume objects, a Volume Drop Options dialog box will ask you to either migrate the volume contents into the directory or volume that you selected or create a new directory with the name of the volume that is being moved. Select the option you want and click OK. -
Once you have dropped a volume or directory to a location in the destination tree, you cannot drag it to a new location. Rather, highlight the volume or directory and click Back Out on the button bar. This will remove the volume or directory from the destination tree and allow you to re-insert it into the correct location. -
To create a new container or folder in the destination tree as part of your consolidation process, highlight the parent container or folder in the right pane, and click New Folder on the button bar. -
To rename a newly created container or folder, highlight the parent container or folder in the right pane and select Edit >> Rename. -
To determine the new location of an object from the source tree, highlight the object in the left pane and choose Edit >> Where Did It Go. The location of the object in the destination tree will be highlighted in the right pane. -
To determine the original location of an object in the destination tree, highlight the object in the right pane, and choose Edit >> Where Did It Come From. The location of the object in the source tree will be highlighted in the left pane. -
To see all objects currently dropped into the destination tree, choose a container in the left pane, and choose Edit >> Show Dropped Folders. Choose Show Dropped Printers to see printer objects that have been dropped into the destination tree. Figure 1.3. The Server Consolidation Utility project window. 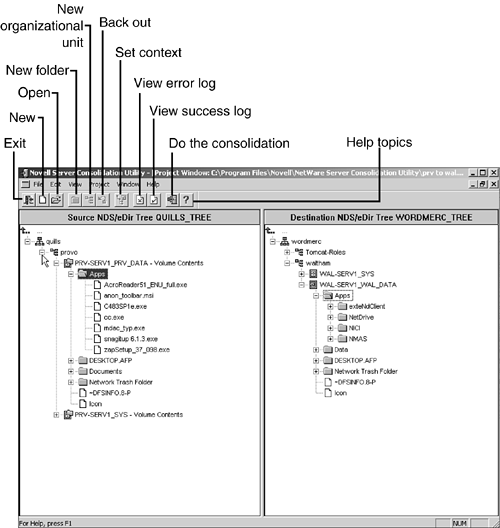 This completes the creation of the SCU project. Following project creation you will go through a project verification process, which is discussed in the next section. Project Verification Once the SCU project has been created, SCU will launch the Verification Wizard: -
Click Next to begin the verification process. -
At the Dropped Folders screen, review the source and destination paths and click Next. If any of the listed information is incorrect, cancel the verification and return to the project window to make the necessary changes. -
(Conditional) At the Create Folders screen, review the new folders you have created as part of your consolidation project and click Next. If any of the listed information is incorrect, cancel the verification and return to the project window to make the necessary changes. -
At the Duplicate File Resolution screen, make your selections and click Next. If the name of a source file is identical to an existing file in the destination volume or directory, you have three options to resolve the conflict: -
Don't copy over existing files: The source file will not be copied, thereby keeping the existing destination file. -
Copy the source file if it is newer : The source file will be copied over the destination file only if it is newer than the existing destination file. -
Always copy the source file: The source file will always be copied over the destination file. -
At the Synchronize Files and Folders screen, make your selections and click Next. Select Yes if you want to delete all files and folders on the destination server that do not exist on the source server. The default option is No. -
At the File Date Filters screen, make your selections and click Next (see Figure 1.4). Choose No to disable any file filter based on file date. If you want to filter the file copy based on file date, choose Yes and provide the following information: -
Attribute: You can filter files based on the Accessed, Modified, and Created file attributes. -
Attribute Dates: For each attribute, specify the appropriate dates to define how filtering will be done. The On or After date specifies that only files with an attribute date equal to or later than the date specified will be copied. The On or Before date specified that only files with an attribute date equal or prior to the date specified will be copied. Setting both dates will define a date range, and only files with attribute dates between the two dates will be copied. Figure 1.4. File date filters in the Server Consolidation Utility. 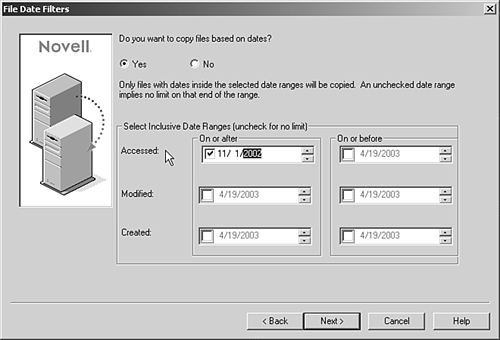 NOTE To make the date range work, the On or After date must be set to a date prior to the On or Before date. -
At the Check for Trustees and Ownerships screen, make your selections and click Next. If the source and destination servers are in different trees, browse to the container you want to search. Check Search All Subordinate Containers to include all containers below the container selected. This process will review trustee rights and file ownership information for the objects that have been dropped into the destination tree, and update them as necessary based on their new location in the destination tree. -
At the Password Verification screen, enter the passwords for the source and destination trees and click Next. -
Click Next to begin the verification process. Before beginning to consolidate your data, you have the option of verifying that the destination server has enough disk space to accommodate the data from the source server. To do this, click Check for Sufficient Disk Space. This process can take some time if there is a lot of data being transferred from the source server. NOTE Click Yes to any messages notifying you that an updated TSA. NLM must be copied for the consolidation to work (see Figure 1.5). Selecting No will stop the consolidation. Figure 1.5. Sample TSA update message during the SCU verification. 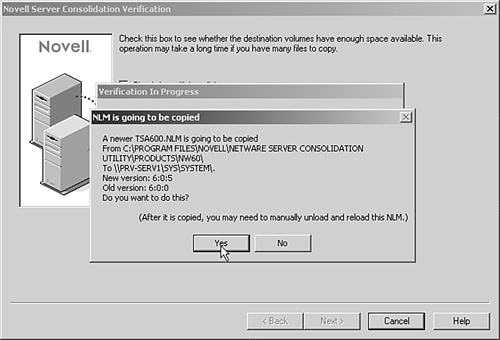 -
(Conditional) At the Tree-to-Tree Object Match Up screen, reconcile how SCU should insert the source tree objects into the destination tree and click Next. To complete this process, do the following: -
Select the type of objects to display from the drop-down list provided. -
Highlight the object(s) you want to match from source tree to destination tree. Use the Ctrl and Shift keys to select multiple objects from the list. If you selected more than one user, right-click the users and then choose Create All Selected Users. -
Select the Yes radio button to create new User objects for all selected users. You can browse to the container in the destination tree in which you want to create the selected users. -
Click OK to continue. -
(Conditional) At the Destination Object drop-down, select one of the four following options for placing the new objects from the source tree into the destination tree: -
Same Name: Select this option if the matching object in source tree with an object in the destination tree that has the same name. -
Don't Match: Select this option if no matching object exists in the destination tree. -
Browse: Select this option to locate and select a matching object from the destination tree. -
Create: Select this option to specify a container in the destination tree in which a matching user, with a different name from that of the source tree user, will be created. You will be asked to specify the new name. -
(Conditional) At the Unmatched Objects screen, click Yes to proceed without matching objects or click No to go back and finish the object-matching process. -
At the Error Resolution screen, click Next to continue the consolidation. If there are any errors during the verification process, they will be listed in the Error Resolution window, along with a possible resolution to the problem. Errors might include name conflicts, insufficient rights, files that need to be updated, required namespaces not loaded, or insufficient disk space. Verification errors fall into two categories: -
Errors must be resolved before files can be copied. You need to take some action to resolve the problem before continuing with the consolidation. -
Errors should be resolved but might not affect the copy process. The project is now completely defined and you are ready to perform the actual server consolidation, which is described in the next section. Performing the Consolidation Once the consolidation project has been configured, you can either execute it immediately or schedule it for a delayed start some time down the road. At the Start Novell Server Consolidation Utility screen, click Proceed to perform the consolidation immediately. During the consolidation, folders and objects are created, files are copied, and printer agents are moved to their destination as specified by the project plan you have just created. When the copy process is complete, the Process Finished screen lets you view the error log, view the success log, and close the consolidation process. NOTE If you interrupt the copy process before it completes, all changes made to the destination tree will remain . Removing the new objects will require you to delete them manually.
Alternatively, you can use the Windows Scheduled Tasks feature to delay the consolidation to a time that is appropriate. This lets you plan and test a consolidation project during the day, and then schedule it to run during off hours to limit the effect on your production network. To schedule a project to run at a later time, take note of the project name and location, and then complete the following steps: -
Launch the Task Scheduler in Windows by selecting Start >> Settings >> Control Panel. -
Select Scheduled Tasks and then select Add Scheduled Task to launch the scheduler. -
At the Scheduled Task Wizard screen, click Next. -
From the list of programs provided, select Novell Server Consolidation Utility and click Next. -
Specify a name for the scheduled task and select One Time Only as the task frequency, and then click Next. -
Specify the start time and date for the scheduled task, and click Next. -
Specify the Windows username and password of the Admin user who will perform the task, and click Next. -
Verify the scheduled task settings, and check Open Advanced Properties for This Task When I Click Finish, and then click Finish. -
From the Advanced Properties screen, select the Task tab. -
Add the following four parameters to the end of the pathname in the Run field, and click OK. Separate each parameter from another by a single space: -
Location and name of project file: Specify the complete path to the SCU project file you have just created. -
Y: Indicates that the specified SCU project should be run automatically. -
Password for source server: Enter the Admin password for the source server. -
Password for destination server: Enter the Admin password for the destination server. The completed Run field should resemble this: c:\program files\novellserver consolidation utility\fc.exe "c:\my documents\Prv_to_Wal.mdb" y novell novell -
Enter the Windows username and password of the Admin running the project once again and click OK. The scheduled task is now ready to run at the time and date you have specified. Server Migration Introduced originally with NetWare 6.0, the Migration Wizard lets you migrate a server's file system and all network data, such as NDS or eDirectory databases, and NetWare 3.x Bindery databases from a source server to a new NetWare 6.5 destination server. With the introduction of the Server Consolidation Utility, which replaces the Migration Wizard in most cases, the primary value of the Migration Wizard is in migrating those few remaining NetWare 3 servers you might have. However, it remains possible to migrate NetWare 3, 4, or 5 servers to a new NetWare 6.5 server with the Migration Wizard. NOTE The Migration Wizard does not support moving NetWare 6.0 servers to NetWare 6.5. Use the Server Consolidation Utility or an in-place upgrade for NetWare 6.0 servers.
There are several steps to the server migration process: -
Prepare the Migration Wizard workstation -
Prepare the destination server -
Prepare the source server -
Copy files and data from the source server to the destination server -
Transfer all network data from the source server to the destination server and convert to eDirectory format -
Bring down the source server and allow the destination server to insert itself into the network and take over the operations of the source server Complete the tasks described in the following sections to prepare for the server migration. Install NetWare Migration Wizard Migration Wizard requires a Windows workstation with the following characteristics: -
Windows 98, Windows NT 4, or Windows 2000/XP with at least 50MB available disk space. -
Install the Novell client that ships with NetWare 6.5 or run a minimum of Novell client v3.3 for Windows 98, or Novell client for Windows NT/2000/XP version 4.8 or later. -
If the source server is running NetWare 4.x, configure the Novell client for IPX or IPX and IP protocols. -
For best performance, the source server, destination server, and client workstation should be located on a common network segment. To install the Migration Wizard software, insert the NetWare 6.5 Operating System CD-ROM into your workstation CD-ROM and complete the following steps: -
Browse to PRODUCTS\MIGRTWZD and run MIGRTWZD.EXE. You can also launch the Migration Wizard software from Deployment Manager by selecting Migrate to New Hardware in the left pane, and then selecting Run the Migration Wizard in the right pane. -
Choose the setup language and click OK. -
At the Welcome screen, click Next. -
At the Software License Agreement screen, click Yes. -
At the Choose Destination Location screen, click Next. Browse to an alternative installation location if desired. The default is C:\PROGRAM FILES\NOVELL\NETWARE MIGRATION WIZARD . -
At the Setup Complete screen, click Finish to close the Migration Wizard installation. Once Migration Wizard has been installed on your workstation, you are ready to set up a server migration. This is described in the following sections. Prepare the Destination Server The destination server is the new server hardware that will receive the data from the source server. This server must be installed into a temporary tree. After data is migrated from the source server to the destination server, Migration Wizard automatically modifies the destination server's AUTOEXEC.NCF file to include the source server's name and internal IPX number/server ID. Then, when the destination server reboots, it takes the place of the source server in the network. To do this, you first prepare the server hardware and install NetWare 6.5 on the new server. To do this, follow the steps given previously in "Getting Ready for NetWare 6.5" and "Installing a New Server." To make sure the destination server is ready for the migration process, complete the following tasks: -
Select the Pre-migration Server pattern in the NetWare Installation Wizard. NOTE When you install a NetWare 6.5 server as a pre-migration server, it does not configure the core management services as it does during a regular NetWare 6.5 installation. Make sure you install the following services after the installation is complete: iManager, iMonitor, NetWare Remote Manager, and Novell Modular Authentication Services ( NMAS ). -
Make sure the destination server is installed into a temporary eDirectory tree with a different server name from that of the source server. If this is not done, the destination server will not assume the identity of the source server after the migration. -
Create volumes on the destination server that are the same size as, or larger than, volumes on the source server. Volume names on the destination server must be the same as the volume names on the source server. -
Migration Wizard migrates compressed volumes. If you are migrating compressed volumes to uncompressed volumes, Migration Wizard decompresses the volumes during the migration. Make sure you have enough room on the uncompressed volume(s) of the destination server to accommodate the source volumes once they are decompressed. -
(Conditional) If migrating from NetWare 3 or NetWare 4, install and configure the IPX protocol on the destination server. If desired, you can remove IPX after completing the migration. -
(Conditional) If you are migrating from NetWare 3, determine whether you want to use a Template object to migrate your users to the destination eDirectory tree. A Template object is used to define additional eDirectory user attributes for bindery or domain users during the migration. Template objects are especially useful for defining additional attributes that are not found in the binderies or domains. NOTE In order to migrate home directories, you must use a Template object. If there is a conflict between the properties of a Template object and legacy user properties or policy settings, the properties of the Template object will, in most cases, take priority. The last name, full name, and description of every Legacy object is always migrated and these corresponding properties from the Template object are overwritten. If you decide to use a Template object, you can create one in ConsoleOne by choosing File >> New >> Object >> Template. IP addresses for the source server will not be migrated.
Once the destination server is installed and configured in a temporary eDirectory tree, it is prepared to receive the data from the source server. Prepare the NetWare 3.x Source Server The source server contains the files, volumes, and network data and objects that will be migrated to the new NetWare 6.5 server. To make sure the source server is ready for the migration process, complete the tasks described in the following sections. Because much of this can be done from the Server Consolidation Utility, discussed previously, only the NetWare 3 migration steps are covered here. For information on using Migration Wizard with other versions of NetWare, see the NetWare 6.5 online documentation. Complete the following tasks to prepare your NetWare 3.x servers for migration to NetWare 6.5: -
Ensure that the source server is running NetWare 3.11 or later. -
Update the source server with its latest appropriate support pack or system file updates. NetWare support packs are available online at support.novell.com/filefinder/6385. -
Load one of the following NLM programs at the server console of each NetWare 3 source server that you are planning to migrate: -
NetWare 3.11: load TSA311.nlm -
NetWare 3.12 and 3.2: load TSA312.nlm -
Use your preferred data archive utility to back up all bindery and server data on the source server so that you can recover should a problem occur during the migration. -
Verify that you are authenticated as a user with Console Operator rights to the NetWare 3.x server. Migrating a NetWare 3.x Server with Migration Wizard Once the migration workstation, destination server, and source server are prepared, you are ready to start the actual migration process. This process varies, as described in the following sections, with the type of source server with which you are working. NOTE Migration Wizard should be used only during network off hours due to the bandwidth it consumes during the actual data migration.
Run Migration Wizard from the location where you installed itby default: Start >> Programs >> Novell >> NetWare Migration Wizard >> NetWare Migration Wizardand then complete the following steps: -
Select Create a New Project and then OK. -
Select NetWare 3 and click OK. -
Enter a name for the project and specify a place to save it, and then click Next. By default, Migration Wizard saves all projects to C:\Program Files\Novell\NetWare Migration Wizard . -
Select the source server, or servers, from the list of available NetWare 3 servers and click Next. -
Select the eDirectory tree into which the NetWare 3 bindery objects will be installed and click Next. -
Have Migration Wizard find any NetWare 3 and eDirectory User objects that have the same name by selecting Yes, and then Next. During the migration, Migration Wizard will look for duplicate usernames in the destination eDirectory tree and on the NetWare 3 source server. Migration Wizard will then display its findings and you can determine whether to merge the matching usernames. -
To save your project and access the project window, click Create. Migration Wizard will create success and error logs to document the migration process. You can view these logs at the end of the migration process. -
To initiate the object comparison, browse the tree, select an eDirectory container, and then click OK. Migration Wizard will search this container and all subordinate containers for matching eDirectory usernames. -
To continue the object comparison, click Next to begin searching for duplicate usernames. -
Determine how you want to handle each of the matching usernames and click Finish. You have the following three merge options for each duplicate NetWare 3 user. If no selection is made, Migration Wizard will automatically merge the NetWare 3 user with the displayed eDirectory user. -
Merge the NetWare 3 user with the displayed eDirectory user: To select this option, do nothing. -
Merge with an eDirectory user other than that currently displayed: Select the arrow by the eDirectory username to view a drop-down list containing all the eDirectory users who have the same username (including context) as the adjacent NetWare 3 user. Select one of the eDirectory names and continue with the next NetWare 3 user. -
Do not merge the NetWare 3 user with any eDirectory user: If you know that none of the listed eDirectory users represents the same person as the adjacent NetWare 3 user, click the arrow by the eDirectory username and then click Don't Merge. -
The Project window now appears. Review the three steps in the Using the Project Window screen and click Close. NOTE The NetWare 3 users who you chose to merge with eDirectory User objects appear automatically in the destination eDirectory tree. Here you can plan the migration process prior to actually performing it. All object modeling is done offline, meaning that none of the changes actually take place until the migration project is actually run. -
Use the project window to plan the migration, as follows. The source server's objects and data are shown in the left side of the project window, and the destination eDirectory tree is displayed in the right side. -
Determine which NetWare 3 bindery objects and volume data will be copied to which containers in the destination server's eDirectory tree. -
Create new containers and folders, as needed, for the NetWare 3 bindery objects in the eDirectory tree. -
Drag and drop NetWare 3 bindery objects, folders, and volumes into eDirectory containers. -
From the Migration Wizard toolbar, choose Project >> Verify and Migrate Project. The verification will review the proposed locations for the new NetWare 3 objects to make sure they do not conflict with existing names in the destination eDirectory tree. NOTE You might be notified during the verification that certain NLM files are outdated on your NetWare 3 source server. Those files must be updated. The proper versions of these NLMs are supplied with Migration Wizard. They are available in the Products\NW3X directory that the Migration Wizard installation routine creates. By default, this is C:\PROGRAM FILES\NOVELL\NETWARE MIGRATION WIZARD\Products\NW3X . Copy only the NLM files that Migration Wizard prompts you to. After copying the NLM files, reboot the NetWare 3 source server and re-launch Migration Wizard. -
Read the Welcome screen and click Next. -
(Conditional) If you are migrating more than one server, choose the order that you want your servers migrated in and click Next. This matters only if you have duplicate User objects among your source servers. -
If prompted, specify the volume to which you want to migrate your NetWare 3 print queue and click Next. -
(Conditional) If you want to apply a Template object to newly created users, browse the tree, select the Template object from the tree view, and then click Next. Home directories are not automatically migrated. To migrate them, you must drag and drop the NetWare 3 directory that lists the home directories into the destination eDirectory tree. Then use a Template object when migrating your NetWare 3 users to the destination eDirectory tree and make sure that the specified home directory path in the Template object points to the location where you dropped the NetWare 3 directory in the destination eDirectory tree. NOTE If you have not created a Template object but you want to use one now, save the project and exit Migration Wizard. Use ConsoleOne to create the Template object, and then restart Migration Wizard and select Open Last Project. Pick up the migration project starting with Step 12. -
Choose an option for handling duplicate files between the NetWare 3 source server(s) and the destination eDirectory tree and click Next. You have three options: -
Don't copy over existing files -
Copy the source file if it is newer -
Always copy the source file -
If you are migrating this NetWare 3 server for the first time, click Yes and then Next. If you are continuing with a previous migration, click No and then Next. NOTE When you migrate users and groups from NetWare 3, Migration Wizard stores a table in the bindery of each source server of the eDirectory names that it associates with the migrated NetWare 3 users as they are migrated to the destination eDirectory tree. This way, you can migrate NetWare 3 objects in phases and Migration Wizard will remember where they were migrated. This also lets Migration Wizard assign the correct file permissions to the appropriate users. -
Enter the password for the destination eDirectory tree and click Next. -
Enter the password for the source server that you are migrating and click Next. If you are migrating multiple servers at one time, you will see this screen for every source server that you migrate. -
Verify that you have enough disk space on the destination volume to accommodate the NetWare 3 file system and click Next. Migration Wizard will also scan the contents of all dropped folders and verify that you have sufficient rights to migrate them. -
(Conditional) Resolve any naming conflicts between objects of different types and click Next. You can choose to rename them or not migrate them. If you are migrating multiple servers at one time, you will see this screen for every source server that you are migrating. -
(Conditional) Resolve any naming conflicts between objects of the same type and click Next. You can choose to merge them or not migrate them. If you are migrating multiple servers at one time, you will see this screen for every source server that you are migrating. -
Verify that you do not want to migrate the NetWare 3 users listed, and click Next. You will see this screen for every source server that you are not migrating. If you see users who should be migrated, click Cancel to return to the project window and drag and drop those users who should be migrated. -
Verify that you do not want to migrate the NetWare 3 groups listed, and click Next. You will see this screen for every source server that you are not migrating. If you see groups that should be migrated, click Cancel to return to the project window and drag and drop those groups who should be migrated. -
Resolve any critical errors and click Next. Warnings, or non-critical errors, can be resolved after the migration. To resolve a critical error or warning, read the description in the text field located beneath it. This description should give you a good idea of what could be the possible cause of the error and a suggestion for fixing it. -
Read the verification summary and click Proceed to start the actual migration. -
View the error log and the success log. This completes the NetWare 3 migration process. Complete the following post-migration tasks to make sure the new server is ready to function in your NetWare 6.5 environment: -
Modify the print configuration if you want to convert your queue-based printing to NDPS. For more information on converting from queue-based printing to NDPS, see Chapter 7. -
Confirm that all migrated applications are functioning properly. -
Install any additional NetWare 6.5 products and services. This can be done from the server console by choosing Novell >> Install from the graphical management interface, or remotely from a workstation using Deployment Manager. -
Confirm that each migrated user has the correct Novell client properties so that they can successfully log in to the destination eDirectory tree. -
Modify user login scripts as needed to accommodate the new data location in the eDirectory tree. For more information on login scripts, see Appendix B. -
Reassign home directories if they were not migrated. As you can see, this is not a simple process. However, the Migration Wizard is a powerful tool for bringing legacy servers into the 21st century. Given the powerful tools and features in NetWare 6.5, it really doesn't make sense to hang on to legacy servers and forego the many advantages now available through NetWare 6.5 products and services. Novell Licensing Services NetWare 6.5 continues to use the User Access License (UAL) model introduced with NetWare 6.0. In this model, users gain access to network services by connecting to the network instead of a specific server. The eDirectory User object for each user on the network receives a license unit, reserved for their User object, which provides them access to network services at any time and from any network workstation, regardless of location. The UAL model replaces the Server Connection License model used with NetWare 5 and previous versions of NetWare. The UAL model is much easier to manage because you no longer have to track connections on individual servers, just connections to the network as a whole. There are three main components to NLS: -
License Service Provider (LSP): This is the licensing software that runs on NetWare 6.5 servers. When you install NetWare 6.5 and its license certificates, the LSP software is copied to the server and an LSP object is created in the eDirectory tree. An LSP provides the actual licensing service. It handles requests from NLS clients and maintains the license certificates, which are stored in eDirectory. TIP Any eDirectory partition that will contain License Certificate objects should have at least one of its replicas stored on a server operating as an LSP .
-
NLS client: This is software that requests licensing services from an LSP. The NLS client will locate and communicate with LSPs as needed to request license information on behalf of NLS-enabled applications. NLS clients are used on both client workstations and NetWare servers. Nothing needs to be done to load an NLS client. The necessary components are installed with the Novell client for workstations and as part of the NetWare installation for servers. -
NLS eDirectory objects: There are two main licensing objects used by NLS, in addition to the LSP object: -
License Certificate object: When an NLS license is installed, a License Certificate object is created that corresponds to the printed license statement that is typically included in the packaging for software products. The name of the License Certificate object typically corresponds to a serial number or name specified by the software vendor. -
License Container object: The License Container object is a special container object in eDirectory that is used to store License Certificate objects. When you install a license certificate, NLS creates a new License Container object unless a license container already exists. Each license container holds one or more license certificates. License Container objects are named using publisher, product, and version. NLS requests are handled through the following process: -
An application, either from a server or a workstation, issues a request to the NLS client. -
The NLS client library packages the request from the application and submits it to an LSP. -
The LSP examines the request and determines whether it can fill the request. It does this by checking the eDirectory context of the requesting client for the specific information or license unit being requested . -
If the requested resource is available, the LSP fills the request. If the LSP cannot fill the request, it searches for a resource. The LSP will start searching in its current container and then work its way upward in the tree. -
Once the search is complete, the LSP returns a license status (such as available/not available) to the client library. The library subsequently returns the status to the application. -
The application determines action based upon the status of license units. When you install or upgrade to NetWare 6.5, NLS is automatically installed. Actual license certificates can be installed either during the installation or post-installation. NetWare 6.5 uses iManager to install and manage license certificates. You can't do it from ConsoleOne. License certificates enable users to access network resources, including NetWare servers and NLS-enabled applications and services. For more information on iManager, see Chapter 3. Installing NLS NLS is installed automatically with NetWare 6.5. To verify that NLS was installed and is running properly, check the following: -
At the server console GUI, choose Novell >> Install, and then look for an Novell Licensing Services entry. -
Check that NLSLSP.NLM is running on the server. To do this you can type MODULES NLS* at the server console or through RConsoleJ. -
Check to see whether there is an LSP object installed in the container where the server is installed. It will have the name NLS_LSP_ servername . Managing NLS Licenses Novell typically distributes licenses in an envelope, which is a file with the extension .NLF (Novell License File). The envelope contains one or more license certificates. Envelopes allow you to install more than one license certificate at a time into License Container objects. For example, if you have purchased three products in a suite, you can use an envelope to simultaneously install license certificates for all three products. In some cases you, will also see individual license certificates. They are files with an extension of .NLS. Installing License Certificates When adding a license certificate to the eDirectory tree, you should know where in the tree you want to install the license certificate. This location or context determines who can use the license units associated with that license certificate. For more information on installing and configuring iManager, see Chapter 3. To install license certificates through iManager, complete the following steps: -
Open iManager and select Roles and Tasks. -
In the Task frame, select Licenses and then Install a License. -
Browse to and select the license file and click Next. NetWare 6.5 licenses are normally found on a disk in the folder A:\LICENSE . Some NLS-enabled applications also link their license certificates to a separate activation key. This key is stored in a file with a .KEY extension or can be entered manually to unlock the license certificate. -
Choose the license(s) you want to install and click Next. NetWare 6.5, for example, includes both a server license unit and a group of user license units in each .NLF file. -
Specify the context where you want the license certificates installed and click Install. If no License Container object exists in the context that you specify, one will be created. If a server license is being installed, you will also need to specify the server to which this license should be applied. -
Click Done to exit the license installation routine. You can also use this process to allow only designated servers to grant requests for license units. This is known as a server assignment . Some products require that a license certificate have a server assignment before the certificate can be used. The following guidelines apply to server assignments: -
Only one server assignment can be made for each license certificate. -
No other server can allow use of units from that license certificate. -
A server with a server assignment can have multiple license certificates assigned to it. NOTE If you participate in one of Novell's Master software licensing programs such as the Master License Agreement ( MLA ) or the Corporate License Agreement ( CLA ), you will receive special licenses that support an unlimited number of users. Such licenses should be installed in the top of the tree in the Organization container and no further license installations should be necessary.
Deleting an NLS License To delete license certificates through iManager, complete the following steps: -
Open iManager and select Roles and Tasks. -
In the Task frame, select Licenses and then Delete a License. -
Browse to the appropriate license and click OK. Remember to browse into the license container to choose a specific License object. You can also select an entire License container, if desired. TIP You cannot move a license certificate from one location to another. To move a license certificate, delete it from its current location and then install it to the new location.
|