| Shadows are an important scene element because they visually plant objects on the ground, as well as make it easier for us to tell how far apart objects are spaced (Figure 14.66). Shadows add realism that would often be difficult to achieve in a scene without them. Figure 14.66. Shadows help to visually plant objects on the ground. 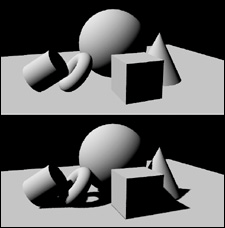
A real-world shadow is the complementary color of the light source: The sun is yellow; therefore, the shadows it casts are purplein essence, there are no black shadows in the real world, only very dark representations of a particular color. Keep this in mind as you create both realistic and artistic shadows: If you apply this principle to your 3D work, you'll produce deeper, richer imagery. A real shadow is darkest close to an object, fading and blurring as it gets farther away. Many times, shadows that people create appear too bold, and are thus unrealistic. You'll do much to bring your scenes to life by remembering that the core, or darkest area, of a shadow is located slightly away from the object's edge, near the base of the shadow (Figure 14.67). Figure 14.67. A real shadow's darkest area is slightly away from the object's edge, near the base of the shadow. 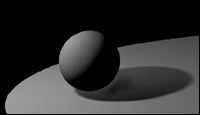
Creating shadows Shadows are turned off on all lights by default. To see shadows in a render, you must turn them on, not only in the light but in the object as well. An individual object will not cast a shadow if shadow casting is turned off on the object, regardless of whether shadow casting is turned on in the light. This gives Maya users an incredible amount of control over each shadow. There are two types of shadows in Maya: depth map (Figure 14.68) and raytraced (Figure 14.69). Both methods can produce realistic shadows, through raytracing often produces more realistic shadow with less effort and tweaking. However, raytraced shadows can take much longer to render than depth-map shadows, so the choice is really a trade-off. It's a constant battle to produce good-looking shadows while keeping rendering time to a minimum for each scene. Figure 14.68. Depth-map shadow. 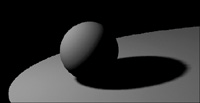
Figure 14.69. Raytraced shadow. 
Depth-map shadows attempt to simulate real-world shadows without adding major amounts of rendering time but at the cost of using more RAM. A depth map is an image file that contains a depth channel (a grayscale representation of how far objects are from the camera, the lights, and each other) rendered from a light's point of view. Maya uses the depth map to determine which surfaces have light hitting them and which surfaces are in shadow. Think of the depth map as a pre-drawn shadow brought into the scene just before it's rendered. This image becomes a replacement for a real shadow in the scene, saving Maya the time it would take to calculate the real shadow. These depth-map image files can be reused, saving even more rendering time. In most scenarios, raytraced shadows produce great-looking, realistic imagesresults you wouldn't be able to achieve with depth-map shadows. One example of this would be a transparent shadow cast from a partially transparent object (Figure 14.70). Figure 14.70. A depth-map shadow can't show an object's transparency within the shadow (top); a raytraced shadow, however, can (bottom). 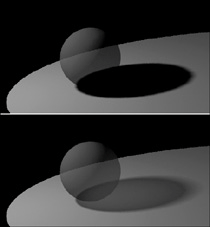
Raytraced shadows do, however, have some restrictions, as well. For one, they won't show up if rendered with interactive photorealistic rendering (IPR) (see Chapter 16)because IPR does not allow raytracing. This represents an additional speed cost because you can use IPR to see depth-map shadows, making depth-map shadow adjustment much faster. You can also preview light placement and depth map shadows using the shaded mode in any view. Depth-map shadowswhich are available in all but ambient lightcan produce relatively realistic shadows without greatly affecting rendering time. To create a depth-map shadow: 1. | Select the light from which you want to produce a shadow.
| 2. | Open the Attribute Editor.
| 3. | Click the arrow next to the Shadows heading to expand the shadow options.
| 4. | Select the box next to Use Depth Map Shadows under the Depth Map Shadow Attributes heading (Figure 14.71).
Figure 14.71. Turn on Use Depth Map Shadows. 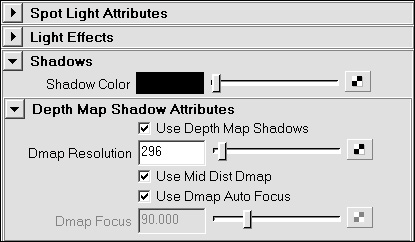
| 5. | In the Shadows section (above Depth Map Shadow Attributes), click the swatch next to the Shadow Color attribute to open the Color Chooser (Figure 14.72).
Figure 14.72. Click the swatch next to the Shadow Color attribute to open the Color Chooser. 
| 6. | In the Color Chooser, select a shadow color from the color wheel.
| 7. | Click Accept to lock in the color.
| 8. | Select the surface you want to cast shadows.
| 9. | In the Render Stats section of the surface's Attribute Editor, make sure that Casts Shadows (the default option) is on (Figure 14.73).
Figure 14.73. Turn on Casts Shadows in the Render Stats section of the Attribute Editor. 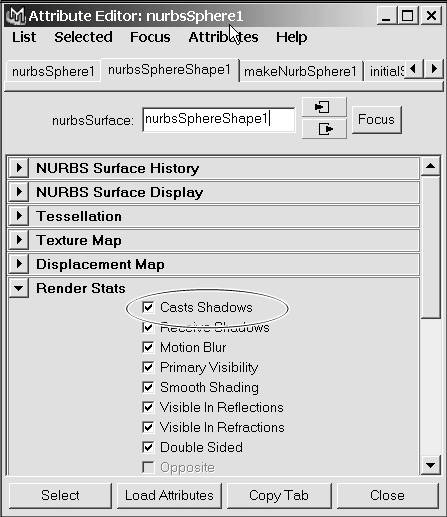
| 10. | From the Hotbox's north-region Marking menu, select Hypershade/Render/persp to split your panel layout into these three panes.
| 11. | Test-render the scene by selecting Render > Render > persp in the Render View pane.
The render shows a depth-map shadow (Figure 14.74).
Figure 14.74. The final render with a depth-map shadow. 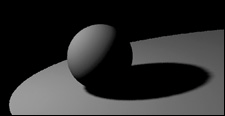
|
To preview depth-map shadows: 1. | Continuing from the previous task, "To create a depth-map shadow," click in the persp pane.
A blue box around the Perspective view indicates that it is the active pane.
| 2. | Press  to switch to shaded mode. to switch to shaded mode.
| 3. | Press  to enable Use All Lights in the Perspective view. to enable Use All Lights in the Perspective view.
| 4. | Select Lighting > Shadows to display depth-map shadows (Figure 14.75).
Figure 14.75. Select Lighting > Shadows to display depth-map shadows. 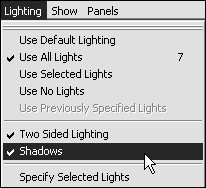
The camera can now be moved and animation can be played with a good approximation of what the final lighting will look like (Figure 14.76). If the lights are set to raytraced shadows, then the shadows will not appear in the view.
Figure 14.76. Theses depth-map shadows are a good approximation of the final rendering. 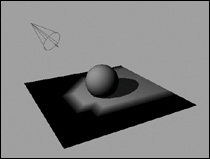
| 5. | Select Shading > High Quality Rendering (Figure 14.77).
Figure 14.77. Select Shading > High Quality Rendering to display depth-map shadows. 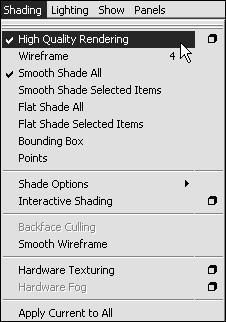
The overall shading quality and especially the shadow edges should be greatly improved, giving an even more accurate preview of what the final shading will look like (Figure 14.78).
Figure 14.78. The overall shading quality is improved, especially the depth-map shadow edges. 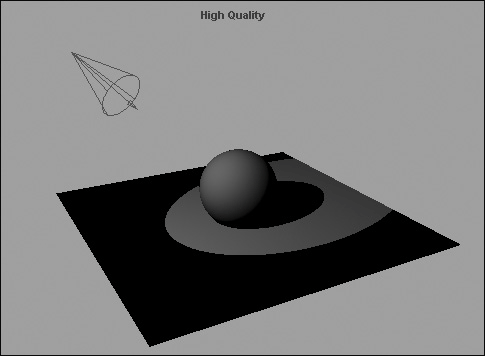
|
Common depth-map shadow attributes Dmap Resolution This is the resolution of the depth-map shadow file. Shadow edges will appear pixilated if the resolution is too low (Figure 14.79). However, you will want to use the lowest possible setting that still produces acceptable results, since this attribute is extremely memory intensive. Figure 14.79. Shadow edges appear pixilated if the resolution is too low. 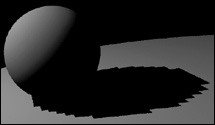
Dmap Filter Size Works in unison with Dmap resolution to control the softness of the shadow's edges (Figure 14.80). Try to maintain a setting of 3 or less to avoid adding excessive render time. Figure 14.80. Dmap filter size controls the softness of the shadow's edges. 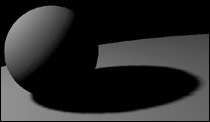
Dmap Bias Moves the map closer to or away from the light. You will only need to use this attribute in the following circumstances: If a shadow appears detached from the shadow-casting surface, gradually decrease the Dmap bias value until the shadow looks correct. If dark spots or streaks appear on illuminated surfaces, gradually increase the Dmap bias value until the spots or streaks disappear.
Raytraced shadows can create highly realistic shadows but also add expensive rendering time. To produce raytraced shadows, you must check three things: Use Raytraced Shadows must be selected in the light's Attribute Editor. Casts Shadows must be selected in the Render Stats section of the Attribute Editor of each object you want to cast a shadow. Raytracing must be checked in the Raytracing Quality section of the Render Globals window (see Chapter 15, "Shaders, Materials, and Mapping").
To create a raytraced shadow: 1. | Select the light from which you want to produce a shadow.
| 2. | In the Raytrace Shadow Attributes section of the light's Attribute Editor, select Use Ray Trace Shadows (Figure 14.81).
Figure 14.81. Select Use Ray Trace Shadows in the light's Attribute Editor. 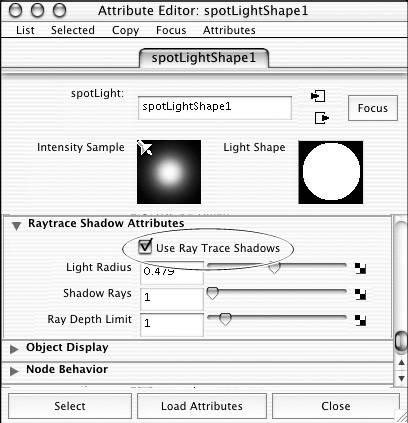
| 3. | Above the Raytrace Shadows Attributes, open the Shadows section and click the swatch beside the Shadow Color attribute to open the Color Chooser.
| 4. | Click in the color wheel to select a shadow color.
| 5. | Click Accept to lock in the color.
| 6. | Select the surface you want to cast shadows.
| 7. | In the Render Stats section of the surface's Attribute Editor, select Casts Shadows.
| 8. | To open the Render Globals panel (Figure 14.82), select Window > Rendering Editors > Render Globals (Windows) or Window > Render Globals (Mac), or click the Render Globals icon in the Render View  . .
Figure 14.82. Select Window > Rendering Editors > Render Globals to open the Render Globals panel. 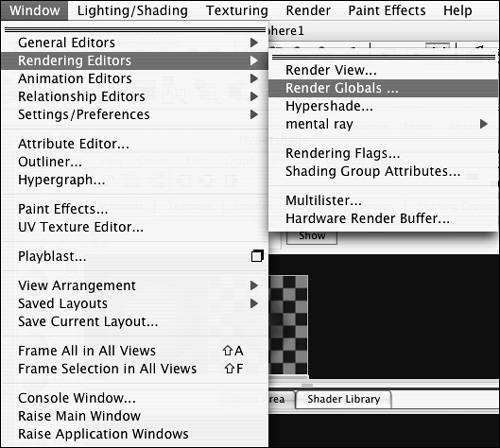
| 9. | Select Raytracing in the Raytracing Quality section of the Render Globals panel (Figure 14.83).
Figure 14.83. Select Raytracing in the Render Globals panel. 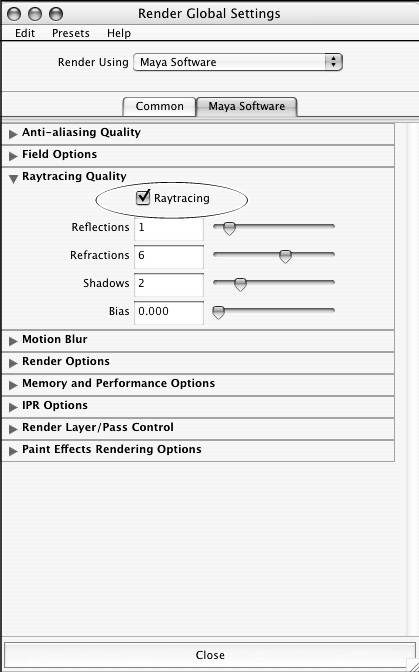
| 10. | Test-render the scene by selecting Render > Render > persp in the Render View window.
|
Common raytraced shadow attributes Light Radius Sets the softness of the shadow's edge relative to the size of the light. For example, smaller light values produce crisper shadows, and greater light values create softer shadows (Figure 14.84). Figure 14.84. A default raytraced shadow (top), and a shadow with the Light Radius attribute turned up (bottom). 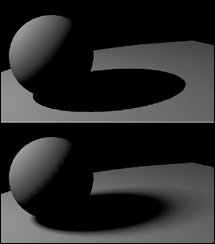
Shadow Rays Sets the amount of grain visible along soft shadow edges (Figure 14.85). Increasing this attribute increases rendering time, so keep it as low as possible. Figure 14.85. Changing the Shadow Rays attribute can cut down on grainy shadows. 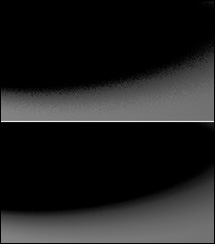
Ray Depth Limit If a light bounces off multiple mirrors before it hits your object, the Ray Depth Limit number determines whether that light will still cast a shadow.
|