UNDERSTANDING PHOTOSHOP S OTHER COLOR MODES AND MODELS
UNDERSTANDING PHOTOSHOP'S OTHER COLOR MODES AND MODELSPhotoshop enables you to work in six color modes in addition to RGB and CMYK: Grayscale, Bitmap, L*a*b (or just Lab), Indexed Color, Duotone, and Multichannel. Each of the color modes has specific characteristics and can be used for specific purposes. In the following sections, each of the color modesand a pair of color modelsare explained.
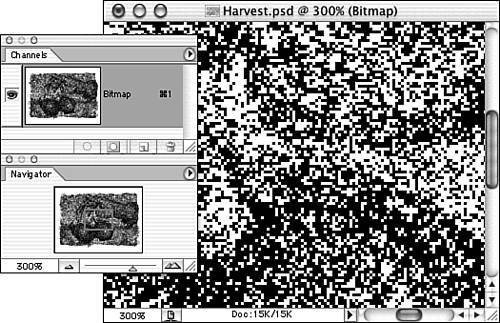
If you place a CMYK Photoshop document into an RGB Photoshop document, the new smart object that is created has some unique properties. From the Layers palette, you can click the placed smart object and then from the palette menu, choose Edit Contents. You then have access to the CMYK image you placed, with all of its layers intact. You can edit the image and click Save. The Smart Object layer then updates in the main document. This means that the smart object created from the placed Photoshop file is really a Photoshop document housed within a Photoshop document. This arrangement can help limit the scattering of all your different project files. Grayscale Color ModeOften referred to (incorrectly) as black and white, Grayscale color mode offers 256 shades of gray, including black and white. Grayscale mode uses one color channel. Although Grayscale is an 8-bit color mode (with 256 shades of gray), Photoshop measures each pixel's color as a percentage of black. Grayscale can be used in commercial printing, on the Web, or for output to other devices, such as inkjet printers and film recorders. Photoshop also permits you to work with 16-bit grayscale images (see "A Note on Color Bit Depth," later in this chapter), which can contain up to 65,536 shades of gray. When you convert color images to grayscale, all color information is lost. The image retains only the brightness value of each pixel, expressed in varying shades of gray. Converting a grayscale image to RGB or CMYK mode does not add color to the image; rather, it adds color channels, allowing you to add color. Bitmap Color ModeBitmap color mode is true black and white. Perhaps the phrase "black or white" would be clearer. Each pixel in such an image is either black or white; there are no shades of gray and no colors. As you can see in Figure 5.6, each pixel is either white or black. The Navigator palette indicates the area of the image that is shown in the document window. In addition, note that the Channels palette shows only a single channel (and the image is somewhat identifiable in the palette thumbnail). Figure 5.6. The image is shown at 300% zoom so that individual pixels are recognizable.
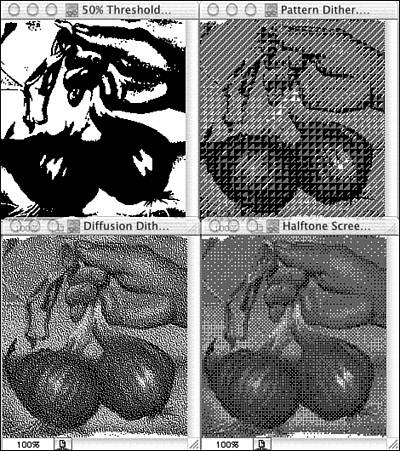
Bitmap color mode can be used effectively with certain line art and for special effects. Bitmap color mode greatly reduces file size but generally is not appropriate for most images. It is the color mode of the WBMP file format, designed for graphics viewed on some wireless devices and cell phones. A file must be in Grayscale mode or Duotone mode before you can convert it to Bitmap mode. When converting from Grayscale mode to Bitmap mode, you have several options for how the gray pixels are converted to black or white (see Figure 5.7). Figure 5.7. The results of four different bitmap conversions are shown.
Photoshop uses different criteria for the four types of bitmap conversion:
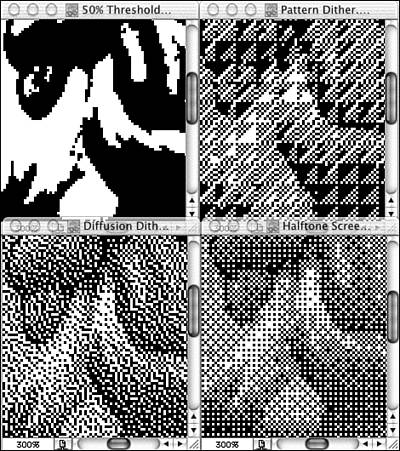
A closer look at the results of the four bitmap conversions shows the different distributions of black and white pixels (see Figure 5.8). Figure 5.8. Here, each of the bitmap images shown in Figure 5.7 is zoomed to 300% at the center of the image.
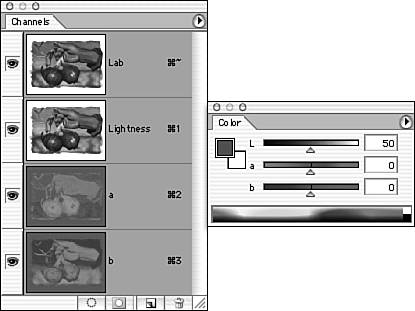
In Photoshop, you can also specify custom screens when converting to Bitmap mode, but you must create a pattern first. If the pattern is smaller than the image, it is tiled. The Custom Pattern option simulates shades of gray by making the halftone pattern thicker and thinner. L*a*b Color ModeThe L*a*b color mode, often called simply Lab, uses three channels. Unlike the RGB and CMYK modes, the channels in Lab mode do not contain component color information. Rather, one channel contains only the Lightness value for each pixel (L), and the additional channels (a and b) split the color spectrum into two pieces (see Figure 5.9). Figure 5.9. The top channel is the composite channel. Next is the Lightness channel (L), followed by the two color channels (a and b).
The L channel controls the brightness of a pixel, with a range of 0 to 100. The a channel contains the color value of the pixel along a redgreen axis. The value normally ranges from 120 (green) to +120 (red). The b channel contains color information running along a blueyellow axis. This value, also normally 120 (blue) to +120 (yellow), is combined with the L and a channels to produce the pixel's color.
In Figure 5.9, you can see that the L channel of a Lab image has a good grayscale likeness of the image as a whole. If converting from RGB mode or CMYK mode to Grayscale mode leaves your image looking flat, try converting to Lab mode and then deleting the a and b channels. The Lab color gamut is wider than RGB or CMYK, containing a range of colors not otherwise reproducible. When Photoshop converts between RGB and CMYK, it uses Lab as an intermediate color model. Lab images can be printed to many PostScript devices (Levels 2 and 3 only) and can be used to edit photo CD images. In addition, converting from RGB mode or CMYK mode to Lab mode enables you to work directly with the luminance values in the image.
Don't submit Lab images or place them into a page-layout document without approval from your service bureau or printer. If they can't work with the Lab color mode, you'll likely incur additional expenses. Indexed Color ModeIndexed Color mode is a subset of RGB. Rather than 8 bits of information for each of the color channels, files in Indexed Color mode contain only a total of 8 bits of color information for each pixel. For that reason, each image can contain a maximum of 256 different colors. They can be any RGB colors, even 256 different shades of blue or red or yellow, but there can be only 256 different colors. Indexed Color mode is used with GIF and PNG-8 file formats, and it can be specified for some other formats. The advantage of 8-bit color is smaller file sizes, but that is often outweighed by the sometimes drastic degradation in image quality. Many photographic images cannot be accurately reproduced with such a limited color palette.
Many basic Photoshop capabilities are not available in Indexed Color mode. For example, the image is restricted to a single layer, and most filters cannot be used. An image in Indexed Color mode has a single color channel, called Index, in the Channels palette. Photoshop records the colors used in an Indexed Color mode image in a color lookup table (CLUT). The CLUT is recorded with the file and might be unique to that file or to a standardized color table. If you attempt to add a color to the image that isn't among the 256 available colors, that color is converted to the nearest color.
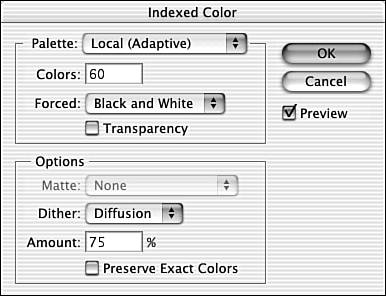
Images must be flattened before being converted to Indexed Color mode. Make sure you don't have any necessary layers hidden at the time of conversion, or those hidden layers will be lost. Only RGB and Grayscale mode images can be converted to Indexed Color mode. Grayscale conversions happen automatically because there are a maximum of 256 shades of gray in an 8-bit grayscale image. When you're converting an RGB image, however, the Indexed Color dialog appears (see Figure 5.10). Figure 5.10. The Indexed Color dialog offers some control over an image's reduction to 256 colors.
The Palette pop-up menu in the Indexed Color dialog offers several conversion options:
The difference between Local and Master for the Perceptual, Selective, and Adaptive options is most apparent when the color table is reduced from 256 to a smaller number of colors. The Local option emphasizes colors that exist in the image, whereas Master looks at the RGB gamut. Dithering can be critical when using the Master options. You can enter a specific value in the Colors field to shrink the file size even more by choosing to retain fewer than 256 colors. The Forced pop-up menu enables you to specify colors that must be maintained in or added to the image's color table. Forcing black and white adds those two colors to the table, regardless of whether they're used in the image. The Primaries option adds black, white, red, green, blue, cyan, magenta, and yellow. Web adds the 216 Web-safe colors. (See the following section, "Web-Safe RGB Color Model," for more information on the web-safe palette.) If you select Forced: Custom, you can specify colors that must be added to the image's color table. Enabling the Transparency check box maintains any areas of transparency that exist in the image. When this option is not selected, any existing transparent pixels are filled with the specified matte color or, if no matte color is selected, with white. Selecting a matte color uses anti-aliasing to help edges along a transparency blend with the designated color. If, for example, the image will be placed on a web page with a specific background color, using that color as the matte color helps the edges blend into the background. Choosing None in the Matte pop-up menu results in a hard-edged transparency or, if Transparency isn't selected, a white fill for transparent pixels. You can also select the type and amount of dithering to apply. Dithering simulates colors missing from the color table. Pixels of colors that are in the color table are interspersed to simulate the missing color. Diffusion, Pattern, and Noise dithering are all available (as is the choice None). Here's how these options differ:
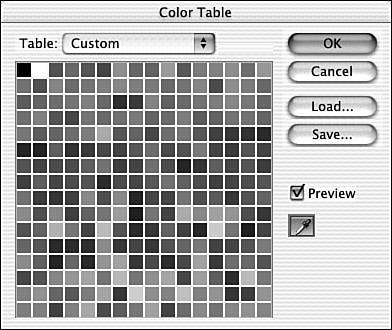
The Preserve Exact Colors option, which is available with Diffusion dithering and mandatory for Noise dithering, ensures that colors already existing in the color table are not dithered. This option is helpful for preserving fine lines and type. Preserve Exact Colors is not available for Pattern dithering. You can edit an image's color table directly by selecting Image, Mode, Color Table. The dialog that appears, shown in Figure 5.11, enables you to make changes to the individual colors saved with the file. Figure 5.11. This color table shows the maximum 256 unique colors allowed for any image in Indexed Color mode.
You have several options when editing a color table:
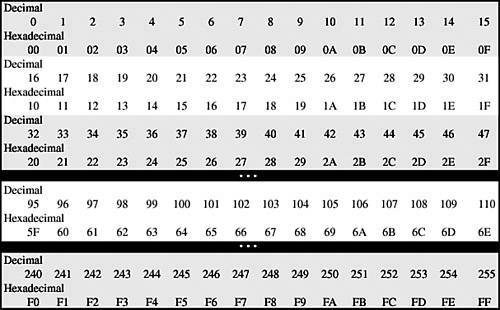
Web-Safe RGB Color ModelThe Web-Safe color model is the subset of an 8-bit RGB gamut (Indexed Color) that is common to both the Macintosh and Windows system palettes. The two operating systems have built-in color palettes for use with 8-bit color (256 maximum colors, not 8 bits per channel). Color values are recorded in a single color channel. Both the Macintosh and Windows system palettes contain 256 colors (the maximum allowed under 8-bit color), but only 216 of the colors are common to both palettes. These are the web-safe colors. HTML, the basic language used with the World Wide Web, records color as a base-16 (hexadecimal) value. Rather than 10 possible values for each digit (the numerals 0 through 9), hexadecimal notation permits 16 different values for each digit. In addition to the 10 numerals, the letters A through F are used. Duotone Color ModeDuotone color mode in Photoshop actually refers to four different types of color images. Monotones use a single colored ink, much like printing a grayscale image with an ink other than black. Duotones use two inks, typically black and a color. Tritones use three inks, and quadtones use four inks. What sets these color modes apart is that the inks are used throughout the image, rather than placed in specific areas. Each of the inks is, by default, distributed according to the single color channel. Duotones can be created only from grayscale images. To convert RGB, CYMK, or another color mode to Duotone color mode, you first choose Image, Mode, Grayscale. The Duotone Options dialog, shown in Figure 5.12, enables you to select Monotone, Duotone, Tritone, or Quadtone from the Type pop-up menu. Figure 5.12. As you can see in the Channels palette, this image has already been converted to Duotone, and the dialog is reopened, enabling a change of color, if necessary.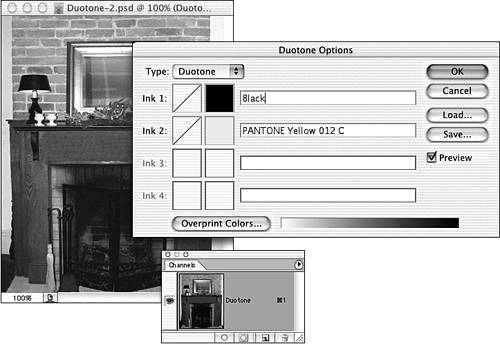 Clicking a color swatch to the left of a color name opens the Color Picker in Custom Color mode. You can select a Pantone or other custom color.
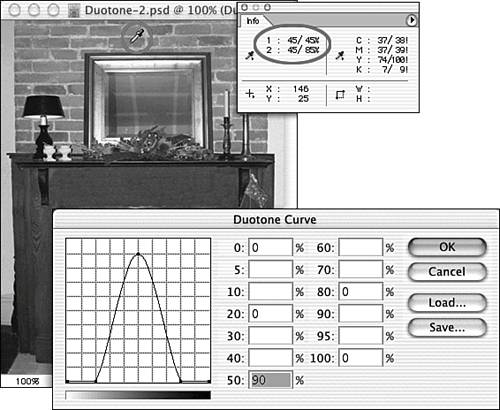
Clicking the thumbnail in the left column, which by default has a diagonal line, opens the Duotone Curve dialog for that ink. Adjusting the curve gives you control over the distribution of the ink in the image. By default, each ink is printed at the gray value of each pixel. For example, a 50% gray midtone pixel is printed at 50% tint of the ink, whereas a darker pixel in a shadow area is printed with a higher tint. The straight-line curve uses the pixel's brightness value as the tint percentage for each ink. The curve can be modified to change the distribution of an ink. To try this, you can reopen the Duotone Options dialog by choosing Image, Mode, Duotone. In Figure 5.13, the curve has been changed to eliminate the yellow ink from the image's highlights and shadows, and to print yellow at a darker tint in the midtones. Note that both the curve thumbnail and the image preview are automatically updated. Figure 5.13. In this example, the yellow ink will be printed only in the image's midtones.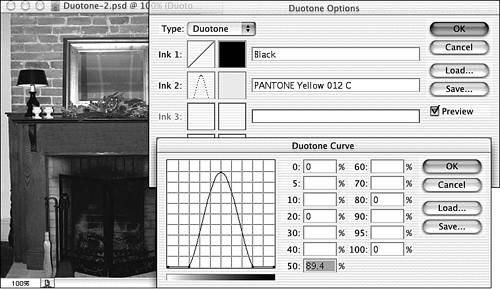 The Info palette shows you the "before" and "after" values when you're modifying a duotone curve. You can move the cursor around the image to get the ink percentages at any point (see Figure 5.14). Figure 5.14. The cursor changes to the eyedropper when moved in the image window. The Info palette tells you each ink's tint percentage before (left) and after (right) the new curve is applied.
Note that custom curves can be saved and loaded in the Duotone Curves dialog. The Duotone Options dialog also has Load and Save buttons. Photoshop ships with a variety of predesigned duotones, tritones, and quadtones. You'll find them all in the Duotones folder, inside the Presets folder, within the Photoshop folder. The presets include a variety of duotones, tritones, and quadtones in shades of gray, with Pantone custom colors and with process (CMYK) inks.
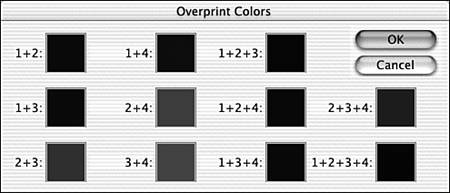
Modifying an overprint color with the Color Picker can produce an unprintable image. If you select a color that cannot be reproduced with the designated colors, your preview will not match the printed result. The Overprint Colors button in the Duotone Options dialog shows you how the inks will interact (see Figure 5.15). Clicking a color swatch in the Overprint Colors dialog opens the Color Picker, allowing you to modify the overprint color. Figure 5.15. With a duotone, only 1+2 is available. With a tritone, 1+2, 1+3, 2+3, and 1+2+3 are available.
Images in Duotone color mode can be saved and printed in the Photoshop (PSD), EPS, PDF, and RAW file formats. In PSD format, all of Photoshop's capabilities are available, including spot channels, layers, and filters. Photoshop CS2's large document format (PSB) can be used to save extremely large images in Duotone mode. (PSB must be activated in Photoshop's file-handling Preferences window.)
Some of Photoshop's filters produce unexpected results with duotones because of the lack of color channels. For example, the filter Pixelate, Color Halftone cannot produce four-color halftone dots without color channels with which to work. Multichannel Color ModeMultichannel color mode uses a separate color channel for each of an image's component colors, just as the RGB and CMYK color modes do. However, Multichannel mode does not include a composite channel, so each color channel can be considered a spot color. Multichannel mode is designed for use with some specialized image printing (such as some Scitex CT format images) and can be used to edit individual color channels. In Photoshop, this color mode is typically used with images destined for commercial printing, including CMYK and duotone images. Although most of Photoshop's capabilities are available for Multichannel mode images, they can be used on only one color channel at a time. Because there is no composite channel as there is in RGB or CMYK mode, the entire image cannot be manipulated at once. Multichannel images can be created from CMYK, RGB, Lab, Duotone, and Grayscale files. Converting a CMYK image creates spot channels from each of the four color channels and deletes the composite channel. The four resulting channels are cyan, magenta, yellow, and black. There might be some color shift during the conversion. RGB images converted to Multichannel mode typically undergo a large color shift. During the conversion, the red, green, and blue channels are changed to cyan, magenta, and yellow.
When working in Multichannel color mode, you can't apply a filter to the entire image at once because there's no composite channel. Remember that a filter can be repeated on each channel individually with the keyboard shortcut Converting an image from Lab color mode to Multichannel mode creates three alpha channels rather than spot channels. Because a Grayscale mode image starts with only one color channel, converting to Multichannel mode results in an image with only one channel. The channel's name is switched from Gray in Grayscale mode to Black in Multichannel mode, but it's otherwise identical. A duotone image can be converted to Multichannel mode, creating one color channel for each of the inks. This allows direct editing of the color placement, which is not possible in Duotone mode.
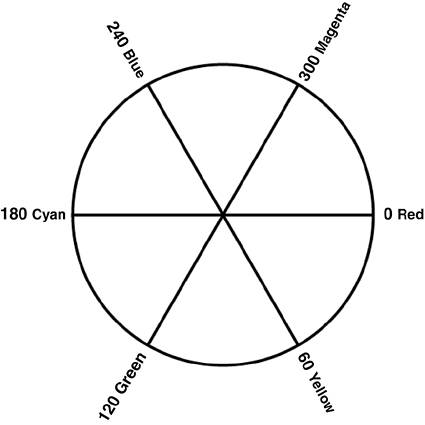
An image converted from Duotone mode to Multichannel mode cannot be converted back to Duotone mode. It can, however, be converted to Grayscale mode and then back to Duotone mode. Doing this, however, eliminates any changes made to the color channels in Multichannel mode. HSB: The Non-Mode Color ModelPhotoshop offers one additional way to define color, but it's not found under the Image, Mode menu. HSB stands for hue, saturation, brightness. Rather than a color mode, it is a color model used with the Color palette and the Color Picker. Images themselves are not recorded as HSB, but this color model can be used to define colors in the file in RGB, CMYK, Indexed Color, Lab, or Multichannel mode. (HSB is not available for images in Grayscale, Bitmap, or Duotone color mode.) HSB is designed to replicate the way the human eye and brain recognize color, breaking it down into color, purity, and brightness. Hue (color) is based on the color wheel and is measured in degrees. The six primary component colors (RGB and CMY) are found evenly spaced around the wheel (see Table 5.3 and Figure 5.16).
Figure 5.16. The hue values for the primary colors are typically measured from the three o'clock position on the color wheel.
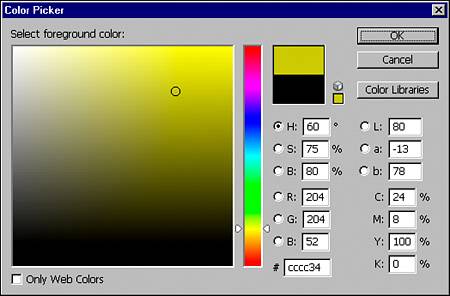
Saturation determines the purity of the color, from gray (0%) to pure or fully saturated (100%). Brightness (also sometimes called lightness) is the relative darkness (0%) or lightness (100%) of the color. When brightness is at 0%, the hue and saturation are insignificantand black results. When brightness and saturation are both at 100%, the result is white, regardless of the hue. Most Photoshop users employ HSB on a regular basis, perhaps without realizing it. By default, Photoshop's Color Picker is set to Hue (see Figure 5.17). Figure 5.17. The H stands for hue. The Color Picker can also be set to use saturation (S), brightness (B), the RGB colors, or the Lab components as the basis for color selection. As you can tell from the lack of radio buttons, the CMYK colors cannot be used as a basis for color definition.
Comparing Color ModesA number of Photoshop's capabilities cannot be used in certain color modes. Table 5.4 summarizes what features are and are not available for images in the various color modes.
A Note on Color Bit DepthIn addition to the various color modes, Photoshop permits you to work in 16-bit color for RGB, CMYK, Grayscale, Lab, and Multichannel modes. Rather than 256 possible values for each pixel in each color channel, 16-bit color theoretically has 65,536 possible values. With over 65,000 possible values for each of the three channels, the theoretical number of colors available is overwhelming. Although most output devices can't handle the additional color information or don't have the capability of reproducing such fine variations among similar colors, 16-bit mode can be printed. Some film recorders, especially with grayscale images, can show improved tonal range. In older versions of Photoshop, few editing options were available for an image in 16-bit color. There were no layers, you couldn't cut or paste, and most of the filters were grayed out. Photoshop CS introduced expanded support for 16-bit images, making it feasible to edit images using most of Photoshop's capabilities. Now Photoshop CS2 includes some support for 32-bit images. Using Multiple Color ModesSome images, including logos and other small art, are multipurpose. When you're preparing an image for both RGB (web or monitor) and print (CMYK), consider the following:
|
EAN: 2147483647
Pages: 426
