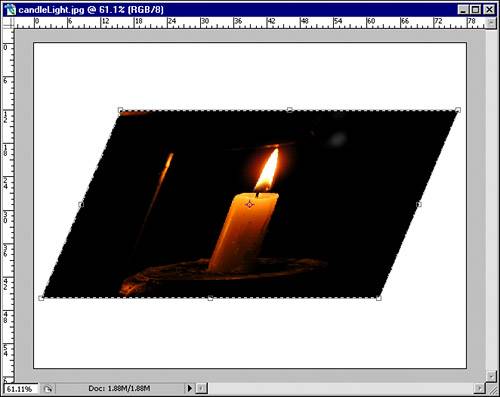
| In the Edit menu, you can cut, copy, paste, transform, undo, redo, warp, rotate your images, and much more. When working in type layers, you also have the ability to copy, paste, check spelling, and find and replace. Undo, Redo, Step Forward, Step Backward: Undo and redo changes, and roll back through the History using these options. Fade: After applying effects such as filters, changes in contrast, or even painting in the canvas, use this command to adjust the intensity of the color or filter or effect applied; you can also change the blend mode of the effect. The Fade command gives you an Opacity slider, which enables you to alter the previous effect, paint stroke, or fill, making it more or less intense. Try the Fade command with filters such as Gaussian Blur or Extract. Change contrast with Curves and then try the Fade command. The results are often quite useful. Cut and Copy: Cut and copy portions of a layer within a selection. Copy Merged: If multiple layers are visible in the document window, you can create a selection and copy it as a merged layer. The contents are merged and pasted. Paste: Paste content that you have cut or copied to the Clipboard. You can paste from other Photoshop layers and documents as well as graphic and text content from other applications. Paste Into: Paste copied content into a selection area only, and within the active layer. Check Spelling: The spell check feature in Photoshop looks at all type layers in your document to find misspelled words. Be sure to check spelling before you rasterize any of your type layers. Fill and Stroke: Create a selection with a Marquee, Lasso, or any other method and fill the contents, or apply a stroke to the border of the selection. Transform and Free Transform: Resize and reshape selected areas, including layer content and path vector data. Hold down the Ctrl key (Windows users) or the  key (Mac users) and alter perspective by dragging the corners of the image selection or layer (see Figure 4.7). Hover outside the bounding box to rotate the contents of the selection or layer. key (Mac users) and alter perspective by dragging the corners of the image selection or layer (see Figure 4.7). Hover outside the bounding box to rotate the contents of the selection or layer. Figure 4.7. The content of a layer skewed by the Transform controls. 
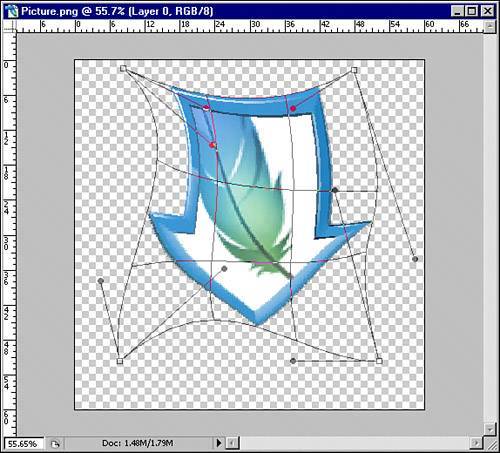
Transform, Skew, Distort, and Perspective: Alter the shape of the selection area or layer by skewing or shearing the contents, distorting, or simulating perspective. Click and drag one of the eight handles to manipulate the selection or layer. Transform, Warp: Warp part of your image in the layer to give it a flexible quality. Simulate wrapping your image around a coffee mug or sagging it like a rubber band (see Figure 4.8). The best part is, Warp enables you to put things back in their original shape as long as you haven't closed the document and your warp changes still exist in the History palette. Figure 4.8. Warping the content of a layer. Click and drag the netted mesh in the middle or pull the handles on the outside to warp the object. 
Define Brush Preset and Define Pattern: Make a selection in your image and Define Brush can create a new paintbrush type. Your new custom brush paints in a totally new way on your canvas. Make a brush out of your own eye or face and paint with it. Define a pattern from a selection area. Then use Edit, Fill to fill an area with your pattern for a background effect, or paint the pattern anywhere in the canvas with the Pattern Stamp tool. Purge: If you are running out of memory due to intensive image editing, purge your history or Clipboard content to free some up. Remember, after the history is purged, you lose access to any of those history states you had during your image editing session as well as the ability to Undo or step backward through the history you just purged. Color Settings: Create your own custom color settings, and save them to a color settings file (.csf). Then apply custom settings to the entire Creative Suite using Bridge. Assign Profile and Convert to Profile: Add or change color profiles of the image you are working on. A digital may already have a profile attached from its digital camera or scanner output setting. Change and modify using these settings for consistent color in your projects. The Preferences command (as well as other Photoshop menu commands) differ only slightly on Macintosh and Windows versions of Photoshop. On a Mac, the Preferences command is found under the Photoshop menu rather than the Edit menu.
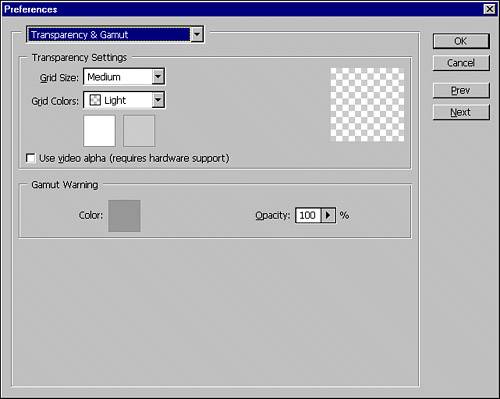
Keyboard Shortcuts: Modify the keyboard shortcuts for the features you use most. Many work with the default keyboard settings, but you have free reign to make complex tasks more streamlined by adjusting these to your specific needs. Menus: Modify the menus in Photoshop and create a custom menu setting for those tasks you want easy access to. Show or hide the existing menus and highlight menus in up to seven different colors to make them stand out. This option is new to Photoshop CS2. Preferences: Change preferences for file handling, grid and guidelines, and measurement settings (see Figure 4.9). Set general preferences for Photoshop's behaviors. Figure 4.9. Transparency & Gamut preferences are just a few of the many preferences you have control over. The top pop-up menu in Preferences changes the category of preferences. 
|
