Saving Web Files
Photoshop and ImageReady share many of the same features so your Web graphics files are small, yet retain great display quality. Photoshop’s File→Save for Web command and ImageReady’s Optimize palette let you select from an array of Web file formats and settings to suit the needs of your Web project. Using either feature, the Save for Web command or the Optimize palette, you can compare different optimized versions of an image side-by-side to maximize display quality while minimizing file size.
The Save for Web command and the Optimize palette
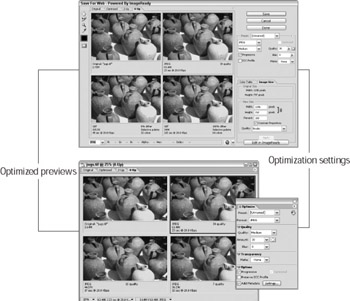
If you compare Photoshop’s Save for Web dialog box with ImageReady’s image window and Optimize palette, you’ll discover that they perform the same functions with virtually the same interface. Figure 18-11 shows Photoshop’s Save for Web dialog box on top and ImageReady’s image window with its Optimize, 2-Up, and 4-Up tabs and the Optimize palette on the bottom.

Figure 18-11: Photoshop (top) and ImageReady (bottom) offer the same optimizing features for creating great Web graphics with a small file size.
Optimizing and saving an image in the GIF file format
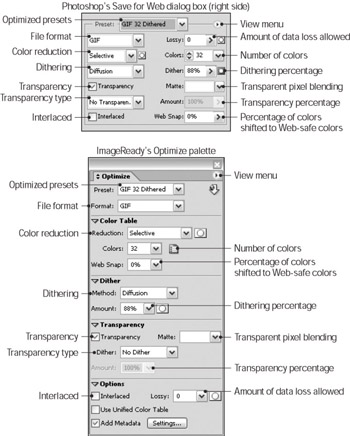
This section takes you through optimizing an image in the GIF file format using either ImageReady’s Optimize palette or Photoshop’s Save for Web command. The area in the Save for Web dialog box that contains the same settings as the Optimize palette is on the right side of the dialog box. This area and the Optimize palette are shown in Figure 18-12.

Figure 18-12: The area at the right of Photoshop’s Save for Web dialog box (top) contains the same settings as Image-Ready’s Optimize palette (bottom).
To optimize an image in the GIF file format using either ImageReady’s Optimize palette or Photoshop’s Save for Web command, follow these steps:
-
Open the image you want to optimize in either Photoshop or ImageReady.
-
If you are working in Photoshop, choose File→Save for Web. If you are working in ImageReady, open the Optimize palette by choosing Window→Optimize.
As shown in Figure 18-12, Photoshop’s Save for Web dialog box and ImageReady’s image window and Optimize palette contain the same optimizing features and settings.
-
Click the 2-Up tab in either the Save for Web dialog box or the Image Ready image window.
This view displays the original image on the left and a preview of the optimized image on the right. As you select optimizing settings, the optimized preview changes to reflect the settings you’ve selected.
-
Use the Preset drop-down list to select an optimized GIF preset combination.
In Photoshop, the Preset drop-down list is at the right of the Save for Web dialog box. In ImageReady, the Preset drop-down list is at the top of the Optimize palette.
Tip Even if you want to choose custom settings, selecting a preset combination is a good place to start. If you like the preset as it is, skip to Step 10. To choose custom settings continue with Step 5.
-
Use the Reduction drop-down list to select a color reduction method.
The GIF file format uses specific mathematical formulas (algorithms) to reduce the number of colors and thereby reduce file size. Here are the settings you can choose from:
-
Perceptual: Creates a color table based on the colors in the image and how people see colors.
-
Selective: Creates a color table using the flat colors and Web-safe colors in the image.
-
Adaptive: Creates a color table based on the part of the color spectrum that contains most of the colors in the image.
-
Restrictive (Web): Creates a color table by shifting the colors in the image to the 216 standard Web-safe colors that the Windows and Mac Web browsers have in common.
You also can use the Web Snap slider to set how wide a range of colors is automatically set to their Web-safe equivalents. The higher the percentage, the more Web-safe colors are used. Higher settings can create more dithering and graininess, though.
-
-
Select a dithering method using the Dither method drop-down list.
The dithering options are: No Dither, Diffusion, Pattern, or Noise.
Remember Dithering simulates colors not available in the image’s color palette by mixing two colors that are available. Dithering does add to the file size, but not significantly. The Diffusion option creates the most subtle results.
Also, you can set the amount of dithering using the Dither percentage slider.
-
Put a check in the Transparency check box to preserve any transparent pixels in the image.
If Transparency is unchecked, any transparent pixels will be colored with the currently selected Matte color. The Matte color is selected in the next step.
-
Select a Matte setting to control how partially transparent pixels along the edge of an image blend with the background of the Web page.
If you know what the color of the Web page background is, use the Matte drop-down list to select the color. You can also select None, Foreground Color, or Background Color.
-
Select the Interlaced option if you want to display the image in successively greater detail as it downloads on the Web page.
-
Save the image.
If you are using Photoshop’s Save for Web dialog box, click Save; or if you are using ImageReady’s Optimize palette, choose File→Save Optimized As. Then, use the Save Optimized As dialog box to enter a name for the file and select a location where you want to save the file.
| Tip | When you save image files in ImageReady using the File→Save Optimized As, ImageReady also generates HTML files associated with the image files. These HTML files are necessary for making Web graphics such as rollovers and image maps work. To find out more about the HTML files check out the sidebar “ImageReady saves HTML, too!” |
Optimizing and saving an image in the JPEG file format
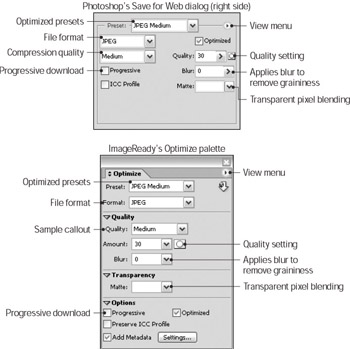
This section takes you through optimizing an image in the JPEG file format using either ImageReady’s Optimize palette or Photoshop’s Save for Web command. The area in the Save for Web dialog box that contains the same settings as the Optimize palette is at the right of the dialog box. This area and the Optimize palette are shown in Figure 18-13.

Figure 18-13: The area at the right of Photoshop’s Save for Web dialog box (top) contains the same settings as ImageReady’s Optimize palette (bottom).
To optimize an image in the JPEG file format using either ImageReady’s Optimize palette or Photoshop’s Save for Web command, follow these steps:
-
 Open the image you want to optimize in either Photoshop or ImageReady.
 -
If you are working in Photoshop, choose File→Save for Web. If you are working in ImageReady, open the Optimize palette by choosing Window→Optimize.
As shown in Figure 18-13, Photoshop’s Save for Web dialog box and ImageReady’s image window and Optimize palette contain the same optimizing features and settings.
-
Click the 2-Up tab in either the Save for Web dialog box or the Image Ready image window.
This view displays the original image on the left and a preview of the optimized image on the right. As you select optimizing settings, the optimized preview changes to reflect the settings you’ve selected.
-
Use the Preset drop-down list to select an optimized JPEG preset combination.
In Photoshop, the Preset drop-down list is at the right of the Save for Web dialog box. In ImageReady, the Preset drop-down list is at the top of the Optimize palette.
Even if you want to choose custom settings, selecting a preset combination is a good place to start.
Tip If you like the preset as it is, skip to Step 8. To choose custom settings continue with Step 5.
-
Use the Quality drop-down list to select the compression quality for the optimized image or use the Amount slider to set the exact amount of compression.
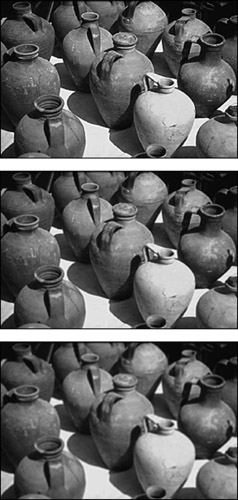
The higher the quality setting, the lower the compression you end up with. The result is an image with higher display quality and a larger file size. Figure 18-14 shows the same image saved at Low, Medium, and High quality. Notice how dotty the low quality image is.

Figure 18-14: The same image saved as a JPEG with High quality (top), Medium quality (middle), and Low quality (bottom).You can use the Quality slider to set the exact amount of compression.
-
Select the Progressive option if you want to display the image in successively greater detail as it downloads on the Web page.
-
Select a Matte color to set how partially transparent pixels along the edge of an image blend with the background of the Web page.
The JPEG file format does not support transparency, so if you know the color of the Web page background, use the Matte drop-down list to select the color. If the None setting is selected, transparent pixels are automatically colored white.
-
Save the image.
If you are using Photoshop’s Save for Web dialog box, click Save; or if you are using ImageReady’s Optimize palette, choose File→Save Optimized As. Then, use the Save Optimized As dialog box to enter a name for the file and select a location where you want to save the file.
ImageReady, by default, saves HTML files along with graphic files for the Web. These files contain the HTML and JavaScript code necessary to make features such as image maps and rollovers work.
When you use the File→Save Optimized command in ImageReady, the program also creates a folder structure in which to place the image files referenced by the HTML. By default, the folder for image files is named images.
You’ll need to understand the structure that ImageReady creates when you publish these files on your Web site or if you want to combine the HTML created by ImageReady with your own HTML code. When you publish rollovers and image map graphics to your Web site, you must upload the accompanying HTML files also. Otherwise, the image maps and rollovers won’t work.
Using the Save as type drop-down list in the Save Optimized As dialog box, you can tell ImageReady to only save image files (as opposed to HTML and image files which is the default). Or you can use the various dialog boxes accessed by choosing File→Output Settings to change the way in which HTML files are saved and named. In addition, you can use these same dialog boxes to set the folder names in which graphics and HTML files are saved.
| Tip | When you save image files in ImageReady using the File→Save Optimized As, ImageReady also generates HTML files associated with the image files. These HTML files are necessary for making Web graphics such as rollovers and image maps work. Rollovers are areas of a Web page that change when the mouse passes over them or perform some other action such as clicking. Image maps are hotspots on a Web page that have attached URLs. When a hotspot is clicked, the user is transported to that Web page. To find out more about the HTML files check out the sidebar “ImageReady saves HTML, too!” |
EAN: 2147483647
Pages: 221