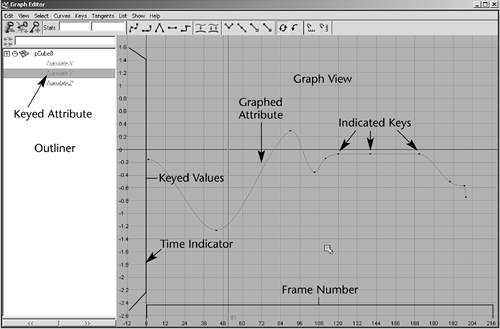
| The Graph Editor, shown in Figure 11.5, is a helpful tool for tweaking values for keys you have set. It gives you a visual representation a curved line of the attributes that are animated. The animation time goes from left to right, and any keyed variable appears as a line that ramps up or down to indicate its value over time. It can help you visualize how things are changing and how fast. You can pan and zoom this panel like any other. Figure 11.5. You can easily work with keys in the Graph Editor. 
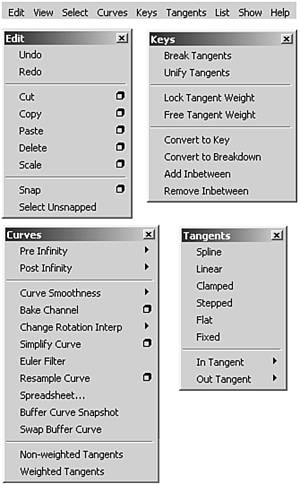
You can use the Graph Editor as a free-floating window or set it up as one of the viewports. To use it as a free-floating window, simply open it from the Hotbox (Window | Animation Editors | Graph Editor). To set it up in a viewport that displays the Perspective view and the Outliner, click Hotbox | Panels | Saved Layouts | Persp/Outliner/Graph. As you go through the next tutorial, try both layouts to see which one works better for you. The following list takes you on a brief tour through the Graph Editor's components: Menu bar The menu bar (see Figure 11.6) contains all the commands you typically need to work with the Graph Editor. The Edit menu is similar to the one in text editors or word processors, except that you're working with keys instead of text. Figure 11.6. The Graph Editor's menus for basic edit functions, keys, animation curves, and tangents. 
The Curves menu gives you control over how the curves are set up with the keys in your scene. For example, you can set certain keyframes to cycle repeatedly. To work directly with a specific key in the Graph view, you use the Keys menu. You use the Tangents menu to tell keys how to ease into or ease out of animation curves at specific keyframes. Toolbar The toolbar (see Figure 11.7) gives you quick access to functions for modifying animation curves and keys. Figure 11.7. The toolbar provides quick access to commonly used features of the Graph Editor. 
Outliner The Graph Editor Outliner has the same basic function of the Outliner you have been using throughout this book. In the Graph Editor, you use it to select attributes for objects that have keys set. Keyed attributes are formatted in italics for easy identification. Graph view This section displays the keys, animation curves, and tangents. You can interactively adjust the displayed curves by using the typical manipulation tools (select, move, and scale). You can also use these tools to modify keys you have set. Curves are displayed with the frame number on the X axis and the numeric keyed value on the Y axis.
tip The Dope Sheet is another animation editor in Maya that is similar to the Graph Editor. Instead of displaying curves, the Dope Sheet displays key times as colored rectangles and lets you edit event timing in blocks of keyframes and synchronize motion to a sound file.
Tutorial: Tweaking Keys with the Graph Editor This tutorial gives you a chance to work with the Graph Editor. If you like, you can load the previous tutorial's scene file (see the file next to the DVD icon) to make sure everything's set up correctly. On the DVD  Chapter_11\movies\ch11tut02.wmv |
Click Hotbox | Panels | Saved Layouts | Persp/Outliner/Graph to set up your layout. Make sure the current frame is set to 0 (the beginning of the animation) in the Time Slider. Hide the PlantStands and Furniture layers in the Layers dialog box. You don't need them now; they'll just slow down the animation playback. On the DVD  Chapter_11\ch11tut01end.mb |
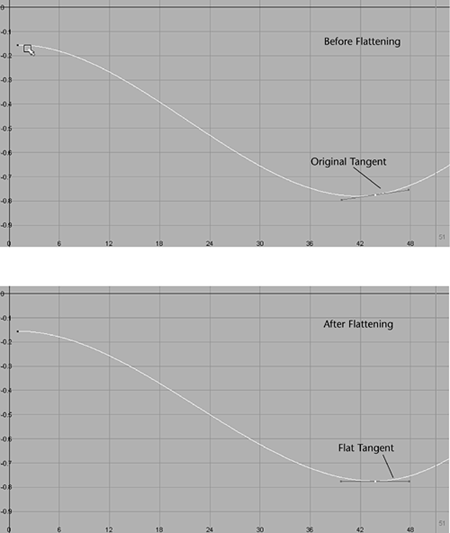
Open the Outliner (hotkey: Alt+o), and select camera1. To frame the animation curve in the Graph Editor, use the hotkey a. The animated curve should now be framed in the window. Each key you set is represented by a small dot along the curve. The pointed curves indicate areas with sudden reversals in direction. Play your animation and watch the Graph view. As the animation progresses, a red bar displaying the current frame slides across the Graph view. To ease into the camera turn and ease out of the motion, you'll select both keys in the Graph Editor. Now, click the Flat tangent icon at the top of the Graph Editor (refer to Figure 11.7). This should straighten out the curve slightly for a more realistic motion. At this point, the handles rotate so that they're horizontal to the X axis. Now, select ElevatorDoorRight and repeat this easing in and easing out, clicking the Flat tangent icon for both keys in the Graph Editor. Then, do the same for ElevatorDoorLeft. Figure 11.8 shows the results. This step gives a more natural look to the door speed while opening. Figure 11.8. The animation curve and tangent handle before and after flattening. 
note You might have expected to see a more dramatic change in the animation curve after adjusting the tangent. The change in the animation curve's line is subtle in the Graph Editor, but the effects on the animation are noticeable. You can set several types of tangents for your keys. Feel free to experiment with them to see how they work. For example, you can click the Break Tangents button so that you can grab each side of the handle and move it independently.
tip If you want to insert more keys to try smoothing the animation more, simply click the Insert Keys button on the Graph Editor's toolbar and MMB-click in the Graph view.
|
