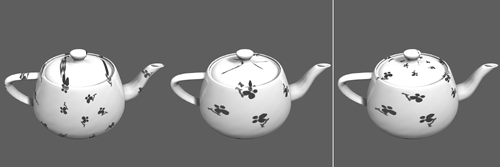
| The next step is to replace a surface's solid color with a texture. Normally, a texture refers to applying a 2D image around a 3D surface, rather like wallpapering a curvy surface. Because a 2D image can be stretched, wrapped, and projected onto a surface in many different ways, you must take control of how the image is applied. Mapping Coordinates Mapping coordinates, also known as UV coordinates, tell the 3D renderer how to place the 2D map across the geometry, which varies depending on whether the model is created from NURBS or polygons. For NURBS, parametric mapping is inherent to the surface and this is typically what's used. Briefly explained, parametric mapping is the 0 to 1 coordinate system that NURBS uses to map textures across its surfaces. It makes sure that the textures stay mapped to the surface like a decal, even if the geometry is deformed. You can also adjust NURBS mapping to move and rotate how the map is positioned on the object. For polygon surfaces, mapping is normally applied by projecting 2D maps across the 3D surface in one of several ways: planar, cylindrical, spherical, and a special method called automatic mapping. When you apply a 2D texture to a 3D object with a planar map projection, you'll see a smearing effect in areas of the object that are perpendicular to the direction of the projected map. The cylindrical and spherical projections would seem to solve this problem, but both mapping types have their drawbacks singularities, which are points at the poles of the sphere or cylinder where the mapping is pinched into a point (see Figure 9.17). Generally, you must apply the best mapping method for the surface and the areas seen during the animation. That is, if the ugly part is in an area that won't be visible to the camera during the animation, the problem is solved. In tough cases, a combination of automatic mapping, multiple mapping coordinates, and some simple photo-editing work can usually fix the problem. Figure 9.17. Three teapots with planar, cylindrical, and spherical mapping (from left to right). 
Maya's Interactive Texture Placement To make adjusting mapping on a surface less confusing, Maya offers interactive texture placement. This feature lets you see maps move on the surface in real time as you move, rotate, and scale the manipulator for the mapping. To make this work, you need to have Hardware Texturing turned on for at least one of the 3D panels. To do that, right-click over the panel, and then click Hotbox | Shading | Hardware Texturing (hotkey: 6). By default, materials with a texture applied to the Color attribute have the color texture map set to appear in the hardware-textured panels. Procedural Maps Explained: 2D Versus 3D In addition to applying an image or movie to a surface, Maya has other texture types called procedural textures. Instead of using actual images for mapping, procedural textures use formulas. Many patterns, such as bricks, tiles, and gradients, are so repetitive that they can easily be represented by an equation. By using special forms of seemingly random values, many natural effects can be simulated mathematically: Marble, leather, water, granite, and many other complex and random textures are included with Maya as procedurals. Maya's procedural textures come in two varieties: 2D and 3D. You can think of the 2D procedurals as a calculated form of a bitmap. A formula is responsible for the image, but the image must be applied to the 3D geometry with some form of mapping, so it's subject to all the benefits and drawbacks of 2D mapping. When 3D procedurals are applied, however, they exist throughout 3D space, and object surfaces define where you see the texture. It's like carving the object from a block of the material. This method has the benefit of not requiring any mapping, but if the object bends or warps, the procedural texture can seem to "swim" through the object (but Maya has an advanced option called Texture Reference Objects for getting around this limitation). Procedural textures have several benefits. Because they are formula based, their parameters can be adjusted to instantly synthesize all kinds of different effects. Because the simulated random "noise" used for natural textures varies at every point in space, the procedurals don't repeat, which is common with a tiled image of, say, marble. Also, because 3D procedurals exist throughout 3D space, you often get good results on objects that would otherwise be hard to map. Instead of trying to wrap a 2D texture around a complicated sculpture, you can apply a 3D procedural and it appears to be perfectly mapped. 2D Procedurals Maya's 2D procedurals can be divided into two categories: regular patterns and noise patterns. The regular patterns include Grid, Checker, Bulge, Cloth, and Ramp. With these patterns, you can create tiles, bricks, and many other man-made repeating effects. Noise patterns include Fractal, Mountain, Noise, and Water. These psuedorandom textures are excellent for creating the complex "dirty" surfaces common in nature. 3D Procedurals All the 3D procedurals but snow are random types. Some, such as wood and marble, clearly imitate nature. However, all are excellent for synthesizing random effects. Even when animating a man-made world such as a building interior, you still need noisy patterns ceiling tiles, carpets, and even the brushed paint on walls are somewhat randomly textured. Tutorial: Applying and Editing Texture Placement In this tutorial, you'll apply some textured materials to the lobby and edit the placement of those textures. You can load the scene file noted next to the DVD icon to pick up from the end of the "Creating the Remaining Base Materials " tutorial. On the DVD  Chapter_09\movies\ch09tut05.wmv |
Begin by selecting the floor, which selects the floor, ceiling, and walls because they are one object. Right-click over the floor and choose Face. Select the floor, and in Hypershade, right-click on the floortile material and choose Assign Material to Selection. On the DVD  Chapter_09\ch09tut05end.mb |
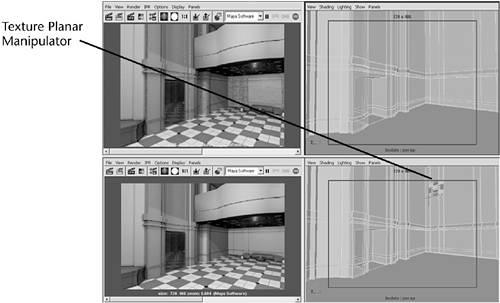
In the Perspective view, turn on the materials in the viewport with the hotkey 6. Notice that the floortile's scale is very large. Toggle the texture back off in the viewport (hotkey: 4). Switch views from Perspective to Top by clicking in the center of the Hotbox. A marking menu appears showing several views. Choose the Top view. Toggle on the background image that was created in Chapter 5 by turning cameras on. Choose Show | Cameras from the panel menu, and you should be able to see the background image. The floor should still be selected, so apply mapping coordinates by clicking Hotbox | Edit Polygons | Texture | Planar Mapping | option box. Select Y-axis in the Planar Mapping Options dialog box and click Apply. tip If you need to bring the manipulator handles back for texture placement, you can do so by selecting the object, and then clicking the polyPlanarProj entry in the Channel Box. If this fails, you need to open the Tool Box (Hotbox | Display | UI Elements | Tool Box). The Show Manipulator Tool button is the sixth icon from the top in the Tool Box, just below Scale. Click it to get your map manipulator back. A texture plane manipulator appears in the view. If it's not visible, be sure you can see the entire floor and zoom out. After finding the manipulator, go to the Channel Box and set Projection Center to 0.731, 0, and -6.411 and Projection Width and Height to 1.47. Zoom in to the seating area. You should see the texture plane manipulator. Go ahead and turn the cameras off now (choose Show | Cameras from the panel menu). Now, switch to the Perspective view. Use the texture viewport key again (hotkey: 6). The square tiles are now a more realistic scale. For speed in texturing, zoom out to see the entire lobby shell. You should still be in Face subobject selection mode. Pull a marquee-selection window over the entire lobby, selecting all faces. Bring your view back inside now, zooming into an area where you can still see a good deal of the lobby. The floor is selected along with the rest of the lobby. Shift-click once on the floor to deselect it. Assign the walls material to the selection, and then apply a planar map, setting Projection Width and Height to 1 in the Channel Box. Click Hotbox | Edit Polygons | Texture | Planar Mapping | option box. In the Planar Mapping Options dialog box, select X-axis, and click Apply. Render an image looking toward any of the walled areas by clicking the black-and-white clapboard icon to the left of the Render view. You might notice two things wrong with the scene: The sides of the walls facing in the Z-axis have the texture stretched across them, creating a smeared look. Second, some darker areas are now evident on the model. At some points during texturing and lighting a scene, modeling flaws can become evident. Take a moment to evaluate what might be causing the irregularity to make sure that it doesn't affect the scene any further. Right-click on the walls, and choose Edge to change the subobject selection mode. Zoom out to see the entire shell and marquee-select all edges of the lobby's walls and floor. To fix the darkening toward the edges, you need to make the edges hard ones. To do this, click Hotbox | Edit Polygons | Normals | Soften/Harden | option box. In the Polygon Soften/Harden Edge Options dialog box, click the All Hard option, and then click Apply. You should see the unnatural shadowing gone in the Perspective view. To solve the other problem of texture stretching in the scene's Z-axis, right-click on the walls again and choose Face. Begin Shift-selecting faces on the back wall of the lobby and all faces pointed toward the back of the lobby and its seating area (see Figure 9.18). Figure 9.18. Selecting individual faces pointed in the Z-axis. 
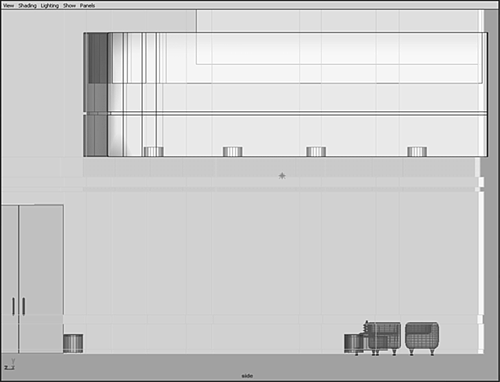
Notice in Figure 9.18 that the top-left image shows stretching of some textured faces. The top-right image shows faces being selected in the Z-axis. After selecting all the stretched faces, create a Quick Selection set to ensure that you won't need to select Z-axis faces again in this manner. Click Hotbox | Create | Sets | Quick Selection Sets (hotkey: Ctrl+Shift+q), and name the set wallsinZ. Apply a planar map to the selected faces (Hotbox | Edit Polygons | Texture | Planar Mapping | option box), and set Projection Width and Height to 1 in the Channel Box. Render again, and notice that all the materials seem to look the same now and the stretching is gone. In Figure 9.18, you'll see that the bottom-left image has been rendered after fixing the mapping. On the right side is the texture planar manipulator as it was sized for the Z-axis. Before turning to the front of the lobby, you need to apply textures to two windows and three borders. Start with the two windows on the lobby's back wall. Use the reference image by turning on the camera for the view (by choosing Show | Cameras from the panel menu). While still in Face mode, select both windows and apply the backwindows material. Now, select the two borders just beneath the second floor. The one closest to the ceiling is larger, then there's a small gap, and the border at the bottom is a thinner strip. Switch to Side view and pull a marquee selection window from the back toward the front. Stop at the column that sits at the front of the second floor (see Figure 9.19). Figure 9.19. Selecting the borders in the lobby for texturing. 
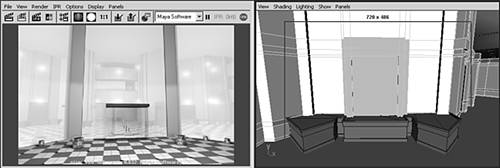
Switch to Perspective view and apply the DarkTrim material by right-clicking over the material and choosing Assign Material to Selection. You should see a darker material applied in Perspective view if hardware texturing is turned on (hotkey: 6). Switch back to Side view and select the middle indentation between the two borders. Marquee-select over the middle indentation this time, and continue all the way past where the second floor ends. Stop just past the planters in the front and use the Shift key while deselecting the areas that aren't part of the middle indentation. Apply the MediumTrim material by right-clicking over the material in Hypershade and choosing Assign Material to Selection. The border trim at floor level is next. Switch to Side view and select all the floor-level border trim. You might need to pan around with your perspective camera to make sure you have it all selected. Apply the LightTrim material by using Hypershade. While in Side view, with the floor/wall object still selected, select the faces that will compose the front windows (see Figure 9.20). Be sure to deselect any faces, such as the floor or ceiling, during subobject selection. Also, deselect the two columns in the front wall. The entire front wall is glass except these columns. Now, apply the glasswindows material by right-clicking over the material and choosing Assign Material to Selection. Figure 9.20. On the left is an image of the front glass windows, and on the right, the granite waterfall behind each planter. 
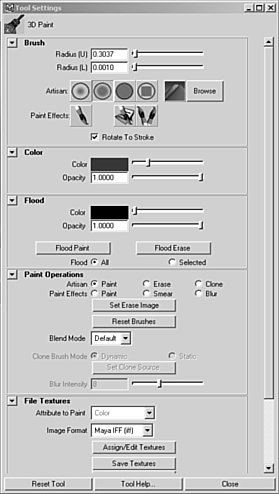
Now, apply a planar map over the three large front windows (Hotbox | Edit Polygons | Texture | Planar Mapping | option box). Select the Z-axis for this planar map, and click Apply. Orbit your view around to see the large planters and the wall behind them. Notice an indentation behind each planter. That area will be a dark granite waterfall. Right-click on the floor/wall object and choose Face. Pull a marquee-selection window over the recessed area and the levels framing it. Use Figure 9.21 as a reference. You can also toggle on the background images any time you need a reference. Figure 9.21. The 3D Paint dialog box. 
After selecting the faces, apply the Granite material (right-click over the material and choose Assign Material to Selection). Then, apply a planar map by clicking Hotbox | Edit Polygons | Textures | Planar Mapping | option box, selecting X-axis, and clicking Apply. In the Channel Box, set Projection Height and Width to 1.0. These settings size down the Granite texture for a more realistic scale in the stone's grain. Press F8 to turn off Face subobject mode, and select the block above the front doors. Apply the Granite material, and then repeat steps 23 and 24 to scale the texture mapping. Next, right-click over the block above the front doors, and choose Face. Select the faces in the Z-axis only, and apply a planar map in that direction to only those faces. Repeat this step for the top and bottom sides, which are facing in the Y-axis. Select the planters and apply the walls material to both planters. Now, right-click on a planter, and choose Face. Use the same MediumTrim and LightTrim materials as the borders around the lobby to texture the planter borders (refer to steps 18 and 19). Repeat this process for the opposite planter. Save your scene now.
|
