SSL Termination
| With SSL termination, a dedicated SSL termination device terminates the SSL connection, offloading CPU-intensive SSL computations from your origin servers. SSL termination devices have special hardware that can perform the SSL operations. SSL termination also enables the content switch to parse cleartext application headers to intelligently load balance SSL requests. To provide SSL offloading, you can configure your content switch and SSL termination device to decrypt SSL traffic and forward the cleartext traffic to non-SSL real servers, as Figure 11-1 illustrates. Figure 11-1. SSL Offloading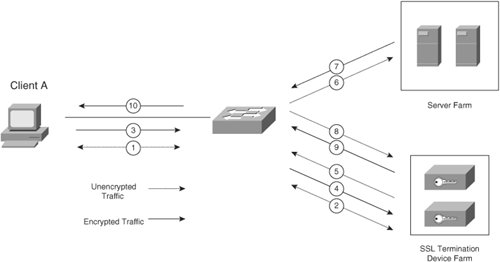 Because the content switch sees the request in cleartext, you can configure Layers 57 load balancing with SSL termination. Also, because the SSL module forwards traffic in cleartext to real servers, you should make sure that you secure your server farm switches to prevent sniffing of the cleartext traffic. Note To encrypt traffic from your SSL termination device to your back-end real servers, you can configure Back-End Encryption on your Content Services Switch (CSS) and CSM. Refer to your product documentation on Cisco.com for more information on Back-End Encryption. Based on Figure 11-1, a client's SSL transaction flows through the content network as follows:
To configure SSL Termination, you can use either:
Configuring Your CSS for SSL TerminationTo configure your CSS to offload your SSL connections to an SSL termination device, you must first load your keys and certificates to the SSL termination device. If you are already using public-key infrastructure (PKI) on your real servers and want to upgrade your system with SSL termination, you can import your existing private keys and server certificates to the SSL termination device. Otherwise, you can generate private/public key pairs and Certificate Signing Requests on the SSL termination device and request a server certificate from a Certificate Authority (CA). Once you enroll with a CA and receive the server certificate, you can import the server certificate to your SSL termination device. Note You can also use your own private CA to enroll certificates with Cisco CSSs and CSMs. For more information on configuring automatic certificate enrollment with private CAs, see your product documentation on Cisco.com. Creating and Importing Keys and Certificates on the CSSYou learned about the SSL module that is available for the CSS in Chapter 10. To import pre-existing keys and certificates to your CSS SSL module, you can use the command: copy ssl [protocol] ftp_record [import filename [format] "password" {"passphrase"} The passphrase is the existing phrase created with the certificate for encrypting/decrypting. This phrase must be used anywhere you use the certificate, not just on the CSS. You must also create a new password as a second layer of security that the CSS will use to encrypt the imported certificate. This password is local to the CSS and prevents unauthorized administrators from accessing the certificate on the CSS. Before issuing this command, you should first create an FTP record where your certificate and private key is located. You can use the ftp-record command to create a record called import-ssl. You must include your FTP username, your password to the FTP server, and the home directory where the certificate and private key is located on the server. For example: ftp-record import-ssl 10.1.1.1 cisco "cisco123" /home/sdaros You can use the following copy ssl command to import a PEM file containing an existing server certificate and private key, called sitecert.pem and sitekey.pem, respectively: copy ssl sftp import-ssl import sitecert.pem PEM "sanfran" "sanfran" copy ssl sftp import-ssl import sitekey.pem PEM "sanfran" "sanfran" You must indicate to the CSS whether the imported files contain a private key or a certificate by using the ssl associate commands: ssl associate cert mycontentcert sitecert.pem ssl associate rsakey mycontentkey sitekey.pem Note Make sure that you import your CA's root certificate. Additionally, if your CA issues you a chained certificate, make sure you also import any intermediary certificates within the chain. Instead of importing existing keys, you can generate an Rivest, Shamir, and Adelman (RSA) public/private key pair for asymmetric encryption on the CSS using the following command: ssl genrsa filename numbits "password" This command stores both the private and public key in a single file that you must associate with a certificate name. For example, to generate a key called mycontentkey, use the following commands: ssl genrsa mycontentkeyfile 1024 "sanfran" ssl associate rsakey mycontentkey mycontentkeyfile To generate a CSR for the key pair, use the following command in Example 11-1. Example 11-1. Generating a CSR on the CSS
To apply for a server certificate, you must send the CSR to a CA of your choice. Most well-known CAs allow you to cut and paste your CSR to their websites and will issue you a server certificate via e-mail within a few business days. Once you receive your server certificate (called sitecert.pem in this example), you can import it using the copy ssl command that you learned previously: copy ssl sftp import-ssl import sitecert.pem PEM "sanfran" "sanfran" ssl associate cert mycontentcert sitecert.pem Note Make sure you keep track of when your certificates expire. You will need to obtain new certificates before they expire. Otherwise, clients will receive an error when they attempt to download the expired certificate. Terminating SSL on the CSSNow that you have a server certificate and a private key on your CSS, you can configure your CSS to terminate SSL connections on behalf of your real servers, as illustrated in Example 11-2. Note Note that there is no IP addressing and server destination-Network Address Translationing (DNATing) involved when configuring the CSS SSL module. Example 11-2. Configuring Your CSS to Terminate SSL Connections
Configuring URL and Header Rewrite on the CSSYou learned previously that, without back-end encryption, real servers receive cleartext requests and send HTML page responses in cleartext (in Steps 68 from Figure 11-1). However, if an HTML page includes embedded HTML references to other sites, you need to make sure that these links are prefixed by "https://" and not "http://"; otherwise, your browser may give you an error while accessing the secure site. For example, your HTML page may include the following links: <A HREF="http://cisco.com/support.html">Support</A> <A HREF="http://cisco.com/services.html">Services</A> <A HREF="http://cisco.com/products.html">Products</A> To inform your HTTP server that the current cleartext request is from the CSS SSL module (in Step 6) and is not a client request, you can configure the CSS SSL module to add an HTTP header to the HTTP request. For example, you can add an HTTP header including the SSL session information. To enable the CSS to insert SSL session information HTTP headers into requests that it proxies, use the following proxy list mode command, as Example 11-2 illustrates: ssl-server number http-header session You can then configure your HTTP servers to recognize these headers and supply an HTML page containing "https://" within the embedded links instead of "http:// ." Note You can also configure the CSS to insert the client and server certificates as HTTP headers using the client-cert and server-cert keywords of the ssl-server http-header proxy list command. Additionally, if your servers send HTTP 300 series redirects to your clients, then you should configure your CSS to rewrite the "http://" reference in the "Location:" header of HTTP 300 series redirect methods to "https://" with the proxy list command: ssl-server number urlrewrite number hostname [sslport port {clearport port}] This command enables you to specify particular URLs that you want to rewrite in HTTP 300 series redirects, by including the exact URL or by using wildcards. Entries without wildcards take precedence over wildcard entries, and prefix wildcards entries take precedence over suffix wildcard entries. For example, you can configure your CSS to rewrite all redirects for "*.cisco.com" (prefix wildcard) and "www.cisco.*" (suffix wildcard) with the commands: ssl-server 1 urlrewrite 1 *.cisco.com ssl-server 1 urlrewrite 1 www.cisco.* You can also rewrite nonstandard cleartext HTTP ports (that is, any port other than port 80) with either the standard SSL port (that is, port 443) or nonstandard SSL ports. For example, the following command will rewrite "http://www.cisco.com:81" to "https://www.cisco.com": ssl-server 1 urlrewrite 1 www.cisco.com clearport 81 The following command rewrites "http://www.cisco.com" to "https://www.cisco.com:444": ssl-server 1 urlrewrite 1 www.cisco.com sslport 444 The following command rewrites "http://www.cisco.com:81" to "https://www.cisco.com:444": ssl-server 1 urlrewrite 1 www.cisco.com sslport 444 clearport 81 Note Neither the CSM nor CSS supports rewriting HTTP URLs embedded directly within HTML pages. Configuring Your Content Services Module with SSLYou can also configure your CSM-S for SSL termination. As with the CSS with an SSL module, you can import existing keys and server certificates to your CSM-S daughter card or generate new keys and request server certificates from a CA. Note You can also configure SSL termination with the CSM using a separate SSL services module (SSLM). The configuration for the SSLM is the same as the CSM-S. For more information on the SSLM, refer to its product documentation on Cisco.com. Creating and Importing Keys and Certificates on the CSMTo generate a private/public key pair on your CSM-S daughter card, use the command: crypto key generate rsa general-keys label key-label [exportable] [modulus size] For example, the crypto key generate command produces the output in Example 11-3 to generate a key pair called mycontentkey on the CSM-S. If you want to be able to export the private key from the SSL daughter card for future use outside the CSM-S, you can use the exportable keyword. Example 11-3. Configuring Your CSM to Generate an RSA Key Pair
To enter your organization's information for a CSR, you must create a trust point, as Example 11-4 illustrates. Example 11-4. Configuring a Trust Point on the CSM-S
To generate a CSR for the key pair, use the command: crypto ca enroll trustpoint-name For example, Example 11-5 shows the command output to generate a request for the key pair mycontentkey that Example 11-3 previously generated. Example 11-5. Creating a CSR on Your CSM-S
As you learned previously, to apply for a server certificate, you must send the CSR to a public CA of your choice (such as Verisign), or to your own private CA (such as Microsoft Certificate Services). If you use a public CA, once you receive the server certificate, you can TFTP it to the CSM-S using the crypto ca import command, as Example 11-6 illustrates. The CSM-S connects to the TFTP server specified previously in Example 11-4 using the enrollment url command. Make sure your certificate exists on a valid TFTP server before using the crypto ca import command. Alternately, if you use a private CA, you can specify its URL with the enrollment url command, and the crypto ca import command will connect to the private CA to download the server certificate. Example 11-6. Importing a Server Certificate on Your CSM-S
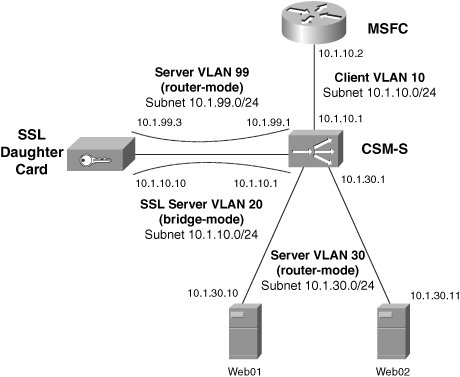
Note Make sure you load your CA's certificate (and intermediate certificate, if necessary) to the CSM-S using the crypto ca authenticate command. Also use the enrollment url command to make sure that the CA's certificate resides on the TFTP server you specify. If you are using your own private CA, the crypto ca authenticate command will load the CA certificate from the private CA. Alternately, if you have existing private keys and certificates, you can import them into your SSL daughter card. For example, to import an existing PKCS#12 key, you need to have previously generated the PKCS#12 file using an external PKI system. Recall from Chapter 8 that a PKCS#12 file can contain a private key and server certificate chain. Then, to import the existing private key and server certificate chain from the PKCS#12 file to your CSM-S, you can use the following command: crypto ca import trustpoint_label pkcs12 {scp: | ftp: | nvram: | rcp: | tftp:} [pkcs12_filename] pass_phrase Note Using the crypt ca import command to import PKCS#12 certificates automatically generates the trust point configuration for use in your SSL proxy services. You will learn how to configure a proxy service on the SSL daughter card later in this section. Terminating SSL on the CSM-SNow that you have private keys and server certificates on your SSL daughter card, you can configure your CSM-S to terminate SSL connections. You can configure the content switch either in NAT-mode (that is, the content switch will destination-NAT the client's request to the SSL daughter card's IP address in Step 2 from Figure 11-1) or in dispatch mode (that is, the content switch will route the packet directly to the SSL daughter card without DNATing it). If you configure the content switch in NAT-mode, make sure you configure the SSL daughter card to DNAT the packet back to the virtual server IP address. Example 11-7 shows how to configure your CSM to terminate SSL connections in dispatch-mode, based on the network topology in Figure 11-2. For the example in this section, the SSL daughter card farm is in bridge-mode and the real server farm is in router-mode, as Figure 11-2 illustrates. Figure 11-2. Dispatch-Mode CSM with SSL Daughter Card in Bridge-Mode Example 11-7. Configuring Your CSM to Terminate SSL in Bridge-Mode
Here are some notes to help you understand the configuration in Example 11-7.
Example 11-8 gives the corresponding SSL daughter card configuration for CSM-S termination. Whereas with the CSM-S you did not have to directly configure the SSL module with IP addressing, you must configure the CSM-S daughter card with an IP address and default gateway. The SSL daughter card is a separate TCP/IP host on the network and, as such, it responds to ARP requests. You must also administer it separately via Telnet through a separate command line interface. Example 11-8. Configuring Your SSL Daughter Card for SSL Termination
Here are some notes to help you understand the configuration in Example 11-8.
Configuring URL and Header Rewrite on the CSMTo enable the SSL daughter card to insert HTTP headers to inform the server that the SSL daughter card is proxying the connection, you can create an HTTP header policy on the SSL daughter card. Example 11-9 illustrates how to create an HTTP header policy and assign it to an SSL proxy service. Example 11-9. Creating an HTTP Header Policy
Similar to the CSS SSL daughter card, if your servers send HTTP 300 series redirects to your clients, then you should configure your CSM-S to rewrite the "http://" reference in the "Location:" header. To inspect the "Location:" header and replace "http://" with "https://" on the SSL daughter card, you can use the configuration in Example 11-10. Example 11-10. Creating an HTTP URL Rewrite Policy
|
EAN: 2147483647
Pages: 178