Recording Automation
| [ LiB ] |
Recording Automation
Because you can record automation in the Mixer window, as well as by using automation subtracks, we will look at these two methods separately. If you are using an external control surface to control specific parameters inside Cubase, you will probably find that recording automation is easier when done through the control surface, rather than adding events in the automation tracks associated with each channel in the project window. On the other hand, editing previously recorded automation might be easier if done through the project window.
Before heading into the automation section, remember that you can set the levels and pans of audio channels in the Mixer without using automation, just as you would on a normal mixer desk. This allows you to monitor your tracks appropriately without adding automation to them. As long as the Write or Read Automation buttons (found in the Common panel on the left of the Channel Mixer window) are not activated (not lit), the faders , pan, and any other effect settings stay at the same position. If the Read Automation button is not activated in the Common panel, Cubase will not read any automation. However, disabling automation doesn't mean that you lose the automation you have previously recorded.
Using Read and Write Buttons
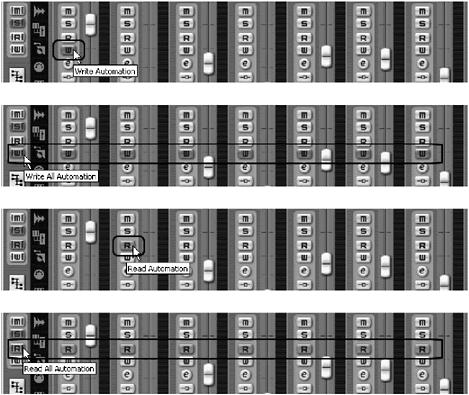
To record your mix automation using the Mixer window, the Channel Settings panel, or the Channel section found in the Inspector area, you need to use both Read and Write Automation buttons to achieve your goal: the Write button to record the automation and the Read button to read whatever you record afterwards or during a previous pass. To activate the automation writing process, click the Write Automation button of the desired channel. Clicking this button in any of the mentioned areas activates the same function in all subsequent windows where the channel is represented (the Inspector area, the Track List area, the Channel Settings panel, and the Mixer window). By clicking the Write Automation button directly in the channel, you activate the writing automation functions for this channel only. If you want to activate the write channel automation for all channels at once, you can use the Write Automation button found in the Common panel of the Mixer window, as demonstrated in Figure 13.3. Which one you use depends on what you want to achieve.
Figure Figure 13.3 . Writing automation by using channel and common write functions.

When you activate the Write button on a channel or in the Common panel of the Mixer, Cubase is ready to record any change in parameter settings. If you don't move a parameter, Cubase will not record any data for this parameter.
After you have recorded automation, you need to activate or enable the Read Automation button for Cubase to read whatever automation you have recorded. Otherwise , the information is present, but your automation is not read. As with the Write Automation button, the Read Automation button is found in several windows inside your project and enabling it on a channel in one window enables it in all the other windows as well. The Global Read Automation button found in the Common panel of the Mixer window also activates the Read option for all channels in the Mixer at once.
Recording Channel Track Automation
This section describes how to record channel track automation, which any channel settings mentioned earlier in this chapter, as well as MIDI and audio channel settings. The actual settings you can record are determined by the track class itself.
How To
To record channel automation:
-
Open the Mixer window (F3 is the default key command).
-
Activate the channel's Write Automation button. This button is lit when active.
-
Position your playback cursor and click the Play button on the Transport panel (or press the spacebar).
-
Move the appropriate faders, knobs , switches, and so on (this includes any settings mentioned in Table 13.1).
-
Stop the playback when done.
After automation has been recorded, you can listen to it by activating the Read Automation button and bringing the play cursor to the same location you started recording automation. Click the Play button to see (and hear) your recorded automation.
After your automation is recorded, you can use the channel's automation subtracks to view each setting that was automated. We'll get into this a little later in this chapter.
Recording Parameter Automation
Recording parameter changes in a plug-in effect, such as a VSTi or send effect, is quite similar to recording channel settings in track automation. However, these automation events are recorded in separate tracks and subtracks, created automatically as soon as you move one of the controls of an effect or VSTi when the Write Automation button is activated inside the plug-in (this can be a VSTi or VST effect plug-in; PC users cannot automate DirectX effect plug-in parameters). This type of automation is normally used to change the parameters of effects or a VSTi, creating dynamic changes in the plug-in through time during playback. For example, you can automate the Cutoff frequency by moving this parameter in the VSTi panel (provided there is such a parameter on the instrument itself).
How To
To record plug-in parameter automation:
-
Open the desired effect's panel.
-
Activate the Write Automation button found inside the panel. This button is lit when active.
-
Position your playback cursor and click the Play button on the Transport bar (or press the spacebar).
-
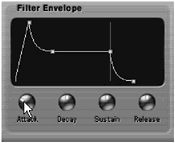
Move the appropriate faders, knobs, switches, and so on. You might need to consult the documentation provided with the effect to find out which parameters are automatable as this varies from one effect to the next (see an example in Figure 13.4, featuring the a1 synthesizer VSTi plug-in).
Figure 13.4. Moving the Attack parameter in this example, while the Write Automation button is active and the project is playing, records the changes through time to this parameter.

-
Stop the playback when done.
Once automation has been recorded, you can listen to it by activating the Read Automation button as mentioned earlier in this chapter.
About Automation Modes
In Cubase SL, there is only one automation mode available. This is called Touch Fader mode . In this mode, the program starts writing automation as soon as you click a control or parameter, such as the volume fader, and stops writing when you release the mouse button.
In Cubase SX, there are four additional automation modes: Autolatch, X-Over, Overwrite Mode, and Trim:
-
With Autolatch, the program starts writing the automation as soon as you click a control, such as the volume fader, and stops writing when you deactivate the Write Automation button. In other words, the last automation value is continuously written until you turn off the Write Automation button within the channel mixer found in the Inspector area or in the Mixer window. This mode is useful if you want to write over a long section that contains previously recorded automation that you want to replace. It is also useful when using an external control surface to control your mix. Because Cubase has no way of knowing which control you want to rewrite, it starts writing as soon as you move a control and keeps the value sent by this control until you stop playback or you switch the Write Automation button off. Make sure, however, that you don't touch any other controls when doing this; otherwise, you might end up replacing automation by mistake. Note that this also applies for some VSTi and VST plug-in effects parameters.
-
X-Over works much like the Autolatch mode, with one exception: When you cross a previously recorded automation curve, the write process is automatically turned off.
-
Overwrite Mode is also similar to Autolatch mode with the exception that it only affects volume automation. Use this mode when you want to redo any previously recorded volume automation.
-
Trim, like the Overwrite mode, works only on the volume automation. What makes it different, however, is that it does not erase previously recorded automation, but rather offsets the previously recorded automation. For example, let's say you recorded a volume automation, starting your automation at -10 dB.
While you listen to the result, you realize that the automation is good, but the whole thing is too soft. Using the Trim mode, you can place the play cursor a bit before your previous automation, enable the Write Automation button, and raise the fader slightly after pressing play. As a result, all the following automation will be raised proportionally by this amount. So, if you start your automation at -7 dB instead, the rest of the automation will have shifted proportionally.
How To
To change the automation mode (in Cubase SX only):
-
In the project window, click the Automation Mode Selection field in the toolbar (see Figure 13.5).
Figure 13.5. The Automation Mode Selection field in the SX project window's toolbar.

-
Select the desired automation mode from the drop-down menu.
| [ LiB ] |