Audio Track
| [ LiB ] |
Audio Track
The audio track class is used to hold audio events, audio parts , and automation information. When you record audio on a track, an audio event is created in your project. Each audio track can play one audio event at a time. This implies that if you overlap audio events, you only hear the event on top of the others. You can change the order of these events to hear a different part.
How To
To change the order of overlapping parts or events:
-
With the Selection tool, click the event (or part) you want to send to back or bring to front.
-
While the event is selected, right-click and choose the appropriate option under Move To from the context menu.
Remember that you can also do this with a MIDI part. However with MIDI parts, you will still hear the overlapping parts no matter what the order might be.
In order to record audio information in a project, you will need to start by creating audio tracks, just as you need to create MIDI tracks if you want to record MIDI events. When you create audio tracks, you need to make a choice about how you want your track configured. In Cubase SL, this choice allows you to pick between mono or stereo tracks (one or two channels). Events recorded on a mono track will be recorded in mono format and events recorded on a stereo track will be recorded in stereo interleave format. Stereo interleave means that both channels (left and right) are recorded into the same file. With Cubase SX, the choice widens to include surround sound formats such as LCRS (left, center, right, and surround), 5.0, 5.1 or one of many other multichannel format.
Once an audio track is created, you can record and import or move audio from the pool into this track. By assigning the track to an output bus, it will allow you to monitor its content through that output bus. For best and predictable results, you should always import audio files into a track that corresponds to the same configuration. For example, you should always drag stereo files onto stereo tracks and mono files onto mono tracks.
How To
To add an audio track to a project:
-
Right-click(PC)/Control-click(Mac) in the Track List area of the project window. You can also select Add Track > Audio from the Project menu.
-
From the context menu, select Add Audio Track.
-
In the Add Audio Track dialog box, select a track configuration from the drop-down menu.
-
Click OK.
NOTE
 QUICKLY ADDING MORE TRACKS
After you have added an audio (or MIDI) track, double-clicking under that track in the track list area will create another track of the same class.
About Audio Terminology
To work with audio inside a Cubase project, it is important to understand the audio terminology associated with your project. In Cubase, audio is referred to as audio clips, events, parts, regions , and slices. This section describes how, when, and why these terms are used.
Audio Clips and Audio Events
In the project window, recorded audio is referred to as an audio event . Audio events are the representation of the audio clip, which is the file recorded onto your hard disk. In essence, when you edit an audio event, you edit the graphic representation of an audio file, named audio clip , inside Cubase without changing the original content found on your hard disk. When an audio clip is placed on a track in a project, it becomes an audio event. So the difference between an audio clip and an audio event is that the event plays at a specific time in a project and is also used in a project, whereas clips don't have a playback time associated with them, and they are found only in the pool window.
Audio Regions
Audio clips in the media pool can also contain regions. Regions can be created automatically when recording in Cycle mode, or you can create regions manually inside the sample editor. Typically, regions represent a portion of an audio clip or audio event.
When placing an audio event that contains several regions in an audio track, it is possible to change which region will play without changing the event's location. You simply need to tell Cubase to play another region instead. For example, if you have recorded three takes of a solo performance in Cycle Recording mode, each time the recording started a new lap, a region might have been created (this depends on the recording preferences found under File (PC)/Cubase(Mac) > Preferences > Record > Audio Cycle Record Mode options). You can later decide which lap you wish to listen to by selecting which region is active (on top).
Audio Slices
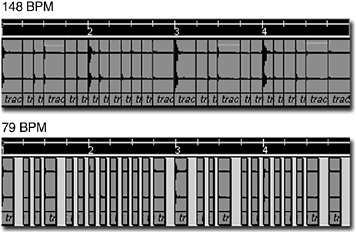
Another type of Event/Region combination found in Cubase is called an audio slice . Slices are used with rhythmic parts, such as drum loops . You can create slices only inside the Sample Editor window. Using the Hitpoints tool allows you to define where important beats or slices occur in rhythmic or percussive musical content. For example, you can cut a drum loop in individual hits. Each hit is what Cubase then calls a slice . These slices do not appear in the Pool like the regions will; however, when you place a drum loop sample containing slices on an audio track, Cubase creates a part that holds this drum loop, and each event in the part corresponds to a slice of the audio clip. By dividing rhythmic audio events using slices, you can later quantize these events the same way you would quantize MIDI events. Furthermore, you can change the tempo of a project, and each slice's start point will keep its relation in the beat. If an audio file containing a rhythmic part is not sliced, changing the tempo will not affect this loop's start point, but the rhythmic accuracy will shift since the tempo of the audio loop and the project do not match anymore. If you take a look at Figure 6.11, you will see a part as it appears when an audio drum loop has been sliced and placed on an audio track. The same content is represented in both portions of Figure 6.11; however, the top portion represents the slices when the project plays at a tempo of 148 BPM, whereas the bottom portion represents the same slices played at a tempo of 79 BPM. As you can see, the beats occur at the same location in the bar/beat grid, but there is space added between each slice when the loop is played at a slower tempo.
Figure 6.11. Example of a drum loop sliced using hitpoints.
Finally, you can have audio parts in your project. Audio parts are containers of audio events, regions, or slices. An audio part does not represent a recorded or imported audio event, but you can place audio events inside of a part. You can also convert an event into a part, and you can place additional audio events inside an existing part. In other words, audio parts are similar to MIDI parts in that they hold information that can be moved across other audio tracks or in time. Audio parts are useful when you want to move multiple events together, such as the ones found when using slices, for example.
Figure 6.12 is divided into three parts. On the left, you can see where to find the different types of audio terms mentioned in this section. In the center, you can see the hierarchy between the different terms, and on the right, a diagram displaying how this hierarchy works in your project. By default, when you double-click in the project window on a part, it launches the Audio Part Editor. Once inside the Audio Part Editor, you can drag other regions, events, or sliced events into a part. When you double-click on an event or a region inside the audio editor or in the project window, it launches the Sample Editor. You can't drag anything in the Sample Editor.
Figure 6.12. The audio terminology's hierarchy.
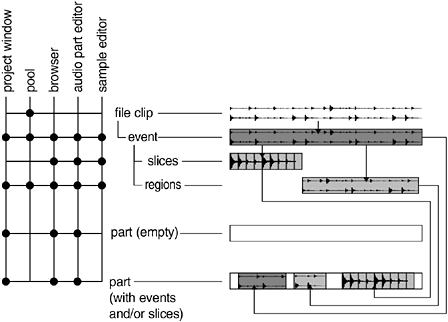
This hierarchy allows for nondestructive editing because what you normally edit is the audio clip, its associated event, regions, and slices, not the audio file itself. When a portion of the audio event is processed, Cubase creates an additional audio clip on the hard disk containing the newly processed section of your audio. The audio parts containing references to processed audio material update themselves to correspond to this new link.
Setting Up an Audio Track
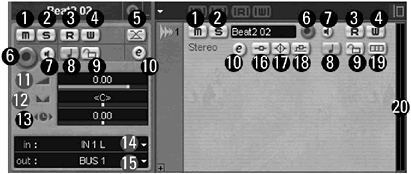
The following numbered list describes the different buttons and control elements found in both the Inspector area and the Track List area for an audio track (see Figure 6.13). It is important to understand what these buttons do as they will be used throughout your work on a project when audio tracks are involved.
Figure 6.13. The Track Parameters section found in the Inspector area of a selected audio track.
-
Mute: Mutes the track during playback.
-
Solo: Solos the track (mutes all other tracks).
-
Read Automation: Reads recorded automation on this track.
-
Write Automation: Writes automation on this track.
-
Auto Fade: Brings up the Auto Fade dialog box, which lets you set how fades and crossfades are handled on this track.
-
Record Ready: Arms this track for recording. When you press the record button on the Transport panel, incoming audio signals will be recorded on this track.
-
Monitor button: Uses the channel's level meters as an audio input monitor. You can't adjust the input level using the channel fader, but you can use this to monitor the level coming in and adjust it by using an external level adjustment or the audio input bus (SX only). You can also use this to monitor incoming signal without recording it when pressing the Record button on the Transport panel.
-
Timebase Format: Switches the track between linear time and musical tempo. When a track is displayed in musical tempo, changing the tempo of the song adjusts the events in the part according to the tempo setting. When a track is displayed in linear time, changing the tempo of the song does not affect the start position of the parts.
-
Lock button: Locks your track from editing.
-
Edit Audio Channel: Opens the Channel Settings panel to edit the settings associated with this type of channel.
-
Track Volume: Sets and monitors the volume level for this track. Automation or volume changes made in the track's channel and project's mixer are displayed here as well.
-
Track Pan: Sets and monitors the pan position for this track. Automation or pan changes made in the track's Channel Settings panel and project's Mixer panel are displayed here as well.
-
Track Delay: Adds a positive or negative delay (in milliseconds ) to your track. Events with a negative delay play earlier, whereas positive values change the timing of events to occur later in time.
-
Audio Input Bus: Sets the input bus for the track. An audio signal coming through the input bus can be recorded onto the track or monitored through the audio output bus if the Monitor button is enabled (see above).
-
Audio Output Bus: Sets the output port for the track. To hear audio events recorded on this track, you need to select the output bus that is associated with a physical output on the computer's sound card.
-
Insert State: Monitors the state of the insert effects. The button is blue when an insert effect is assigned to the track, and a yellow rectangle will appear next to it when the Bypass button is active. Clicking on this button will bypass any audio inserts you have assigned to this track.
-
EQ State: Monitors the state of the EQ. The button is green when one or more of the four bands are in use by the track, and a yellow rectangle will appear next to it when the Bypass button is active. Clicking on this button will bypass any equalization settings you have assigned to this track.
-
Sends State: Monitors the state of the send effects. The button is blue when an insert effect is assigned to the track, and a yellow rectangle will appear next to it when the Bypass button is active. Clicking on this button will stop any audio from being sent to an FX channel in this track.
-
Lane Display Type: Displays overlapping parts or events on several lanes inside the audio track. Clicking on this button will reveal a menu with different lane display options. When the lane display is set to Off, overlapping parts will go back to the usual display (for previous Cubase owners ). Fixed lane display will spread overlapping parts or events over the corresponding number of lanes. Note that events that would appear on top of overlapping events will appear in lower lanes. Since each audio track can only play one audio event at a time, audio events on lower lanes will prevent audio events on higher lanes from playing.
-
Output Activity: Monitors event activity for the track. In audio tracks, the number of actual activity meters will depend on the track's configuration. Mono tracks will display a single output meter while a surround track configuration will display as many output meters as the track contains. With the audio track in input monitoring mode (the monitor button is active), the activity represents the input level instead.
Audio Track Inserts
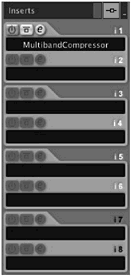
In Cubase SX, you can have up to eight insert effects per channel and up to five in Cubase SL. The signal from an audio track is routed through each active insert effect one after another. In other words, the output of one insert effect feeds the next one, and so on, from top to bottom (see Figure 6.14).
Figure 6.14. The Track Inserts section from the Inspector area of the audio track.
NOTE
 REDUCING PROCESSING POWER NEEDED BY USING SENDS INSTEAD OF INSERTS
Because each instance of an effect that is loaded into an insert effect slot uses as much processing power and memory as it does in send effects, it is strongly recommended that you use track send effects when you use the same effect with the same settings on more than one track. This reduces the amount of processing power needed to process the audio and also reduces the amount of memory needed to load each instance.
To monitor how your computer is doing in terms of system resources, you can take a look at the VST Performance panel or on the Default Transport panel. The default key command to open the VST Performance panel is F12. You can also open it by selecting its option in the Devices menu. This way, you can make changes to your project before your computer starts to become overloaded.
Each insert effect slot has four controls: the Active/Deactivate, Bypass, and Edit effect setting buttons. Below these buttons you will find a field where you can select which effect should be added to the track. These controls are similar to the ones explained earlier in the MIDI Track Inserts section. You will also find two buttons in the title bar of this section:
-
The Bypass Inserts button bypasses all insert effects found on this track. As with the Active/Bypass button found on each insert, this can be useful to monitor your track with or without effects without having to make changes to these effects. When the inserts are bypassed, a yellow rectangle appears at the location of the Bypass Insert button.
-
The Track Insert section's Control button in the upper-right corner maximizes or minimizes this section in the Inspector area. As with all other Control buttons in the MIDI track's Inspector, the Control button has two states: the default project color means that there are no inserts on this track and turquoise means that there are inserts on this track
Adding an insert effect, bypassing an insert, or all inserts is done exactly the same way as with MIDI track inserts. Please refer to that section in this chapter if you are unsure about the procedure.
NOTE
 USING INSERTS 7-8 FOR POST-FADER PROCESSING
Normally, when using inserts, the signal passes through the effect before the volume control (prefader) and before any EQ is applied to the track. However, with inserts 7 and 8 (SX Only), the signal is sent to the insert after the volume control (postfader) and after the EQ for this track.
This type of insert is best suited for effects that need to be inserted regardless of the volume and EQ settings, such as final dynamic processing using limiters or dithering processes. For that reason, you should use the inserts 7-8 on output buses during the mastering process. This will be discussed further in Chapter 15.
Audio Track Equalizer
Below the Track Inserts section, you will find the track's Equalizer section (EQ). Each audio track you create has a four-band parametric equalizer (see Figure 6.15). An equalizer allows you to control the gain of a specific band of frequencies. The frequency found at the center of this band is displayed in the EQ. The width of each band depends on a setting called Q. These four bands are called (from top to bottom in the Equalizer section): Hi, Hi Mid, Lo Mid, and Lo.
Figure 6.15. The Equalizer Section from the Inspector area of the audio track.
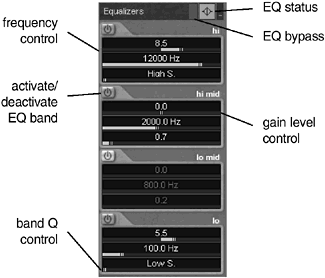
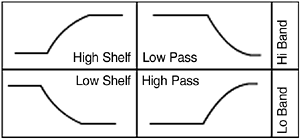
Most of the features for each EQ band are similar with the exception of the Hi and Lo bands. In the Hi band, setting the Q completely to the left creates a high shelf, which means that any frequency above the center frequency for this band is affected by the gain control. Inversely, if the Q is set completely to the right, it creates a low-pass filter, where every frequency above the band's center frequency is reduced. For the Lo band, setting the Q completely to the left produces a low shelf and setting the Q completely to the right creates a high pass, as shown in Figure 6.16.
Figure 6.16. The different types of shelves and pass filters found in the Hi and Lo band EQ.
How To
To adjust an EQ band from the audio track Equalizer section:
-
Make the Equalizer section visible for the track you want to adjust.
-
Enable the band you want to use.
-
Find the center frequency you want to adjust by dragging the slider bar under the numeric display of the frequency, by clicking on the frequency value and using your scroll bar to increase or decrease the value, or by double-clicking on the value and entering a new value between 20 and 20,000 (which corresponds to the range of each band).
-
Adjust the amount of gain or reduction you want to apply by using the gain control values. You can adjust these values the same way you can adjust the frequency (as seen in Step 3). However, the minimum and maximum values for this field are -24 to +24 (which correspond to dB values).
-
Adjust the width of your band by changing the Q value for the appropriate band. Smaller values result in wider bands, whereas higher values result in narrower bands.
-
Repeat these steps for each band in your EQ.
You can bring back each value to its default position in the EQ by Ctrl(PC)/ ![]() (Mac)-clicking on the appropriate field. You can also do a before/after comparison listening by deactivating the band. This acts as a band bypass. When you are bypassing the EQ bands, the settings remain unchanged.
(Mac)-clicking on the appropriate field. You can also do a before/after comparison listening by deactivating the band. This acts as a band bypass. When you are bypassing the EQ bands, the settings remain unchanged.
Note that you can also adjust the EQ settings (as well as inserts and sends) through the Mixer panel and the Channel Settings panel. Finally, you can also bypass all bands in the EQ by clicking on the Bypass button in the Equalizer section's title bar.
Equalizer Curve
The Equalizer Curve section of the Inspector area (see Figure 6.17) offers a graphical display, representing the current EQ settings for the selected audio track. Each band is represented by a point along a centered horizontal line. This center line represents an EQ in its default state, which implies that no changes have been made to the audio's frequencies. Frequencies are displayed from low on the left, to high on the right of the display. The space above the centered line represents a gain in the frequency while the space under the centered line represents a cut in a band's frequencies.
Figure 6.17. The Equalizer Curve display in the Inspector area.

Any changes you make in the Equalizer section will be visible here, so you can use this area to quickly glance at the EQ settings for this track, but the EQ curve also draws your EQ settings for the track. Here's how:
How To
To adjust the EQ settings using the Equalizer Curve:
-
To add an EQ band: Click where you want to add it on the EQ's curve. The band numbers correspond to their respective frequency range. This implies that the area where you click in the display will influence which band number appears. Remember that if you want to use a low shelf, low pass, high shelf, or high pass filter, you will need to click near the left or right extremities of the display, depending on the band you want to activate.
-
To change the gain without changing the frequency: Hold the Ctrl(PC)/
 (Mac) key down while you drag the band's handle in the graphical display.
 -
To change the frequency without changing the gain: Hold the Alt(PC)/Option(Mac) key down while you drag the band's handle in the graphical display.
-
To change the band's Q: Hold the Shift key down and move your mouse up to increase the width of the Q (the Q value will actually go down) and move your mouse down to decrease the width of the Q (the Q value will actually go up).
Audio Track Sends
As with track inserts, the track sends for audio tracks are similar to MIDI track sends, with a few differences to point out. First, let's start with the title bar. In the MIDI Track Sends section (and in the audio Track Sends section), you have a State button that views if there are currently any sends assigned to the selected track. The button is colored when this is the case. To the left of the Sends state button is a Bypass button. You can click on this area to bypass all the sends at once without changing any settings in this section. When all the sends are bypassed, you will see a yellow rectangle next to the sends turquoise State button (see Figure 6.18). You may also stop sending a signal from this track to an effect by deactivating it (the first button on the left over each sends).
Figure 6.18. The Track Sends section from the Inspector area of the audio track.
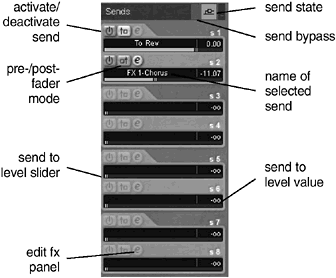
For each audio track send, you have three buttons above the effect's name that resemble the MIDI track sends: the Activate/Deactivate (or Bypass) button, the Pre-/Post-fader toggle button, and the Edit Effect Parameter button. Below these three buttons, you will find the name of the send effect. The effect name displayed here represents the effect associated with an FX track. In other words, to assign an audio track to a send effect, you need to create an FX track and load an audio plug-in effect into that track's insert effect. You can only have a total of eight send effects per audio track (five in SL), but you can create as many FX tracks as you want. This means that you don't need to share the same send effects for all the audio tracks in your project. For example, you might have 10 FX tracks where the audio track 1 uses sends 1 through 4, audio track 2 uses sends 1 through 4 as well, but in both cases, the signal might be sent to different FX tracks altogether, with track 1 going to FX tracks 1, 2, 3, and 4 while track 2 might be sending its signal to FX tracks 3, 5, 7, and 9.
Below the effect's name is the Send to Effect Level setting. This setting controls how much signal from this track you want to send to the selected FX track. Audio sent to an FX track (which then routes the signal into an audio plug-in effect) is processed at the level at which it is sent. The more signal you send to the effect, the more you hear the processed sound for this audio signal. The idea is to give you control over how much effect you want over each individual track without having to load multiple instances of plug-in effects.
NOTE
 SENDING A SIGNAL TO AN FX TRACK
In order to send a signal to an FX track, you will need to create an FX track and assign a plug-in effect to that track beforehand. To find out how to do this, go to the FX Track section later in this chapter.
NOTE
 SENDING A SIGNAL OUTSIDE CUBASE
You can also use sends to route your signal to an additional set of output buses on your sound card. This might come in handy when you want to send a signal to a headphone amplifier outside of your computer during a recording session or if you want to process the signal with a hardware device rather than a plug-in.
In order to send your signal outside Cubase using sends, you will simply need to select the appropriate output bus where you want to send the signal instead of an FX track.
This works better if you have a spare set of outputs (more than two) that can be dedicated as a send to effect bus. You should create a separate output and input bus and label them respectively FX Sends Bus and FX Return Bus. Labeling your input and output buses as such will make it easy to recognize them when assigning a track's send effect to a sound card's physical connectors.
How To
To send an audio track to an FX track:
-
Unfold the Sends section in the Inspector area of the audio track.
-
Select the desired send effect from one of the Send Effects plug-in selection fields. You can also send an audio signal to a group channel (if one exists) or an output bus.
-
By default, selecting an effect in the first two send effect slots will activate this effect automatically, but you will need to activate the effect if you are selecting any other send effect slot (3-8 with SX or 3-5 with SL).
-
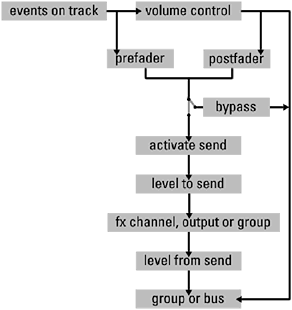
In the Send Effect section for the audio track, select Pre- or Post-fader, as desired. You can see how the signal is routed in Figure 6.19. In Post-fader mode, the signal sent to the effect is taken after the audio track's channel volume level and volume settings.
Figure 6.19. The audio send signal path diagram.
-
In the Sends section of the audio track, raise the level sent to the effect until the desired effect is reached.
NOTE
 ADJUSTING THE OVERALL LEVEL OF AN FX
To adjust the overall level of the effect in the mix, you will need to adjust the FX channel's volume level. Changing this level will influence all audio tracks that are being routed through that FX channel.
After completing these steps, you need to fine-tune both the level being sent to the FX channel as well as the level returning to the mix from the FX channel until the appropriate blend is found.
To send the signal of one track to more than one send effect, repeat the same steps as mentioned earlier in this section for another effect. Unlike insert effects, each send effect is processed in parallel, not in series. This implies that the order in which the signal is sent to the send effect does not influence the end result.
As you can see in Figure 6.19, there are many places you can bypass the effect. The following list describes the differences between each one and how you can use them.
How To
To bypass/activate the signal sent to all send effects in a track:
-
Use the Bypass button found in the Sends section's title bar (in the Inspector area of the audio track).
How To
To bypass/activate the signal sent to one send effect in a track:
-
Use the Bypass/Activate button found above the effect's name in the Track Sends section in the audio track's Inspector area.
How To
To bypass all the tracks sent to the same effect:
-
Use the Bypass button found on the FX channel track list or in the FX channel's settings.
Audio Track Channel
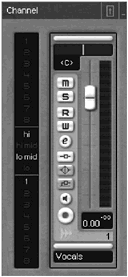
The Track Channel section (see Figure 6.20) in the Inspector area offers control over the track's audio channel. Most of these controls are also present in the Inspector's Setup section or in the Track List area. You will find a description of each button found in the Track Channel section in the "Setting Up an Audio Track" section found earlier in this chapter. This said, because these controls are the same as the ones found in the Setup section, the Track List area, the Channel Settings panel, and the Mixer panel, any changes you make in any of these windows is updated automatically in every one of them. For example, if you change the volume level in the Channel section, this is reflected in the Channel Setup section as well as in the Channel Settings and the Mixer panels.
Figure 6.20. The Track Channel section from the Inspector area of the audio track.
| [ LiB ] |
- Chapter IV How Consumers Think About Interactive Aspects of Web Advertising
- Chapter VIII Personalization Systems and Their Deployment as Web Site Interface Design Decisions
- Chapter XV Customer Trust in Online Commerce
- Chapter XVI Turning Web Surfers into Loyal Customers: Cognitive Lock-In Through Interface Design and Web Site Usability
- Chapter XVIII Web Systems Design, Litigation, and Online Consumer Behavior