| This appendix gives detailed steps required to install WebSphere Application Server V5 and Lotus Domino 6.5. We first discuss the preliminary setup that will be needed and then walk through the installation steps for WAS V5 and Domino 6.5. We also discuss the installation of DB2 V8.1, which may be used with WAS. The installations presented are aimed at Windows platforms, with comments about Unix-based platforms included. Please refer to the WebSphere Info Center and Domino Administration Help documentation for further details. Hardware and Software Prerequisite Details In this section, we list the hardware and software requirements for the computer you want to install on, as well as the different product software levels required. System hardware requirements: -
Pentium III or higher at 500MHz, 256MB memory at minimum ”greater than 512MB recommended for both WAS and Domino. -
At least 1GB of free disk space. The approximate disk space requirements of the products after installation are Domino 500-600MB, IBM HTTP Server 30MB, WebSphere 500-800MB. At least 150MB must be available in the system temporary directory (/tmp). You must also provide space for the unzipped install files. -
CD-ROM drive. The space requirement for Domino also can be reduced to a certain extent by choosing to install fewer components . For example, it is possible not to install the Help files. These files alone require 50MB. Similarly, the space for WebSphere specified here includes documentation and sample applications, which would not be needed in a production installation. Software requirements: -
Microsoft Windows 2000 with Service Pack 4 or Windows Server 2003. -
Linux: Red Hat Enterprise Linux WA/ES/AS for Intel 2.1 or UnitedLinux 1.0 SP2a, UnitedLinux 1.0 for pSeries, or iSeries or zSeries (31-bit mode only for zSeries). -
TCP/IP networking with a fixed IP address for each machine. Creating a User with Administration Rights WAS, Domino, and DB2 must run under the permissions of a user or as system services. For testing purposes, it is more flexible to use a user ID with rights to run as an extension of the operating system rather than load the products as system services (however, WAS and DB2 must run as system services). For a production system, these products should run as services so that they will automatically load when the system is started without operator sign-on. Here is how to create a Windows 2000 user ID with rights to run as an extension of the operating system. To do this, you must have the right to create an ID on your local machine (and in any Windows 2000 Domain Control server's user registry if your machine logs onto a network). If you already have a user ID (no longer than eight characters if to be used for DB2) with the right permissions, you can skip this section. A new user ID can be created in Windows 2000 using the Computer Management panel or the Users and Password wizard in the control panel. Here we describe the steps if using the Computer Management panel. -
Start the Windows 2000 Computer Management panel by selecting Start>Programs>Administrative Tools>Computer Management .
-
In Computer Management select the left pane, expand the tree under Computer Management (Local), and then expand the node System Tools. Expand Local Users and Groups to display the Users and Groups folders.
-
Either open the Users folder or right-click on the Users folder and select New .
-
Fill out the user information. We specified the user name db2admin . Specify a password. Change the default setting for password expiration so only Password Never Expires is selected. Click the Create button to create your new user and then click the Close button to dismiss the dialog box.
-
Right-click the new user ID in the Computer Management window and select Properties . Once the properties are displayed, select the Member of tab on the top of the panel to show the groups the user belongs to. Click the Add button on the lower left of the panel. Highlight Administrators in the upper pane displayed and click the Add button in the middle of the panel. Click OK to confirm and return to the Computer Management window.
-
Close the Computer Management window.
-
Select Start>Programs>Administrative Tools>Local Security Policy from the Windows 2000 desktop to set the user rights. Expand Local Policies in the left pane and select User Rights Assignment . In the right pane you can see a list of system policies that users can be granted.
-
Right-click the entry Act as part of the operating system to get a pop-up menu and select Security . You will be presented with a panel that shows the current list of users with the right to act as part of the operating system (the list may be empty).
-
Click the Add button to select the new user ID ( db2admin in our example) just created. Note that you can also select groups such as Administrators to grant this right.
-
Select the user and click the Add button to add the local security right to the user. Click OK to return to the Local Security Settings Policy window.
-
The new user also needs the following rights if DB2 is to run under the user ID just created: Create a token object, Increase quotas , and Replace a process-level token .
You can go ahead and assign them to the user. However, the DB2 install process will add these rights if they are not set, provided the right Act as part of the operating system is set.
-
Finally, close the Local Security Policy Setting panel and log on with the new user ID just created.
If you are unable to log on with this ID, you need to resolve the situation (perhaps with your administrator's help) before proceeding. It may be that you need to create a stand-alone server not associated with your existing Windows 2000 Domain for testing purposes. The user ID we just created only needs to be on the WebSphere computer. However, to make it easier to work with both computers, we recommend that you create the same user ID on both computers.
Installing WebSphere Application Server V5 Make sure that all HTTP servers or existing WAS servers on this computer are shut down before proceeding. Note that, by default, Windows 2000 server will be running the IIS HTTP service. Ensure that it is shut down and set to start manually in the services panel. The IIS HTTP service will be listed as World Wide Web Publishing Service. Ensure that it is stopped and its startup type is set to Manual by right-clicking the service, selecting Properties , and changing Startup Type in the General tab. Switch to the administrative user (Windows) or root (Linux). Check that the java command points to a Java runtime greater than 1.1. (Issue: java “fullversion to see the Java version.) If not, adjust your default path or JAVA_HOME environment variable to use a current JDK. You can install WebSphere from a product CD. The installation program should start automatically when you insert the CD. If not, run the setup.exe program on the CD (Windows) or change to the install directory /mnt/ cdrom /85 and run the LaunchPad.sh script (Linux). The LaunchPad application points to the documentation and WAS Installation Wizard. (To run the Wizard directly, change to the subdirectory containing the WAS install files and run the install.sh script.) If your installation CD supports installation using different languages, you can select the language for the Wizard text. A panel similar to that shown in Figure C-1 is displayed. Figure C-1. WAS Installation Wizard (1). 
Click Next to continue with the WebSphere installation. A panel is displayed indicating that the Wizard is checking the system prerequisites. If successful, the WebSphere license is displayed and the user is asked to accept the license. A panel is displayed showing the default path in which WAS will be installed. You may accept this path or change it. If the Wizard detects another installation of WAS on the system, it will ask if this install is to update the existing installation(s) or create a new instance. (Note: if you choose to create a new instance, you will need to adjust the set of ports used by WAS to be different from the existing instances.) The Wizard then verifies the operating system level. If running on a Linux system, which doesn't exactly match the IBM supported Linux distributions, an error message is reported , but the installation can be continued . Since WAS is Java-based, it will likely run on other distributions as long as the Java runtime is supported. The Wizard then displays a panel allowing a choice between a full install or a selective install. This panel is shown in Figure C-2. Select the install type and click Next . Figure C-2. WAS Install options. 
If a custom install is selected, the Wizard displays a panel allowing the specific WAS components or features to be selected, as shown in Figure C-3. Select the components to install. If the Wizard detects HTTP servers present on the system, it will allow selection of WAS plug-ins to install and configure to the HTTP server. If no HTTP server is found, the IBM HTTP Server can be selected for installation and plug-in configuration. Figure C-3. WAS Install feature selection. 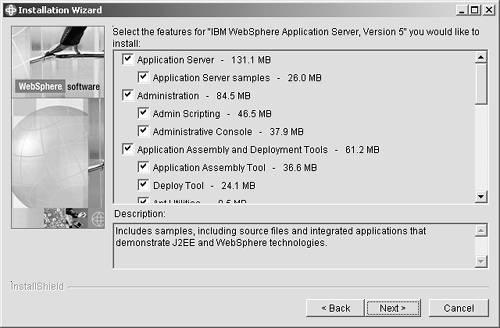
When finished with the selection, click Next to continue. A panel is displayed asking for confirmation of the features selected. Click Next to begin the install. Verifying Installation of WebSphere V5 To verify the installation of WAS, you can run the Install Verification Tool (IVT). To run this program, change to the WAS bin directory under the install path ( install_root ), and issue the command: ivt (Windows) or ./ivt.sh (Unix). The IVT program starts the server automatically if the server is not running. Once the server initializes, the IVT runs a series of verification tests and reports pass or fail status in a console window. It also logs results to the install_root \logs\ivt.log file. Alternatively, you can start the application server and attempt to access the WAS administrative application via a browser. To start the server, issue the command: startServer server1 (Windows) or ./startServer.sh server1 (Unix). Then, from a browser, attempt to open the URL: http:// yourhost :9090/admin . If the application server fails to start or there is a problem accessing the administrative application, check the WAS log files located in the install_root \logs\server1 directory. The application server process (JVM) writes its log messages to the files SystemOut.log and SystemErr.log. Apply Any Relevant e-Fixes If you have problems with your application in WebSphere and suspect you have found a WebSphere product problem, check the support download page for relevant e-fixes: http://www-4.ibm.com/software/webservers/appserv/efix.html. E-fixes are individual fixes for critical problems. They have been individually tested, but not integration tested , and should only be applied if you have a critical problem without a valid workaround. They may be applied to both Standard and Advanced Editions, except where specifically noted. All e-fixes are rolled into the next scheduled FixPak. Each fix has a readme file with installation instructions. This completes the installation of WebSphere and its FixPak. We are now ready to install Domino on a separate computer. Installing and Configuring Domino 6 We now turn our attention to our Domino computer and describe how to install Lotus Domino 6.5 on a Windows system. The Lotus Domino 6.5 Server family consists of Domino Utility Server, Domino Messaging Server, and Domino Enterprise Server. If you want to do more with Domino than just use its HTTP stack to integrate with WebSphere, you should install the Utility or the Enterprise server. -
If you install Domino from a CD, the installation program should start automatically. If it does not, start the installation by running setup.exe from the installation CD. A welcome screen will be shown. Click Next .
-
Read the license agreement and click Yes to accept it.
-
Enter your name and company on the next panel if the installation program hasn't been able to pick up this information from the system. Click Next .
-
Specify where you want the Domino program and data files placed or accept the default locations. The default locations are C:\Lotus\Domino and C:\Lotus\Domino\Data. The installation program will create these directories if they don't already exist. Click Next .
-
Choose the type of server to install. We selected the Domino Enterprise Server, as shown in Figure C-4. Figure C-4. Domino Server type selection.  You can use the Customize button to further refine the installation. If you click Customize you will get a list of server file sets to select or deselect. For example, you may not need the Help files because you will install the Help together with the administration client on another machine or in another directory later on. Deselecting Help files from the server install will save you around 40MB. Click Next. -
Whether you picked the default installation or the customized one, you will be brought to the panel where you select which (Windows) Program Folder to which to add the Domino Server. Change the default if desired. Click Next.
At this point, the installation of the Domino server begins.
Once all the files are installed, the installation program shows a message confirming installation has been completed. You are instructed to start the server via the Program Folder you specified in Step 6. Click Finish to end the installation program.
Domino Server Configuration and Setup After the Domino Server files are installed, the server must be configured before we can use it. -
Start Domino by selecting Start>Programs>Lotus Applications>Lotus Domino Server from the Windows task bar. This will launch the Domino configuration program.
-
The initial configuration screen asks whether this is the first or an additional server in your Domino domain. We selected First Domino Server to set up a stand-alone test domain, as shown in Figure C-5. Click Next . Figure C-5. Domino Server instance selection. 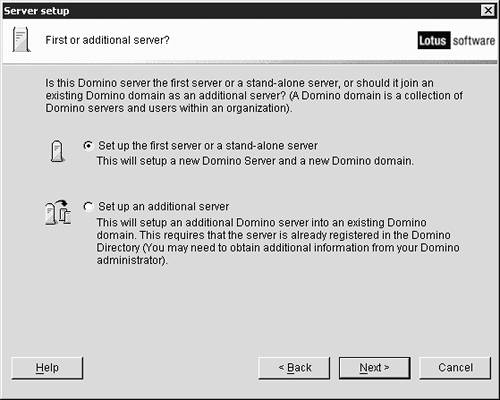 -
The next panel asks you to specify the name for the Domino server, as shown in Figure C-6. This name is used within the Domino domain to identify the server; it is not the TCP/IP host name. Specify a name and a descriptive title for the server and click Next . Figure C-6. Domino Server name selection.  -
The next panel asks you to specify the Organization name for the Domino server ”that is, the top level qualifier of the Domino server name, as shown in Figure C-7. Specify an Organization name for the server and a password for the certifier (digital signature) used to sign user ids. You can add Organizational Unit names under this Organization name by selecting the Customize button. The Organizational Unit names are used to further qualify names in the Domino name space. Click Next when complete. Figure C-7. Organization name specification. 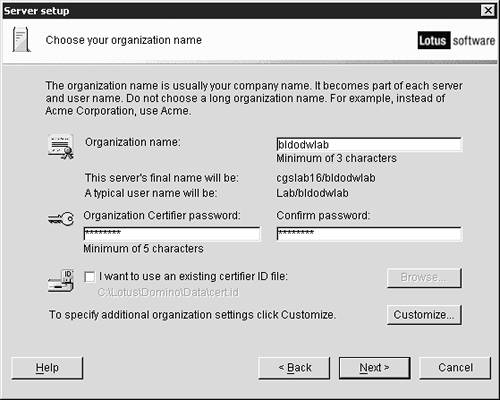 -
The next panel asks you to specify the Domino domain name. This name represents a collection of servers. It is similar to a TCP/IP domain name and can be made the same. Click Next .
-
The next panel asks you to specify an administrator name for the server. A Notes ID file and entry in the Domino directory is created with this name. A password must be specified for the Notes ID as shown in Figure C-8. Click Next . Figure C-8. Administrator name specification. 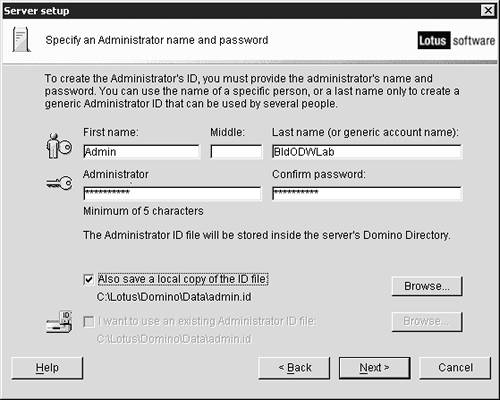 -
The next panel allows selection of the Internet services, which the Domino server will provide. Three basic sets of services, HTTP, mail, or LDAP can be selected from this panel, see Figure C-9. The Customize button brings up a second panel from which a more specific selection can be made, as shown in Figure C-10. Figure C-9. Internet Services selection.  Figure C-10. Advanced Services selection.  We selected the basic HTTP and mail services and then refined this selection to include only the SMTP service. We selected the DIIOP service since it is required for remote access from Domino Java Classes. Nonessential services such as calendaring or DOLS can be turned off if they are not going to be used. If you are going to use the Domino directory as your user registry for WAS security, you will need to enable the LDAP service since this provides the LDAP access to the Domino directory. If you are going to use a stand-alone LDAP directory (and Directory Assistance to access it from the Domino directory), you do not need to enable the Domino LDAP service. Any of these service selections can be changed via the Domino server configuration document once the server is running. -
The next panel allows configuration of the network settings to be used for the Domino server, primarily the network ports and TCP/IP host name. The default settings detected by the configuration program can be changed via the Customize button. The host name specified should be the fully qualified TCP/IP host/domain name for the server. See Figure C-11. Figure C-11. Network Settings configuration.  -
The next panel allows two security related options to be disabled, but both should be left enabled. They are: Prohibit Anonymous access to databases and templates and Add LocalDomainAdmins group to databases and templates . Click Next .
-
A summary panel is displayed next, and the user is asked to confirm the selections made. Click Finish to have the configuration program complete the server configuration.
Verifying the Domino Server Configuration We now check that the Domino HTTP server loads correctly and that it can be reached from a Web browser. -
Start the Domino server by selecting Start>Programs>Lotus Applications>Lotus Domino Server from the Windows task bar.
-
Ensure that the HTTP task is running by issuing a show tasks command from the console or by observing the console log when the server starts. Note: The Domino HTTP task will fail to start if another HTTP task is running using the default HTTP port 80. For example, if you have IIS installed on your server, it should be stopped from the Windows Services panel and set to be started manually.
-
Next, HTTP access to the Domino server can be checked by using a browser. Start your Web browser and type in the host name of your Domino server as the URL. (If you are running on the same machine, you can just type localhost as the host name in the URL.)
Installing the Domino Administration Client You need to install the Domino administration client on your server or another workstation (IBM recommends using a separate workstation for administration). This will allow you to change the server's settings, especially those in the Domino directory. We will not describe the installation of Domino administrator in detail. Be sure that the Administration Client is selected for installation; you can accept all other default values during the installation. One of the first things you can do after installing Domino Administrator is allow your users to run Java programs on the Domino server. This completes the installation and configuration of Domino 6.5. Configuring Domino to Use the WebSphere Plug-In The plug-in itself is provided as a shared library (DLL for Windows, .a for AIX, .so for Solaris; and as of this writing no plug-in exists for Domino on Linux) and a default configuration file: plugin-cfg.xml . The plug-in files are packaged with both the Domino and WAS products. The plug-in files can be found under the Domino install path: /Domino/Data/domino/plugins/was5. There are two essential steps to installing the plug-in: 1) specifying the plug-in library file to the Domino HTTP server and 2) specifying the location of the plug-in configuration file to the plug-in itself. The first step is straightforward and simply requires a change to the Domino server document in the Domino directory. You specify the plug-in library file as a DSAPI filter file on the Internet Protocols/HTTP page of the Server document. The second step is not as straightforward and is operating system-dependent. The plug-in library itself looks for the plug-in configuration file via an operating system environment variable (registry key on Windows). Unfortunately, these variable names are not well advertised in the WebSphere or Domino documentation. For Windows systems, a registry key value needs to be set as shown in Figure C-13 (you can use the regedit utility program to create the required key path if it is not already defined). For Unix systems, the plug-in looks for the configuration file in the config sub-directory under the path defined by the WAS_HOME environment variable, that is, $WAS_HOME/config . For IBM iSeries systems, the configuration file location is specified in the Domino notes.ini file. Figure C-13. Registry Setting for WAS plug-in. 
Figure C-12. Specifying WAS plug-in to Domino. 
Once these settings have been made, you can restart the Domino HTTP server task to have it load the WebSphere plug-in as a DSAPI filter. If the settings are correct, you will see the following messages at the Domino console:
HTTP Server: Java Virtual Machine loaded WebSphere HTTP DSAPI filter loaded HTTP Server: DSAPI WebSphere HTTP DSAPI Filter Loaded successfully HTTP Server: Started
Next, let's take a closer look at the plug-in configuration file, plugin-cfg.xml, to see what it controls and how it can be tailored. This configuration file specifies three key aspects of how the plug-in operates: which URL hostnames and which URL types get routed to WAS and to which WAS servers they get routed. It also allows specification of the log file written by the plug-in and the level of logging. The following shows the configuration file that comes with Domino:
<Config> <!-- The LogLevel controls the amount of information that gets written to the plugin  log file. Possible values are Error, Warn, and Trace. --> <Log Name="C:/WebSphere/AppServer/logs/native.log" LogLevel="Error"/> <!-- Server groups provide a mechanism of grouping servers together. --> <ServerGroup Name="default_group"> <Server Name="default_server"> <!-- The transport defines the hostname and port value that the web server plugin will use to communicate with the application server. --> <Transport Hostname="localhost" Port="9080" Protocol="http"/> </Server> </ServerGroup> <!-- Virtual host groups provide a mechanism of grouping virtual hosts together. --> <VirtualHostGroup Name="default_host"> <VirtualHost Name="*:*"/> </VirtualHostGroup> <!-- URI groups provide a mechanism of grouping URIs together. Only the context root of a web application needs to be specified unless you want to restrict the request URIs that get passed to the application server. --> <UriGroup Name="default_host_URIs"> <Uri Name="/servlet/*"/> <Uri Name="/webapp/examples/*"/> <Uri Name="*.jsp"/> <Uri Name="*.jsv"/> <Uri Name="*.jsw"/> <Uri Name="/ErrorReporter"/> <Uri Name="/j_security_check"/> <Uri Name="/tradetheme/*"/> <Uri Name="/theme/*"/> <Uri Name="/WebSphereSamples/*"/> <Uri Name="/estore/*"/> </UriGroup> <!-- A route ties together each of the above components. --> <Route ServerGroup="default_group" UriGroup="default_host_URIs" VirtualHostGroup="default_host"/> </Config> log file. Possible values are Error, Warn, and Trace. --> <Log Name="C:/WebSphere/AppServer/logs/native.log" LogLevel="Error"/> <!-- Server groups provide a mechanism of grouping servers together. --> <ServerGroup Name="default_group"> <Server Name="default_server"> <!-- The transport defines the hostname and port value that the web server plugin will use to communicate with the application server. --> <Transport Hostname="localhost" Port="9080" Protocol="http"/> </Server> </ServerGroup> <!-- Virtual host groups provide a mechanism of grouping virtual hosts together. --> <VirtualHostGroup Name="default_host"> <VirtualHost Name="*:*"/> </VirtualHostGroup> <!-- URI groups provide a mechanism of grouping URIs together. Only the context root of a web application needs to be specified unless you want to restrict the request URIs that get passed to the application server. --> <UriGroup Name="default_host_URIs"> <Uri Name="/servlet/*"/> <Uri Name="/webapp/examples/*"/> <Uri Name="*.jsp"/> <Uri Name="*.jsv"/> <Uri Name="*.jsw"/> <Uri Name="/ErrorReporter"/> <Uri Name="/j_security_check"/> <Uri Name="/tradetheme/*"/> <Uri Name="/theme/*"/> <Uri Name="/WebSphereSamples/*"/> <Uri Name="/estore/*"/> </UriGroup> <!-- A route ties together each of the above components. --> <Route ServerGroup="default_group" UriGroup="default_host_URIs" VirtualHostGroup="default_host"/> </Config>
As with all WAS configuration files, the plug-in configuration file has XML syntax and thus can be edited with any text editor. The Log element specifies the file name of the log file written by the plug-in and the level of logging desired. The ServerGroup element specifies the WAS server(s) to which URLs are routed and the protocol used. The default is to route to the WAS server on the same host at port 9080 (the embedded WAS HTTP server) over HTTP. Obviously, you must change the Hostname attribute to point to the WAS server host name if WAS is running on another host. Additional servers can be specified here, as well as HTTPS instead of HTTP. If more than one server is specified within a server group, the plug-in routes to the servers in a round- robin fashion. If HTTPS is used, additional system environment variables must be set pointing to the SSL libraries and the certificate and encryption key files required by the plug-in for HTTPS. One or more VirtualHostGroup elements can be specified to define the hostname patterns, which the URLs must match to be considered part of that host group. Similarly, one or more UriGroup elements can be specified to define the types of URLs belonging to the URI group. Finally, the Route element specifies a single routing definition in terms of the virtual host and URI group elements. That is, a Route element defines that URLs found to belong to the specified VirtualHostGroup and UriGroup should be routed to the specified ServerGroup. Enabling Tracing in the Domino WebSphere DSAPI Plug-In By default, very little information is captured during the running of the plug-in. You may wish to log more information to understand the underlying processing or to diagnose error situations. Stop the Domino HTTP server by issuing the console command: tell http quit . Modify the plug-in XML file, changing LogLevel attribute of the Log element to Trace . Adjust the Name attribute to point to the log file to contain the trace messages. Restart the Domino HTTP task. |