| Color cast refers to a general shift of color to one extreme or another: an image can be said to have a yellow or red cast, for instance. Although sometimes introduced into images intentionally (to create a certain mood or effect), color casts are usually unhappy accidents. They can result from any number of circumstances, from a scanner in need of calibrating to tired chemicals in a film developer's lab. Even light from a fluorescent bulb can create unwanted color shifts in photographs. Thankfully, Photoshop Elements gives you several ways to deal with color cast: a wonderful little automatic menu command, a dialog box that allows you to manually color-correct your image by adding and subtracting color values in small increments, and a feature new in Version 4.0 that can dramatically improve skin tones. To remove color cast with the Auto Color Correction command - From the Enhance menu, choose Auto Color Correction, or press Shift+Ctrl+B (Figure 3.33).
Figure 3.33. Choose Auto Color Correction from the Enhance menu to automatically remove color cast from your image. 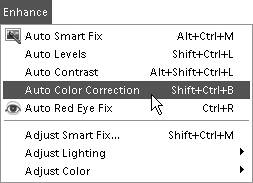
That's it. Photoshop Elements does some elegant, behind-the-scenes magic, examining the image's color channels and histogram and performing a little math, and voilàno more color cast. (See the color plate section of this book for a full-color example of removing color cast.)
 Tip Tip
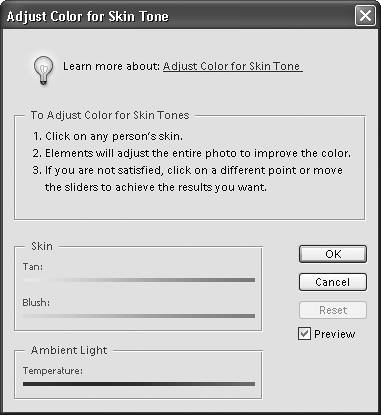
To adjust color in an image based on skin tones 1. | From the Enhance menu choose Adjust Color > Adjust Color for Skin Tone to open the Adjust Color for Skin Tone dialog box (Figure 3.34).
Figure 3.34. The Adjust Color for Skin Tone dialog box. 
| 2. | Check that the Preview check box is selected, and then move the cursor onto the photo until it becomes an eyedropper. Click with the eyedropper on any part of a person's skin (Figure 3.35).
Figure 3.35. The eyedropper samples skin tones in a photo and then makes a best-guess color correction. 
Photoshop Elements will adjust the color in the entire image, but will pay special attention to the skin tones.
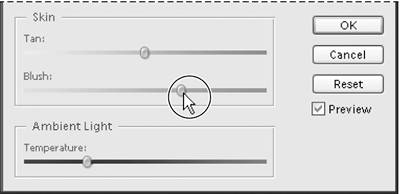
| 3. | If you're not satisfied with the results, you can click on a different area of skin, or use the sliders to fine-tune the color (Figure 3.36).
Figure 3.36. Use dialog box sliders to make manual skin tone corrections. 
| 4. | Click OK to close the dialog box and set the color changes.
|
To remove color cast with the Color Variations dialog box 1. | From the Enhance menu, choose Adjust Color > Color Variations.
| 2. | Determine the color cast of your image.
Because Elements doesn't offer any help in determining color cast, you're pretty much on your own here. Look for clues to color cast in objects or areas you are familiar with and can make good, educated guesses on. Ask yourself if that bright blue sky is looking a little yellow, or if those leafy greens have a little pink tinge to them, then work from there.
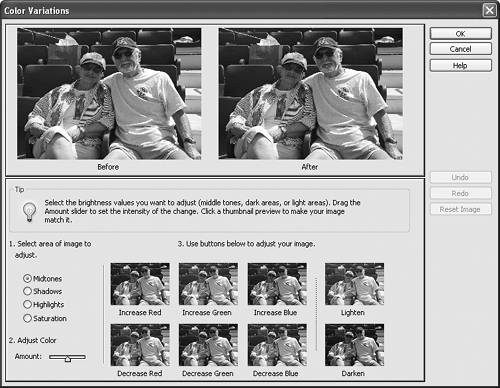
| 3. | In the lower portion of the dialog box, click the thumbnail with the description that most describes what you need to do (Increase Red, Decrease Blue, and so on) while referring to the After view in the top half of the dialog box (Figure 3.37).
Figure 3.37. The core of the Color Variations dialog box is the lower, thumbnail button area. Each time you click a thumbnail you apply a slight color shift to your image. The thumbnails can be clicked any number of times and in any combination. 
| 4. | Continue to click any combination of thumbnails, as many times as necessary, until the After view looks satisfactory.
| 5. | Click OK to close the Color Variations dialog box and view your corrected image.
|
 Tips Tips
To a large degree, using the Color Variations dialog box is a matter of trial and error, and to a lesser degree a rather subjective process. And as much as I'd like to be able to provide some little hints or formulas, experience and experimentation are the real keys to success with this dialog box. If you find yourself completely lost, or just want to start over, click the Before thumbnail in the upper-left corner, or the Reset Image button along the right side to reset the entire dialog box.
|

 Tip
Tip