4.5. More Fun with Buttons In the last section, you learned how to create a generic button that promotes reusability. Next, you'll carry that notion forward by creating invisible buttons that can be used to add "hot spots" to just about anything, and by learning how to spice up your buttons with animation. 4.5.1. Invisible Buttons In some cases, you want the ability to freely place interactive hot spots throughout a project, without having to go to a lot of trouble to create many different buttons. For example, think of a large or complex illustration in which you want to trigger the display of detail views, or a block of text that should display definitions for certain words. Finally, imagine a quiz that requires you to click the correct detail in an image. In these cases (and many more), it would be difficult to have to create a separate button for every interactive location. However, the generic button you created earlier wouldn't work either, because it would cover the material you want to be visible as a button. This is where invisible buttons can be very handy. Invisible buttons are merely normal buttons with no Up, Over, or Down state. Only a Hit state exists, to define the area that should respond to the mouse. Try to make one now: Create a new file with which to experiment. Draw a rectangle on the Stage and convert it to a button symbol, using any name. The rectangle will serve as a starting point for your invisible button. Double-click on the button to edit it. Select the Hit frame and press F6 to insert a keyframe. You now have Up and Hit states. Select the Up frame and delete its contents. (That's right; delete everything but the Hit state.) Click on Scene 1 to leave Symbol Editing mode.
If the button is invisible, why can you see it? Well, it wouldn't be very convenient if you couldn't ever see the button. Flash will automatically create a translucent blue area that represents the button's shape (as defined by the Hit state), which is visible only in authoring mode. When you test your movie, you will not see the button at runtime, but you will see the requisite cursor feedback to show the button is functioning. If you want to see an example of how invisible buttons work, look at the invisible_buttons.fla file in your 04 directory. 4.5.2. Animated Buttons Animated buttons can be created a number of ways, but in this project you'll look at the simplest. You'll build an animated button by creating an animation sequence within a movie clip and then simply adding that movie clip to a button's timeline: Open menu_buttons_01.fla, located in the 04 folder. To skip some of the text-only setup, and to make sure the file matches the following steps exactly (including x- and y-coordinates), this file has been started for you. On the Stage, there is one line of text, in a layer named txt. The text has been broken apart, so it is a shape and not editable text, and the layer has been locked. This ensures that this portion of the file will remain intact during this exercise. Create a new layer called btns, and drag it to the bottom of the layer stack. Next, create a graphic symbol to use in your animation. Press Ctrl/ Cmd-F8 to open the Create New Symbol dialog box. Choose the Graphic symbol type and call it box. When you okay the dialog, the symbol will open in Edit mode. Using the Rectangle tool, draw a light-gray-filled rectangle, with no stroke. Use the Properties panel to give it a width of 80 and a height of 25, and position it using an x-value of 0 and a y-value of 0. You are now finished with your box. Press Ctrl/Cmd-F8 again to create another symbol. This time, choose Movie Clip for the symbol type and call it btn_rollover. When you OK the dialog, you will again be in Edit mode, but this time you will be editing the movie clip. From your Library, drag the box symbol to the Stage. This places an instance of the box graphic symbol in your new movie clip. With the box selected, position it at (0, 0). Add a keyframe at frame 5. At frame 1, select the rectangle, and enter 1 into the Height field in the Properties panel. This will reduce only the height to one pixel. Because the entire symbol has been scaled to a new height of one pixel, you will need to reposition it to its former y-coordinate for it to remain centered. With the symbol still selected, enter a value of 12.5 in the Y field of the Properties panel. (Yes, you can use decimal values for pixel positioning. Flash simulates fractional pixels using anti-aliasing.) This value is used because it is one-half of the 25-pixel height of the button. Select the keyframe in frame 1 and, using the Properties panel, apply a motion tween so that frames 1 through 5 are tweened, causing the box to animate to full size. Add a new layer and name it actions. In the new actions layer, insert a keyframe at frame 5, and add a stop() command to the Actions panel: stop();
Press Enter to play the animation. This will allow you to preview the animation of this timeline without having to test your movie.
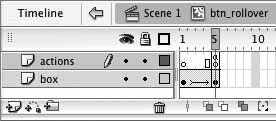
The rectangle begins short and increases in height from its center point. The stop() command stops the animation at frame 5. Figure 4-14 shows the timeline of the animation. Figure 4-14. The btn_rollover symbol's timeline 
Now you will nest the movie clip inside a button: Press Ctrl/Cmd-F8 to create another new symbol. Name the symbol btn and choose Button as the Behavior type. In Edit mode for the btn symbol, select the Over frame and add a keyframe there (by pressing F6). Add another keyframe in the Hit frame. While in the Hit frame, drag the box graphic symbol to the Stage and position it at (0, 0). Select the Over state, and drag the btn_rollover movie clip symbol from your Library to the Stage. Again, with its current height of 1, you will need to position this symbol at (0, 12.5) for it to remain centered. Leave the Up state empty, just as you did in the invisible buttons project. Return to Scene 1 and drag an instance of the btn symbol to the Stage. Position it at (0, 0). As discussed earlier, the Hit state will display a translucent blue shape that allows you to test your placement. The button should fill the area from the left of the Stage to the first vertical text dividing line, as seen in Figure 4-15. Figure 4-15. The first button of your menu bar in place  Add another instance of the btn symbol to the Stage, this time positioning it at (80, 0). This button doesn't fill the entire area needed, so that must be corrected. With the button still selected, choose the Free Transform tool. Drag the right edge handle to size the button until you reach the second text divider. Repeat steps 7 and 8 for the last two remaining buttons. Save your work and test the movie. If you want to compare your work with the sample file, open menu_buttons_02.fla and see how well you fared.
As planned, when you roll over the "about us" text, the corresponding button's hit area is triggered, its Over state displays, and the animated movie clip on that frame begins to play. When you roll out, the animation disappears. 4.5.3. What's Next? Finally, your Flash movies are starting to include some interactivity. From here on, you'll build more and more functionality into your movies, and this chapter should better prepare you for what's coming. To get some practice adding ActionScript to buttons, try coding the buttons in the animated_buttons.fla file to go to various web sites. As you gain more experience, you can mimic button behavior using movie clips for even more creative freedom. For more information, check out Sham Bhangal's Flash Hacks (O'Reilly)specifically, Hack #63, "Button Movie Clips." Also, visit some of your favorite Flash sites to see how other developers design their buttons. Does animation in a button contribute to the overall look of the site, or does it distract you? How do animated buttons integrate with the site's design to blend in with it? Studying the work of other Flash designers is a wonderful way to get ideas. Learn what you can about how elements in site designs work together to create a cohesive look. Specifically, study when Flash is used and, even more so, when Flash is not used. Many sites benefit from integrating Flash with other HTML content rather than using Flash exclusively. In the next chapter, you'll begin working with bitmaps. You'll learn how to: Import bitmaps Use bitmap tiles as fills for shapes Trace images to create vector art from bitmaps Organize your growing Libraries
|
