Using the Web Service Features of COM 1.5
|
Using the Web Service Features of COM+ 1.5
One of the more interesting new features you’ll find in COM+ 1.5 is the ability to create a SOAP setup for your COM+ application. For the purposes of discussion, this section relies on the COMPlusComp.DLL file originally presented in the “Working with COM+” section of Chapter 8. You’ll find the version of this example used for this chapter in the \Chapter 11\ C#\COMPlusComp and \Chapter 11\VB\COMPlusComp folders of the source code located on the Sybex Web site. See the Listing 8.5 and the associated write-up for an explanation of this example.
| Note | The example in this section will only work on platforms that support COM+ 1.5 such as Windows XP and the Windows .NET 2003 server. This example won’t work on earlier versions of Windows, including Windows 2000. Create the COM+ application by manually defining an application and adding the component to it in the Component Services console found in the Administrative Tools folder of the Control Panel, rather than the RegSvcs utility. The RegSvcs utility technique creates a COM+ 1.0 application, even on platforms that support COM+ 1.5. The example in this section uses TestCOMPlus as the COM+ application name. You’ll find an MSI file to install this application in the \Chapter 11\ COMPlusApp\ folder of the source code located on the Sybex Web site. |
Performing the Application Setup
You’ll begin the project by creating a COM+ application named TestCOMPlus and installing the COMPlusComp component. Right-click the TestCOMPlus icon in the Component Services console and choose Properties from the context menu. Select the Activation tab. Figure 11.6 shows the SOAP configuration setting on the Activation tab of the TestCOMPlus Properties dialog box. Notice that the figure shows the Uses SOAP option checked and MathFunctionsMethod entered in the SOAP VRoot field.
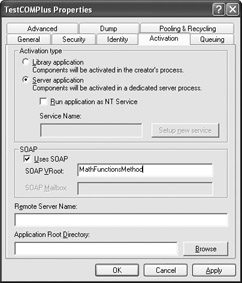
Figure 11.6: Adding support for SOAP to your COM+ application is relatively easy.
When you click Apply, COM+ creates several files for you that become accessible from Internet Information Server (IIS) as an application. Figure 11.7 shows the results of this process. As you can see, the application includes several files and a bin folder.
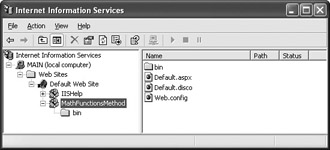
Figure 11.7: Setting the SOAP support options automatically creates some application files for your IIS setup.
The first problem you’ll notice when you look at the settings for this application is that it lacks security settings. When you enable anonymous access for any location on your Web site (even the root directory), the application allows anonymous access too. Follow this procedure to secure your application:
-
Right-click the MathFunctionsMethod entry in the Internet Information Services console and choose Properties. IIS displays the MathFunctionsMethod Properties dialog box.
-
Select the Directory Security tab, and then click Edit in the Anonymous Access and Authentication Control section. IIS displays the Authentication Methods dialog box.
-
Clear the Anonymous Access option and click OK. Clearing this option ensures the caller has to present some type of credential to the server before gaining access to the application. If your program will transmit confidential data and you have a server certificate installed, you’ll want to perform a few additional steps.
-
Click Edit in the Secure Communications section of the Directory Security tab. IIS displays the Secure Communications dialog box.
-
Select the Require Secure Channel (SSL) option. This step forces the caller to use SSL to access the application.
The second problem is that the application doesn’t expire the content. Not only does this mean that copies of your application data will hang around on client hard drives forever, but it means clients could receive old data. Select the HTTP Headers tab. Check the Enable Content Expiration option and choose the Expire Immediately radio button. Click OK to make the changes to the application permanent.
Now that you’ve secured the application a little better, you can try it out. This application displays a simple Web page containing the name of the SOAP application. When you click the COMPlusComp.MathFunctions.soap?WSDL link, you’ll see the Web Services Description Language (WSDL) output generated for this application, as shown in Figure 11.8. The WSDL describes the COMPlusComp.MathFunctions class and the services it provides.
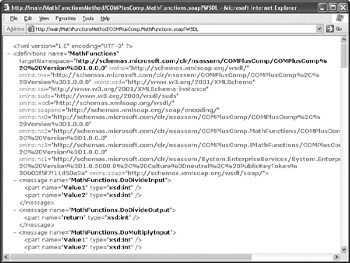
Figure 11.8: The WSDL output of the Web page describes the class and the functionality it provides.
You can obtain this same output using the SoapSuds utility initially discussed in the “Creating a Remoting Client Application” section of Chapter 10. This utility accepts a number of inputs and generates output using a number of techniques. For this example, it’s most convenient to obtain the required information directly from the Web site and place it in an XML file. Simply open a command line, type soapsuds -url:http://Main/MathFunctionsMethod/COMPlusComp .MathFunctions.soap?WSDL os:MathFunctions.XML, and press Enter. You’ll also find the SoapSudsGen.BAT file in the \Chapter 11\COMPlusWSDL folder of the source code located on the Sybex Web site. Note that you’ll have to change the name of the server to match your server.
Look through the MathFunctions.XML file in the \Chapter 11\COMPlusWSDL folder and you’ll notice that it contains a complete description of the Web service. Using a Web service represents a tradeoff. The WSDL output of the IIS request or the SoapSuds utility represents information that you’re giving away. A cracker could use this information to learn more about your application and eventually break into it. Consequently, securing the Web site so that only authorized applications users can access it is essential. In general, this means adding some type of secure data transmission for the WSDL information such as the example in the “Understanding Remoting and Data Encryption” section of Chapter 10.
Creating a Simple COM+ Test Application
Once the Web application is in place, using it is easy. All you need to do is start a new project and create a Web reference by right-clicking the References folder in Solution Explorer and choosing Add Web Reference from the context menu. When you browse to the location that holds the MathFunctionsMethod application (http://Main/MathFunctionsMethod/Default.ASPX on my system), you’ll see a list of discovery services for that server (you can also view the DISCO file if desired). Click the COMPlusComp.MathFunctions.soap?WSDL link and you’ll see a display like the one shown in Figure 11.9. Click Add Reference and your application will have access to this COM+ application through SOAP and the IIS server.
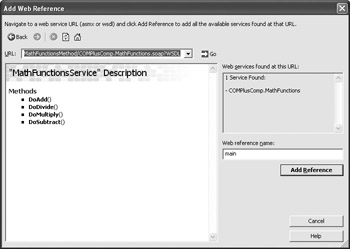
Figure 11.9: The Add Web Reference dialog box can help you locate and use services.
The transformation of your COM+ application to a SOAP application can bring some unexpected surprises. You might intend that your COM+ application provide only direct synchronous service. However, given the nature of the Web, Microsoft assumes that you also want asynchronous service. Listing 11.7 demonstrates that the COM+ application from Chapter 8 now sports both a synchronous and an asynchronous interface. The problem with this assumption is that it could cause security breaches on your system. It’s important to test both the synchronous and asynchronous setup to ensure your COM+ application continues to work as anticipated and doesn’t crash. In some cases, you might need to include a hand tuned WSDL file that excludes the asynchronous operation within the IIS application directory to ensure a cracker can’t use the security hole to gain access to your system. You’ll find this example in the \Chapter 11\C#\COMPlusComp and \Chapter 11\VB\COMPlusComp folders of the source code located on the Sybex Web site.
Listing 11.7 The SOAP Quick Test Application
private void btnSynchronous_Click(object sender, System.EventArgs e) { Int32 Input1; // First input value. Int32 Input2; // Second input value. MathFunctionsService MFS; // Remote object. ICredentials MyCred; // Credentials for the current user. // Create the network credential. MyCred = new NetworkCredential("YourName", "YourPassword"); // Get the input. Input1 = Int32.Parse(txtInput1.Text); Input2 = Int32.Parse(txtInput2.Text); // Create the MathFunctionsService object. MFS = new MathFunctionsService(); // Add the credential to the service reference. MFS.Credentials = MyCred; try { // Perform a synchronous add and display the result. txtOutput.Text = MFS.DoAdd(Input1, Input2).ToString(); } catch (System.Net.WebException WE) { MessageBox.Show("Message: " + WE.Message + "\r\nSource: " + WE.Source + "\r\nResponse: " + WE.Response + "\r\nStatus: " + WE.Status, "Web Access Error", MessageBoxButtons.OK, MessageBoxIcon.Error); } } private void btnAsynchronous_Click(object sender, System.EventArgs e) { Int32 Input1; // First input value. Int32 Input2; // Second input value. MathFunctionsService MFS; // Remote object. ICredentials MyCred; // Credentials for the current user. // Create the network credential. MyCred = new NetworkCredential("YourName", "YourPassword"); // Get the input. Input1 = Int32.Parse(txtInput1.Text); Input2 = Int32.Parse(txtInput2.Text); // Create the MathFunctionsService object. MFS = new MathFunctionsService(); // Add the credential to the service reference. MFS.Credentials = MyCred; // Perform a synchronous add and display the result. MFS.BeginDoAdd(Input1, Input2, new System.AsyncCallback(MyCallback), null); } public void MyCallback(IAsyncResult ar) { // Create the MathFunctionsService object. MathFunctionsService MFS; MFS = new MathFunctionsService(); // Obtain the result of the operation. txtOutput.Text = MFS.EndDoAdd(ar).ToString(); } Both of the pushbutton event handler routines begin by creating a credential using the ICredential interface. This single credential can include the name, password, and domain of the caller, but the sample uses just the name and password. You must add this credential to the MFS.Credentials property or the application will always fail—a Web service application can’t negotiate security information with the server. It also helps to set the Web services application to use Windows integrated security, rather than digest or basic security.
As you can see from the btnSynchronous_Click() method listing, making a synchronous call isn’t much different from making a direct call to the COM+ application. You instantiate the MathFunctionsService object, and then call the DoAdd() method to add the two input numbers. Obviously, the .NET Framework has made it quite easy to make SOAP calls without worrying about the SOAP coding that used to take place.
Notice that the btnSynchronous_Click() method includes a try...catch block. The “Verifying the Application Is Safe” section describes why this check is necessary. However, the btnAsynchronous_Click() doesn’t include this check. An asynchronous call simply won’t return when a security error occurs, so the try...catch block is unnecessary. However, the lack of feedback points out one reason why you shouldn’t use asynchronous calls and should avoid them whenever possible.
The asynchronous call is still simple, but not quite as straightforward as the synchronous call. The code still begins by instantiating the MathFunctionsService object. In this case, the code calls the BeginDoAdd() method with the name of the callback method as the third parameter. The MyCallback() method follows the format of the System.AsyncCallback delegate. The fourth parameter is an optional asynchronous state object that you can pass to the callback method—you don’t need it in this situation.
The MyCallback() method receives an IAsyncResult variable, ar. This variable actually contains a significant amount of information about the call. However, all you need for this example is the result of the addition. Notice that the code begins by instantiating the MathFunctionsService object again. It calls the EndDoAdd() method with the IAsyncResult variable and converts the result to text for display.
Verifying the Application Is Safe
Don’t assume that the Web server is your first and last level of security when working with a COM+ application. One of the better reasons to use COM+ is that the same role-based security features discussed in Chapter 8 are still in effect when using COM+ as a Web service. In fact, when you run this program the first time, it will very likely fail with the error information shown in Figure 11.10.
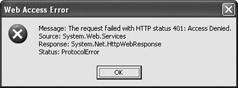
Figure 11.10: Web services set up through COM+ retain COM+ security features.
The “Implementing the Security Setup” section of Chapter 10 points out the problems with the IWAM group. Unfortunately, the same problems will plague your COM+ application. You’ll need to work out the same issues that the “Building the Validated Database Application” section of Chapter 10 discusses for your COM+ application. In many cases, you might want to provide very limited access for the IWAM group to the component.
|
EAN: 2147483647
Pages: 168