Creating Buttons
| I l @ ve RuBoard |
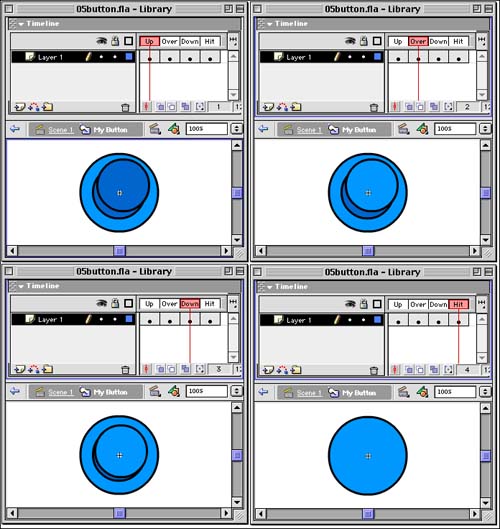
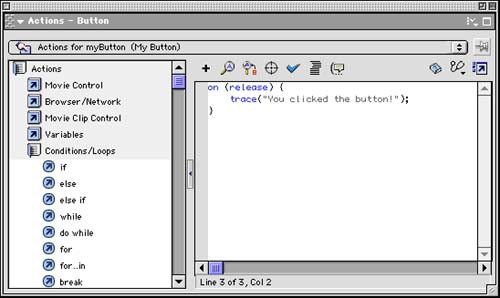
| Buttons are one of the three main types of symbols that you use in Flash. The others are movie clips and graphics. Making a New ButtonThere are many ways to create a button. One method is to choose Insert, New Symbol from the menu. You are presented with a dialog asking you to name the symbol and to choose whether it is a movie clip, button, or graphic. Choose Button. The main Flash window now changes to show the button's timeline instead of the movie's main timeline. There are four frames in a button timeline. They are labeled Up, Over, Down, and Hit. They represent the three button states, and the active area of the button. If you place a graphic, such as a circle, in the first frame and nothing in the other three frames, the Over and Down states of the button will be the same as the Up state. The active area of the button will be the same as well. On the other hand, you can create a different graphic for each key frame. Figure 5.2 shows four different views of the main Flash window, each with a different key frame selected. In this example, I used a simple circular button with a slight variation for each state. The Hit frame represents the entire area of the button so that it is easy for the user to click it. Figure 5.2. The four different key frames of a button. When you are finished creating your button, return to the main timeline by clicking the name of the scene, usually Scene 1, where it appears just under the timeline. Now, open up the library by choosing Window, Library. You should see the button in the library. Drag it to the work area in the main window. Adding a Script to a ButtonTo add a script to a button, first select the button. Then bring up the Actions panel. Alternatively, you can right-click the button in Windows, or Control+click the button on the Mac. Select Actions from the menu that appears. Make sure that the Actions panel is set to Expert mode. You can check this in the pop-up menu that is activated at the upper-right corner of the window. Here is a typical button script. You can place this in the script window and then test the movie to see whether it works. Figure 5.3 shows the Actions panel with the script in it. Figure 5.3. The Actions panel with a simple button script. on (release) { trace("You clicked the button!") }
You could also use the alternative event press in place of release . The difference is that the handler will run when the user first clicks the button and will not wait for the user to release the mouse button. When a handler is activated, the code inside the brackets is executed. In this case, just a trace command is there. It sends a message to the Output window to let you know that the script worked. Now let's put our knowledge of ActionScript navigation commands and button scripts to work. |

| I l @ ve RuBoard |
EAN: 2147483647
Pages: 272