The Effects Panel
| The Effects panel is where all your audio and video effects and transitions live. To access it, choose Window > Effects or click the Effects tab in the Project panel. The panel has five master folders:
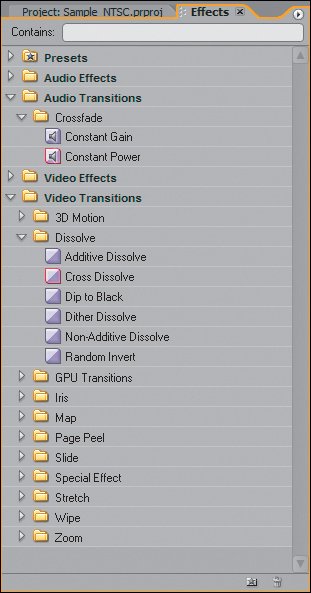
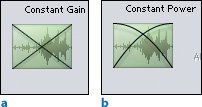
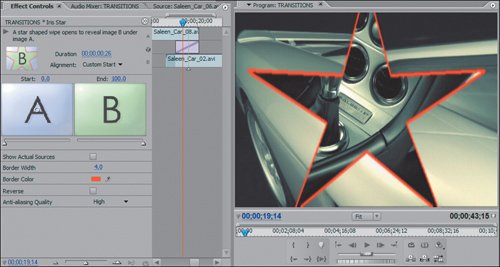
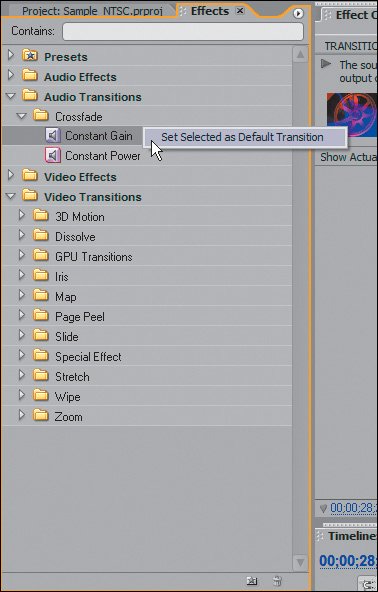
Each contains subfolders in which effects or transitions are grouped by category. To find an effect, browse through the subfolders by twirling down their contents (Figure 7.2) or use the Contains field at the top of the window to search by name. As you type in the Contains field, Premiere expands folders to show items matching the search criteria. As you type the word "dissolve," for example, Premiere first displays all transitions and effects with "d" in their names, then only those with "di," and so on until displaying on those with "dissolve" in their names. Deleting letters backs you up through the displays of search results. Figure 7.2. With both the Audio and Video Transitions folders expanded, you can see that your choice of audio transition boils down to two different fades. For video transitions, you have a lot more to choose from. Notice Constant Power and Cross Dissolve are the default transitions, as indicated by the red squares surrounding their icons As you browse through your transitions, one audio and one video transition will look slightly different as their icons are surrounded with red squares. These are your default transition. Default transitions are the transitions used for automated tasks and quick placement with the keyboard shortcuts. (Chapter 8, "Effect Controls Basics," will discuss the contents of the Video and Audio Effects folders.) Audio TransitionsThe Audio Transitions folder contains a single subfolder called Crossfade, which contains two transitions: Constant Gain and Constant Power. Both transitions accommodate fading a clip up at its head, fading it down at its tail, and crossfading between two clips. The difference between Constant Gain and Constant Power is subtle but distinct (Figures 7.3a and b). Figures 7.3a and b. You can see the primary difference between the two audio transitions by comparing their icons: Constant Gain (a) increases volume uniformly, while Constant Power (b) adheres to more of a curve that rises faster to the full volume level Constant Gain always fades in a straight, diagonal rising or falling direction. When using Constant Gain to fade your audio up at the head of a shot, the audio volume starts at 0% at frame 1 and reaches the 100% level at the end of the transition. Along the way, the volume (the gain) constantly rises in a uniform fashion, like a straight rising line. Constant Power is a bit different. When fading up, Constant Power increases your audio from 0% to 100% in a steeper curve that quickly gets the volume up, then climbs more slowly to its 100% limit. Instead of being at 50% halfway through your transition, Constant Power would be closer to 75% and then it would slowly level off to 100% from there. Looking at the icon for each of these placed transitions will give you a good sense of how each works. For general fade purposes (fade in or out), I always use Constant Gain, which results in a progressive, simple fade. For cross-fades between two clips, I use Constant Power. With Constant Power transitioning two clips, instead of the audio dipping down halfway through the cross-dissolve the audio levels stay a bit higher and the sound level doesn't dip too low during the transition. In either case, you can quickly add the transition to your clips to fade their levels. Video TransitionsThe Video Transitions folder has ten subfolder categories:
When editing in the timeline, if you reach the end of a shot that you would like to fade out or a cut where you want to apply a transition, it is only a keyboard shortcut away to add your default transition to the content at the current Edit Line position. Tip While there are enough transitions here to get plenty of work done and have some creative choices, you can expand your transition options when you invest in a third-party capture card. Wedding and event videographers who need to have transitions with color, motion, and a bit more personality, for example, would benefit from more options than the standard transitions that come with Premiere Pro. Other editors, such as for film, TV, and music videos, and hobbyists certainly have enough transitions to choose from in Premiere Pro. Just be judicious in your selection of transitions, considering your audience and tone of the transition. A Star Iris Wipe might be flashier, for example, but perhaps a Cross Dissolve would better blend with your project's tone. Default TransitionOut of the box, Premiere Pro's default video transition is Cross Dissolve, but perhaps you'd prefer another transition to be a keyboard shortcut away at all times. To choose or change the default transition, select the transition you want from the list in the Effects panel. With the transition highlighted, simply right-click on it and select Set Selected as Default Transition (Figure 7.8). The transition's icon now has a red border indicating it is assigned as your default. You can only have one audio and one video default transition. Figure 7.8. Set your default transition by right-clicking on a transition in the folder and selecting Set Selected as Default Transition You can quickly add the default audio and the default video transitions to the timeline using their keyboard shortcuts: Ctrl+D adds the default video transition, and Ctrl+Shift+D adds default audio transition. Once again, CTI position and targeted tracks are the keys to indicating where you want your transition added. Default DurationsYou can set a default duration for your transitions in your General Preferences. Choose Edit > Preferences > General, then input the desired number of frames for Video Default Transition Duration and the desired number of seconds for Audio Default Transition Duration (Figure 7.9). Whenever you add a transition to the timeline, it will automatically last the number of frames or seconds you specified. Figure 7.9. In the General Preferences dialog you can assign the default duration values for your video and audio transitions. Video transition durations are based on frames, while audio durations are based on milliseconds and can have subframe values. For example, 0.05 is a valid duration for a tiny audio transition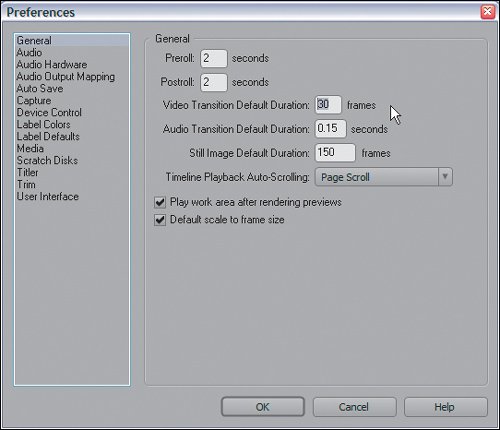 If you need to change the setting while you work, choose Default Transition Duration from the Effects panel's wing menu. When I am adding a lot of audio transitions between clips so that there are no straight cuts, for example, I usually shorten the Audio Transition Default Duration to a bit less than one second. Sometimes a 0.10 second transition gets rid of the abrupt pop that exists when one audio clip cuts directly to the next. For fading both audio and video clips in and out, I find one second is usually enough, but that's simply a matter of timing, tempo, and personal taste. Custom BinsIf you find that you use a specific group of transitions and you hate navigating to them every time, you can create a new bin in the Effects panel to hold your favorites. Choose New Custom Bin from the wing menu, or click the folder-shaped icon in the lower-right of the window. Now you can drag the transitions or filters that you use most into the custom bin and rename it accordingly. Note that the transitions or effects do not move from their normal resting place; instead, Premiere places a shortcut to them in the custom folder for easy access. I recommend creating one custom bin for your favorite transitions and another for your favorite effects. Once you have your favorites organized for easy access, you're ready to drag and drop them into the timeline. |
EAN: 2147483647
Pages: 200