| A picture-in-picture effect (PiP) is quite easy to achieve in Premiere Pro: Drop a clip in the timeline on one video track, then drop a second clip above it on another track. Resize the top clip to make it smaller, add a drop shadow, and quickly you've created a simple PiP. The result is a small video clip on top of another full-size clip. This effect is useful when you are trying to put more information on the screen or when you want to reference a video clip that someone on screen is talking about. The best and most common PiP examples play every night on the news. To help your PiP image stand out from the image it's covering, however, you need more than a basic drop shadow. You need a frame. In this chapter, you will learn the Adobe Title Designer settings that make up a great-looking frame, then you will marry the title and the video to build a simple, clean picture-in-picture effect. You will then learn how to transform your settings into custom presets that can be used for multiple PiP effects. Building a Custom Frame The most common question I hear about Premiere picture-in-picture effects is how to create a strong border or edge for the image that is overlaid on the other clips. Using effects only on a clip, you might add a Bevel Edge and a soft Edge Feather, but this typical look doesn't frame the PiP image well or make it stand out. Using the Titler, I discovered a picture perfect way of creating a custom frame that you can resize and adjust to look different every time you use it. Here's how: | | 1. | Open PiP_Start.prproj from the APPST2 Lesson Files/Chapter 24 folder. Press F9 to open the Titler, name the title PiP Frame, and create a rectangle in the center of the Titler's drawing area by selecting the Rectangle tool. Drag from the upper-left corner down to the lower right, trying to stay in the safe-area boxes. To ensure the resolution and position of the rectangle are correct for this lesson, assign it the following values in the Title Properties panel (Figure 24.14):
Figure 24.14. The rectangle fits exactly to the edge of the title frame, because the Titler window size is not 720x480, but 648x480. For this lesson, that actual size is important to remember 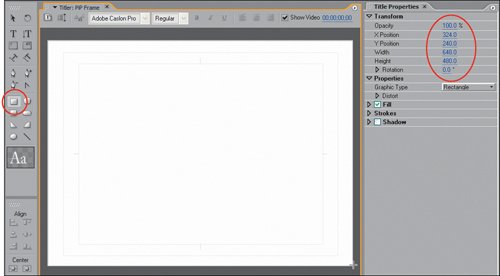
|
|---|
Opacity: 100% | Width: 648X | Position: 324 Y | Height: 480 | Position: 240 | Rotation: 0.0 |
You now have a title that fits to the exact edge of the frame. Using what you learned about inner strokes in Chapter 15, "Advanced Titling: Styles and Templates," you next can create an inner stroke that grows inward from the outer edge to help build a border or frame for your PiP effect.
| | | 2. | In the Title Styles panel, click off the check box for Fill. Twirl down Stroke, and add one inner stroke.
By making the fill of the rectangle empty, you can see directly through the center of the title. The inner stroke provides an "outline" that is bound to the edge of the frame and will expand inward, always locking to the edge of the frame when you increase its size. Next, you'll give that inner stroke a personality to transform it into a beautiful frame, or at least a good-looking frame.
| | | 3. | Assign the following settings to the inner stroke:
Type: Edge
Size: 40
Fill Type: Bevel
Highlight Color: 47,35,100 (HSB, Golden color #FFECA6)
Highlight Opacity: 100
Shadow Color: 47,35,69 (HSB, Brown color #B0A272)
Using a Bevel fill for the inner stroke gives the appearance of a more three-dimensional stroke, one that stands out a bit more. Although I used a skin tone type of color, you can use your own color choices to customize the frame. The highlight color should be a bright color, and the shadow should be a darker setting of the same color. Notice how the H (Hue) and S (Saturation) values are the same; you just decrease the B (Brightness) value to make an exact color darker.
| | | 4. | Click the Lit check box (Figure 24.15), then click on the Tube check box (Figure 24.16). Click off the Lit check box (Figure 24.17).
Figure 24.15. With only Lit checked the result is a typically angled-looking flat frame. Changing the Light Angle adjusts the direction the light comes from, while altering Light Magnitude affects the strength and presence of the light 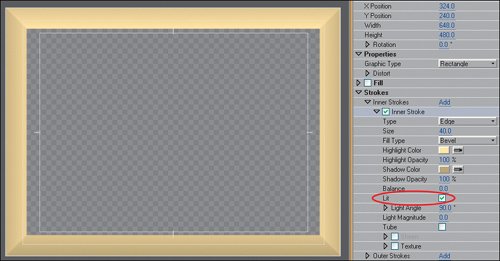
Figure 24.16. With both Lit and Tube checked, the result is a rounded bevel edge with a gentle lighting effect. Increasing Light Magnitude adds even more emphasis to this effect 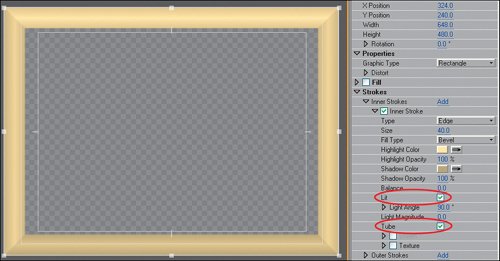
Figure 24.17. Turning off Lit and checking Tube creates a simple rounded frame rim with the light shadowing bleeding off to the sides of the edges 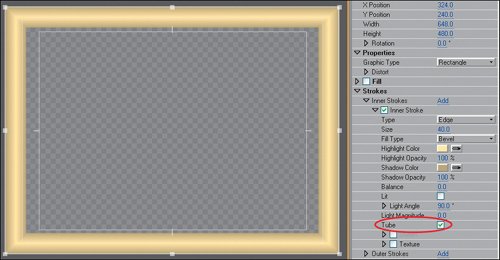
The Lit check box engages an effect that assumes a light source is shining down on the edge and provides a more three-dimensional look. The light source comes from whatever angle you like; you can increase or decrease the magnitude to heighten or lessen the effect. When checked, Tube makes the bevel edge rounded; turn it off for a flat edge. Lit and Tube offer a good selection of options for creating an attractive PiP frame.
| 5. | With the Titler open, press Ctrl+J to access the Templates dialog. From the wing menu of the Templates dialog, select Save PiP_Frame as Template. Name the template the same as the title, PiP Frame, then click OK.
By saving your new title as a custom template, you can use it time and again with any project. Because of what you learned about modifying templates in Chapter 15, you can quickly load this PIP Frame template and change its color and lighting properties to make it unique and appropriate for any subsequent projects.
|
This PiP frame technique is quite simple and straightforward, offering excellent results that you can customize as you like. Additionally, you can increase or reduce the size of the stroke depending on how much emphasis you want to give the frame and its image. You can continue with this project for the next lesson. Nesting Your PiP To make your PiP files easier to manage you can add your custom title frame to the video file and nest the two elements in their own sequence. You will then be able to use the frame and video file synonymously as one file. With the two files nested, you can more easily explore additional effect settings to help complete the look and position of your PiP. Tip Because the title picture frame is using an inner stroke, it is technically cropping inward onto the video clip that it surrounds. You can adjust the size of the stroke to reduce the size of the frame, or you can reduce the size of the video clip on Video 1 so that it fits inside the inner edge of the inner stroke. To reduce the size of the video clip on Video 1, select it and in the Effect Controls panel's Motion listing, reduce Scale to the appropriate size.
1. | Open PiP_Nest_Start.prproj from the APPST2 Lesson Files/Chapter 24 folder.
The video file for this project is in the APPST2 Lesson Files/Chapter 27 folder and the WA114.avi file is located in the APPST2 Lesson Files/Artbeats folder.
| 2. | Drag and drop the file A Cam 01.avi to the Video 1 track in PiP Sequence. Drag and drop PiP Frame to the Video 2 track, covering the clip. Extend the duration of the title to cover the entire clip beneath it (Figure 24.18). Preview the results in your Program Monitor.
Figure 24.18. When you are nesting your title and video clip, keep the duration of the title equal to the duration of the video clip it is covering, unless you want the border to disappear 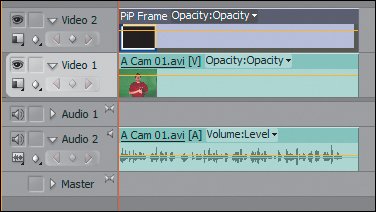
Because the title frame is bound to the exact edge of the video frame, placing the title above the PiP video file is all you need to do to merge the picture frame with the video clip. Now that these two elements are merged into one sequence, you can develop the final look of the PiP.
| | | 3. | Open the Master Sequence and drag and drop the WA114.avi clip to Video 1 six times in a row. Drag and drop the PiP Sequence to Video 2. Press the \ key to snap the zoom of your sequence to completely contain the added clips (Figure 24.19).
Figure 24.19. By nesting the title and video element into one sequence (PiP Sequence), you can now drag and drop the sequence file as if it were an individual clip. The Artbeats graphic on Video 1 serves as the background under the PiP image 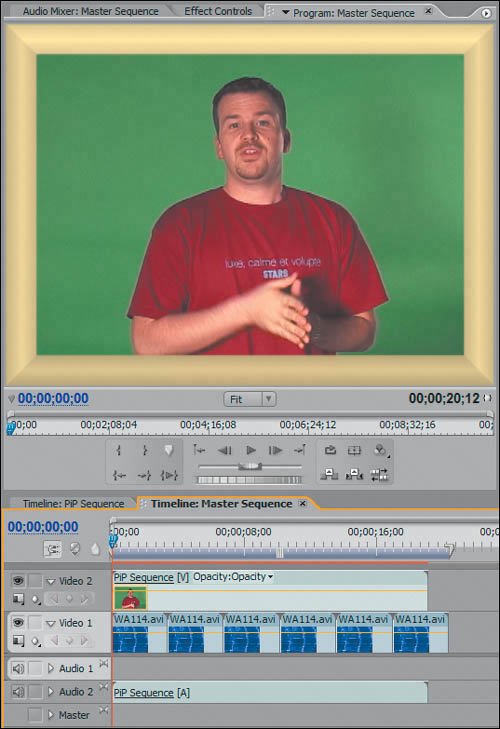
Because you have married the title border with the video clip, you can now treat them as a single clip by dragging and dropping the host sequence. For the PiP to appear on top of the background video element, the PiP sequence must be placed on Video 2 above the background on Video 1. With the two files stacked in the proper hierarchy, you can reduce the scale, change the position, and then add a nice drop shadow effect to give the appearance that the PiP is on top of the other video.
| | | 4. | Turn on the Safe Margins in the Program Monitor. Select the PiP Seqeuence clip on Video 2, and open the Effect Controls panel. Open the Motion effect, and reduce the Scale to 40%. Click on the PiP Sequence clip, and in the Program Monitor physically reposition the clip in the upper-right area of the frame (Figure 24.20). My final position was 530123.
Figure 24.20. With the PiP Sequence selected in the timeline, if you click on the clip in the Program Monitor you have direct manipulation automatically activated. For any effect displaying the Direct Manipulation square next to its name, you can click and make adjustments directly inside the Program Monitor panel. For the PiP effect, you dragged the selected clip to the upper-right frame region 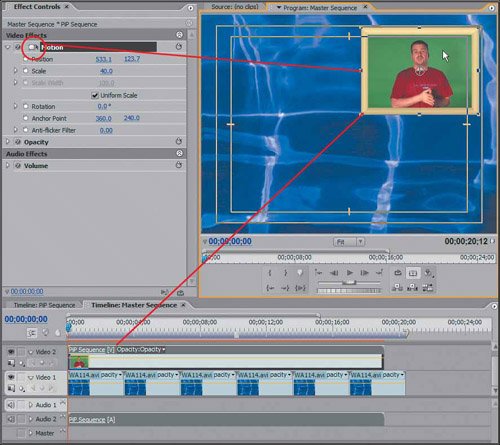
Turning on Safe Margins enables you to see the title- and action-safe areas of your frame. By positioning the PiP on the line of the title-safe margin, you are ensuring that the entire clip will be visible on a standard television. Placement and scale of your PiP is entirely up to you. I recommend 40% as the half size and 25% as a small size.
| | | 5. | From the Effects panel, drag and drop the Drop Shadow effect from the Video Effects/Perspective folder onto the clip PiP Sequence in the Video 2 track of your Master Sequence. In the Effect Controls panel, assign these Drop Shadow effect settings:
|
|---|
Color: Default Black | Distance: 40 | Opacity: 45 | Softness: 40 | Direction: 135 |
A drop shadow gives a sense of depth to the composition. The direction and settings of the shadow are entirely up to you. I chose a simple and subtle lower-right falling shadow. The shadow is not too dramatic, yet it still gives off the appearance that the PiP is floating on top of the video that it covers.
| | | 6. | For the final step, target Video 2 by clicking its track header or holding Ctrl while pressing the + key. Target the Audio 2 track by clicking its track header or pressing Ctrl+Shift++. With both Video 2 and Audio 2 targeted, press the Home key, then Ctrl+D, then Ctrl+Shift+D. Press Page Down so that the Edit Line snaps the end of the A Cam PiP, Ctrl+D, and Ctrl+Shift+D again (Figure 24.21). Press Enter to render your sequence and see the final results.
Figure 24.21. On Video 2, you can see the purple effect line signifying that effects have been added to the clip. Also, the one-sided dissolve transitions appear at the head and tail of the clip. Having applied all the effects and transitions to this clip, you can move it up to another track or down the timeline to a different position without reassigning effects or reapplying transitions. The integrity of the clip with effects will remain unchanged until you manually adjust it 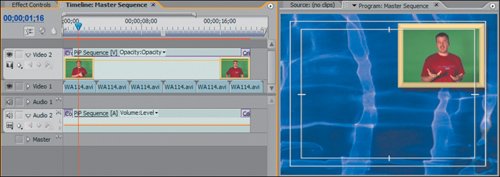
By targeting Video 2 and Audio 2, you activated each track to receive keyboard editing commands. After you pressed Home to snap the Edit Line to the head of the timeline, you added video and audio default transitions to the clips on those tracks. Page Down advanced you to the next edit point, which got you to the end of the same clip. Here you added two more default transitions. The end result is an attractive PiP effect that fades in and out to the upper right with a nice drop shadow for added depth.
|
With the files nested, making refinements is easy. If you want to add any effects or color correction to the video in the PiP, simply adjust the original file in the nested sequence. If you want the title border to be thicker, open the title and adjust the size of the inner stroke. Once you save the adjustment to the title, all instances where the title is used will update to reflect its saved state. While you're in the mood to make adjustments, take a look at some of the custom PiP presets that came with Adobe Premiere Pro 2.0. You can easily customize them for your projects. Using Custom Effect Presets Part of my contribution to the previous 1.5 version of Premiere Pro was to create a bunch of custom effect presets that you can quickly apply to clips in the timeline for immediate results. This final lesson shows you how to use the custom effect presets to quickly create and enhance a PiP effecta moving PiP. For this effect, the PiP will spin in to hold in the upper-right corner. As the clip finishes, the PiP will spin out and off to the right. Three custom presets make this easy: Drop Shadow LR, PiP 25% UR Spin In, and PiP 25% UR Scale Out. Notes When using the PiP custom presets, take note of the abbreviations UR (upper right), UL (upper left), LR (lower right), and LL (lower left). The effects are organized by the start or end position, so all UR effects either start or end in the same upper-right position.
Because of how Premiere Pro handles effect settings, however, you can't just add the three effects to the same clip at once. To accommodate two separate motion adjustments, you must razor the clip into two pieces. 1. | Open PiP_Presets_Start.prproj from the APPST2 Lesson Files/Chapter 24 folder.
This project starts midway through the last lesson, just before you assigned the PiP effects.
| | | 2. | From the Custom Presets/PiPs/25% PiPs/25% UR folder drag and drop the PiP 25% UR preset onto the PiP Sequence clip on Video 2 in the sequence.
Here you dragged and dropped a custom effect preset onto a clip in your sequence. The clip automatically updated with the settings of the preset; in this case Scale resized to 25% and Position updated to the upper-right picture-in-picture location.
Notes All Custom presets have a default duration of one second. Any preset displaying the word "In" anchors its first keyframe to the first frame of the clip it applies to. Any preset displaying the word "Out" anchors its last keyframe to the last frame of the clip it applies to. | 3. | Press the C key to access the Razor tool. Make incisions at 2;00 and at 17;00 in the PiP Sequence clip.
With the clip split into three pieces, you can apply two different keyframed presets to begin and then end your PiP effect.
| | | 4. | Drag and drop the PiP 25% UR Spin In custom effect preset from the Presets/PiP/25% PiP/25% UR preset folder onto the first instance of the A Cam Pip clip. Drag and drop PiP 25% UR Scale Out from the same folder onto the third instance of the same clip (Figures 24.22 and 24.23). Press Enter to preview your results.
Figure 24.22. In the Effect Controls panel, two scale keyframes represent the scale in so that the PiP zooms into position. At the same time, two rotation keyframes represent two full rotations from the first keyframe to the second. If you want to slow the scaling, just slide the second keyframe to the right. If you want to increase the number of rotations, position the Edit Line on top of the second rotation keyframe and increase the number of rotations from 2 to 4 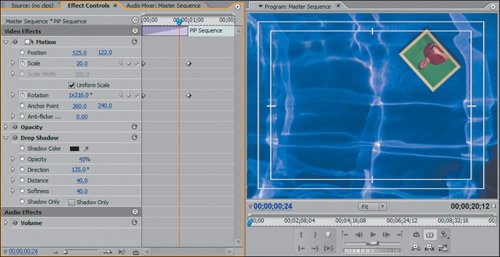
Figure 24.23. The last clip has two scale keyframes that represent the clip scaling from its current 25% down to 0%. If you want to slow the scale, just move the first Scale keyframe to the left 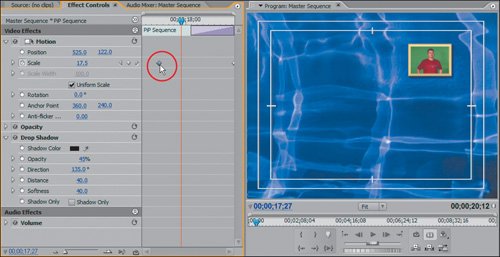
Having properly split the clip into three pieces, you can't see the seam when you play back the shots, although the division is clear in the timeline. Each clip accommodates a different move, and the result is a more dynamic PiP effect. The next step will show you how to adjust the keyframes created from the preset, in case you decide to adjust timing of the effect.
| | | 5. | Select the first instance of the PiP Sequence clip in the timeline, and open the Effect Controls panel displaying the Timeline view. Marquee select the second two keyframes for scale and rotation ( 24.24a). With both keyframes selected, move them to the right to move their position closer to the end of the clip ( 24.24b).
Figures 24.24a and b. Marquee select the separate keyframes in the Timeline view of the Effect Controls panel (a). Once the two keyframes are selected, you can quickly drag them to a new position to adjust their timing (b). Now the scale and rotation are a little slower 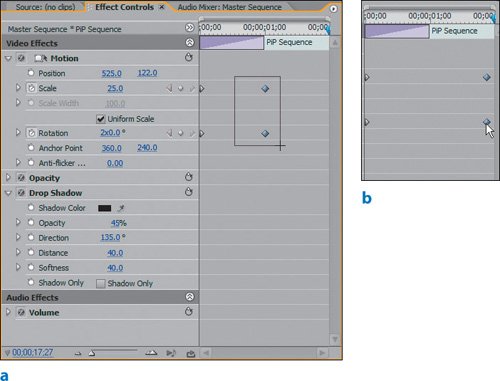
Notes You cannot see literal time positioning when moving keyframes, but you can reposition the Edit Line to give you an idea as to the time value of the adjustment you are making. By either marquee selecting or holding down the Shift key and clicking multiple keyframes, you can select and move multiple keyframes in unison. To deselect the keyframes, click off of them.
| 6. | Holding down the Shift key, select all three pieces of the split clip. Right-click on the selection, and choose Group from the context menu. To ensure that these three clips remain together, joined as a seamless trio, you grouped them. Grouping the clips creates a hard link that binds them together, enabling you to physically drag them to another track or timeline position while they are locked together. If you want to update or modify individual effect or keyframe settings, you must right-click and select Ungroup to get the individual clip effect parameters back.
|
Presets are great for streamlining effect building. The lessons from the second half of this chapter should help you not only to use the custom PiP presets to their highest potential, but also to create an attractive PiP easily. Keep in mind that all your clips with anchored In or Out custom presets should have a duration of a least one second to ensure all the keyframes can be displayed. If you want to add multiple keyframed presets to one clip, remember to split the clip before you apply the In and Out presets. |