| I am very excited about this new lesson. Prior to 2.0, you were never able to easily apply a color correction effect to a specific defined region of your image in Premiere Pro. In a professional color correction session this type of effect is called power windows. A power window defines a region of your image and within that region applies a precise color adjustment. Thanks to upgrades to the Track Matte Key effect, this new workflow is possible in Premiere Pro. To demonstrate this, you will create luma mattes in the Titler to define the regions of the your image to which you want to apply your color correction. Your final result will be a stylized color correction of a specific shot from Bleach (Figure 24.9). Using a color correction adjustment, you will darken the area around the box of bleach to make the box visually stick out in the frame. Figure 24.9. The image in the Source Monitor shows the original clip. The image to the right in the Program Monitor shows the luma matte result. In Premiere Pro 2.0, you can easily animate or move your luma matte by adding motion to the graphic used as the matte 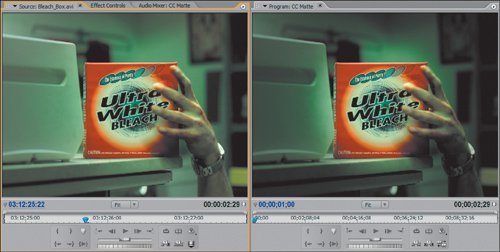
| | 1. | Open the project Luma_Mattes_Start.prproj in the APPST2 Lesson Files/Chapter 24 folder. Drag the Bleach_Box file from the Project panel onto Video 1 in the panel. Drag the file again directly above itself onto Video 2 (Figure 24.10).
Figure 24.10. The only cumbersome part of this workflow is that in order to do luma matte color correction effects, you need to place the corrected clip on top of itself. If you plan on animating the corrected result, you will want to nest the stack of clips into your final sequence 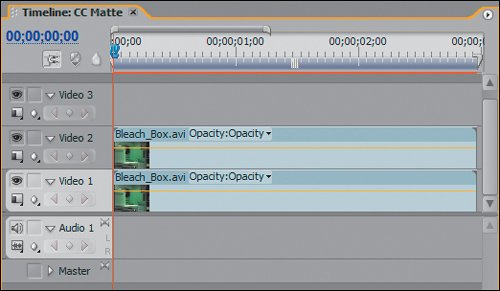
To control the region of the luma matte and color correction applied, you need to place the clip you want to adjust directly on top of itself using two video tracks. This is the secret step that enables you to apply a color correction effect to the clip instance on Video 2 using a regional luma matte from Video 3.
| | | 2. | In the Effects panel, go to the Color Correction subfolder within Video Effects. Drag and drop the Luma Corrector on top of the Bleach_Box instance on Video 2. With the clip selected, open the Effect Controls panel and enter the following settings for the Luma Corrector (Figure 24.11):
Figure 24.11. The Luma Corrector is the tool you use if you want to quickly increase or decrease the brightness and contrast of your clip. For this effect, you have darkened the video quite drastically 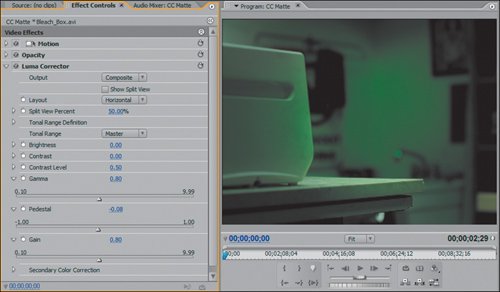
Tonal Range: Master
Brightness: 0
Contrast: 0
Contrast Level: 0
Gamma: .8
Pedestal: -.08
Gain: .8
The Luma Corrector is your quick and simple color correction effect that allows you to adjust all the parameters associated with brightness and contrast. By reducing the Gamma, Pedestal, and Gain you have effectively pulled down all the primary brightness levels of the image, decreasing the highest bright points and making them darker. This luma correction reflects the look that you want applied to the matte region.
| | | 3. | Press F9 on your keyboard to open the Titler, and name your new title Color Matte. With the Titler open, click the Show Video check box and position the Edit Line at 00;00;01;00. Using the Default Pure White style, select the Rectangle tool from the Titler Tools panel and make a rectangle that covers the entire frame. Twirl down the Fill properties and set the Fill Type to Radial Gradient. Click on the left color square and reduce its Opacity to 0%. Grab the right color square and slowly drag it closer to the left one so that the circle in the center has a smooth gradient edge and it encircles the Bleach Box (Figures 24.12a and b).
Figures 24.12a and b. First, you need to select the Rectangle tool and create a rectangle that covers your frame (a). Clicking on the first style in the Titler Styles panel ensures that the rectangle is filled with pure white. Then you apply a Radial Gradient fill to the rectangl (b). By assigning the first color square to be 0% Opacity you ensure that its color point becomes completely transparent. By pulling the second color square closer to the first you are reducing the length of the gradient that connects the two color squares. Because they are both white and the center is transparent, the result is a gradient that dithers into complete transparency 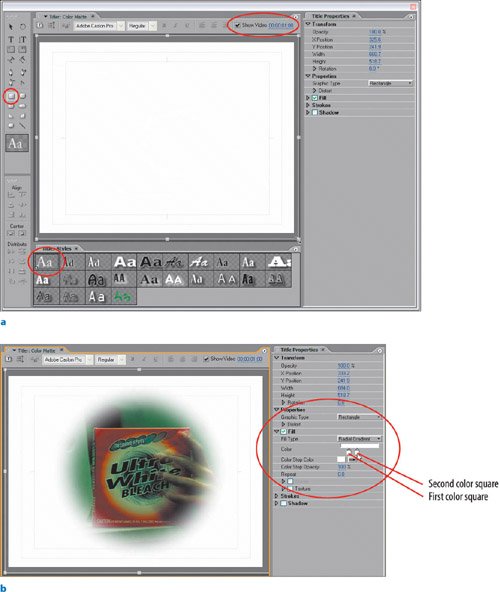
In this step, you created your luma matte. You filled the image with a pure white rectangle, then changed its fill to Radial Gradient so that you could effectively punch a hole through the center of the rectangle. By assigning a 0% opacity level to the first color square, which reflects the center of the radial gradient, you created a pure white gradient that smoothly transitions to completely transparent. Sliding the color squares left reduces the size of the radial center. Sliding the color squares closer together shortens the gradient that connects the two. The trick here is to first define the size of the center circle with the left color square, then slowly drag the right color square left to find the perfect gradient amount that connects the two.
When doing luma mattes for color corrections you should always use gradients with opacity adjustments as your object file. You should also keep the gradient as smooth as possible when it transitions from white to transparent.
| | | 4. | Drop the Color Matte Title onto Video 3. In the Effects panel, go to the Keying subfolder of Video Effects. Drag and drop the Track Matte Key effect onto the Bleach_Box clip on Video 2 (Figures 24.13a and b). With the clip selected, set the Track Matte Key effect parameters to
|
Figures 24.13a and b. shows your final result with the specified Track Matte Key settings. Notice that with Video 1 turned off in the timeline (b), you can see exactly what is being keyed using your custom title as a luma matte. This reinforces how important it is to have a smooth gradient that helps with the transition between the color corrected matte portion of your image (Video 2 and 3) and the original colored image (Video 1) 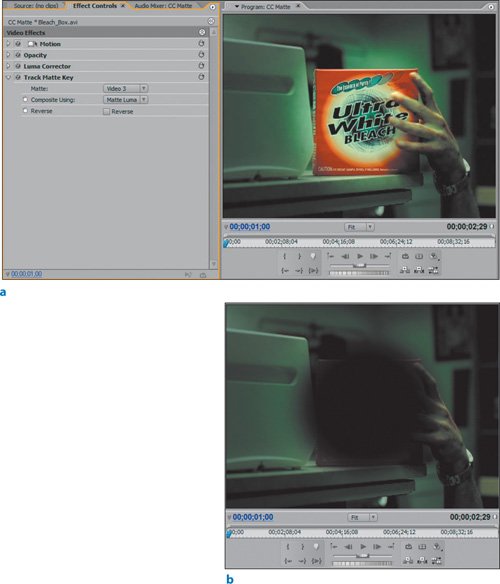
Matte: Video 3 Composite Using: Matte Luma This last step used the created title as a luma matte to key the color-corrected Bleach_Box clip through. The length of the gradient that transitions the pure white outer region to the transparent center region is what ultimately sells the effectiveness of this technique. If the gradient is too short, the line of distinction between the original clip and the corrected clip will be very obvious. To see this for yourself, simply open the Color Matte title and drag the second color square (right) to the left so that it is immediately next to first color square. As with the previous lesson, if you want to integrate this color-corrected clip into a master sequence, nest this sequence directly into the master. If you want to adjust the color correction effect, simply select the clip on Video 2 and continue adjusting its effect properties. To take this lesson a step further, experiment with using gradient fills and 0% opacity values on one of the two color squares. In the case of the Radial Gradient, giving the second color square (left) 0% opacity would make your luma matte element a circle. With a white circle, you could apply a color correction adjustment to only someone's face. You could also add some motion to the title in the sequence and track color corrections with the movement of someone's face. To see an example of this, check out the Luma_Mattes_Finish.prproj project. Although still in the world of effects, the next section of this chapter switches gears slightly to focus on creating a clean and simple picture-in-picture effect and template. |