The Liquify Filter
The Liquify filter is, at its heart, a set of painting tools that distort and transform regions of an image by intuitively manufacturing pixels. If you can imagine applying the earth-shaking effects of the Photoshop s Distortion filters on the fly with a set brushes, then you understand the essence of this powerful subinterface (Figure 20.38). The Liquify filter dialog box contains sophisticated masking tools that protect the image from alteration and a complete set of reconstruction modes that correct unwanted distortions so you can apply a partial or complete reconstruction at will. There is an optional mesh grid overlay that enables you to gauge the effects of the distortion as you apply it. If desired, you can save the mesh and apply it to an entirely new image regardless of the image s size or resolution.
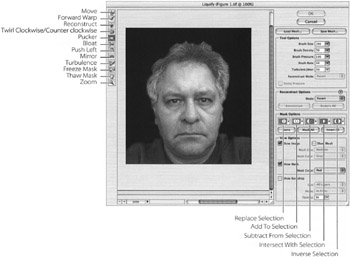
Figure 20.38: You can Liquify extensively within this subinterface.
The Liquify filter has fully functional previewing capabilities and a set of transformation tools that let you experiment before actually applying their effects. You can configure everything exactly the way you want it without the risk of damaging the image, click OK, and your entire session is applied to the image.
Tools
Let s first look at the Liquify painting and masking tools, which work somewhat like a set of distortion filters.
Forward Warp tool This pushes pixels along as you drag. If you hold the mouse down and drag longer, the effect is enhanced. Short, gentle drags of the mouse can move changes along slowly and precisely. Generally applies the effect like a smudge tool.
Reconstruct tool If you change your mind after you ve made some distortions, drag over the distortions with the Reconstruct tool to completely or partially restore your image to its initial state.
Twirl Clockwise tool This tool rotates pixels. Don t confuse it with the Twirl filter discussed earlier in this chapter. Unlike that filter, this tool causes pixels to rotate faster at the edges of the brush than at the center. The default tool twirls clockwise; press Option/ Alt to twirl counterclockwise.
Pucker and Bloat tools These tools squeeze your pixels in or out. Pucker pinches pixels under its drag, and Bloat moves them away from the center of the brush.
Push Left tool This tool moves pixels at a 90-degree angle to the way you re moving the brush. Dragging moves pixels to the left of your mouse path ; Option/Alt-drag moves pixels to the right.
Mirror tool This tool drags along a mirror image of the pixels perpendicular to your brush.
Turbulence tool This tool is another Liquify brush that applies the pixel-pushing effect more radically . If you click and hold the mouse, the pixels merge and melt like a piece of film burning in the projector. It s as if a randomizing Wave filter were at work inside the confines of the brush size. Changing the numbers on the Turbulent Jitter slider in the control panel slows down or speeds up this effect.
Freeze Mask tool The Freeze Mask tool creates a mask to protect an area from distortions.
Thaw Mask tool This tool unfreezes an area of an image so that are exposed to transformations.
Hand and Zoom tools Notice in the toolbar the familiar Hand and Zoom tools. You can zoom in on a specific area of the image you are distorting and navigate anywhere you need to go inside the zoom. There is also a Zoom options menu at the lower-left corner of the window that lets you choose a zoom factor at which to display the image or you can click the plus or minus symblos to zoom in or out in specified increments . Incidentally, the interface displays the height and width of the entire image unless you have an area selected, in which case it will display only that area.
Options
On the right side of the Liquify window are Options that control that application of the distortions. Some of these options preprogram the tools in the Tool palette. The options are as follows :
Tool Options These options configure the size, pressure, density, and rate of the brushes used to apply the distortion. Instead of individual brushes, you re provided with sliders that pop up when you click their arrow. They enable you to control the behavior of each tool s characteristics. The Turbulent Jitter slidercontrols the strength of the Turbulence tool.
Reconstruct Options The Reconstruct Options area sets specifications for tool behavior. In the Mode pop-up list, there are seven options for regulating the degree and type of reconstruction, ranging from Rigid to Loose. Each one offers a slightly different degree of reconstructing capability. These options are applied to the Reconstruction tool. Choose the Reconstruction tool and then a brush size and pressure. Paint over the area and the reconstruction will be applied. If you want to reconstruct back to the original image, click the Restore All button. Or you can reconstruct it back to the original in steps by clicking the Reconstruct button.
| New | Mask Options The Mask options give you various ways of creating masks to protect segments of your image from distortion. The icons enable you to create a new mask, add to a mask, subtract from a mask, intersect from a mask or invert a mask. Each icon s drop-down list enables you to load an active selection, a layer mask, or the transparent part of a layer as a mask. |
View Options The View Options area provides options for the way you look at the liquification. Most important of these is the Show Mesh option. It displays a grid that is at first a regular square matrix, but as you apply distortions it takes on the shape of the transformations you apply. This can be useful when applying reconstructions, by letting you see how close to square you re able to return. At the top of the control area, you can save and load grids ”which is useful if you want to apply the distortions made on one image to another image.
Show Backdrop The Show Backdrop feature enables you to superimpose the distortions over the original image so that you can view the liquified image on top of the original for comparison. When you click the Show Backdrop check box, choose a specific layer or all layers from the drop-down list and adjust the Opacity slider to compare the results.
Liquify can be used to create hilarious caricatures, as in Figure 20.39, or more subtle distortions that can improve the credibility of copied or composited regions of an image. For practice, you can open the ch20 folder on the CD to obliterate and abuse sample files in the things-to-liquify folder.
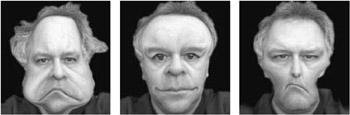
Figure 20.39: These three images show the application of the Liquify filter and how it can be used to distort facial characteristics to produce wild caricatures.
Remember, when using the Liquify filter, less is usually more. It s easy to get carried away with this feature and turn your image into a swirling amorphous galaxy of gray mud. With a little restraint and in the spirit of fun you can produce images that defy reality and have your audience wondering, How d they do that?
EAN: 2147483647
Pages: 355