Publishing Outlook Web Access with ISA Server
The Microsoft ISA Server is a powerful and flexible product that can act as a packet- inspecting firewall and Web cache. Among its many other helpful features, it can safely publish RPCs so that your users can use Outlook in MAPI mode against the server ”a useful trick (see Chapter 11 for more details). ISA Server also offers a broad suite of Web and server publishing features; for Outlook Web Access, our main interest is in publishing the Outlook Web Access pages using the ISA Web publishing feature.
First, of course, you have to install and configure ISA Server, which this book can t help you with, except to note that you ll normally have two network interface cards (NICs) in the ISA machine: one for connection to the Internet and the other for connection to your LAN or perimeter network. In this section, I assume that you have ISA installed and configured and that it s working properly for ordinary firewall requests ; these instructions focus on configuring ISA just for Outlook Web Access.
| Tip | You do have to make a small change to your Outlook Web Access server, too: you have to change the default gateway for its internal NIC to point to the internal NIC on the ISA server. This effectively makes the Exchange server into what the ISA documentation calls a Secure-NAT client. If you don t do this, the Exchange server won t be able to return any traffic back to the ISA server, and it will appear to Internet clients that the server is not functioning. |
ISA publishes Web sites according to rules that you specify. These rules can control which specific virtual directories are exposed, which clients can request data from those directories, and how the requests should be processed when received. We need to create a publishing rule to expose the Outlook Web Access virtual directories, but before we can do so, we ll have to create a destination set that groups those virtual directories together so they can be managed by a single publishing rule. You ll need to create a Web listener, a destination set, and a publishing rule for each set of virtual directories on your Outlook Web Access server. For example, let s say Fabrikam s Outlook Web Access machine provides mail service for the fabrikam.com domain; in addition, the Fabrikam admins added a secondary OU and Outlook Web Access virtual directory named contoso.com for users at a subsidiary. To provide full access to the contoso.com users using ISA, the admins would need to follow the steps in the next section twice: once for each hosted domain.
| Note | If you re running Exchange on the same computer that hosts ISA Server, there are a few additional steps required to publish Outlook Web Access; I ve noted them where appropriate. In most circumstances, you wouldn t run things this way; however, small environments (particularly those using the Small Business Server version of Exchange) might be forced to consolidate servers in this manner. |
Creating the Web Listener
The first step in setting up ISA for Outlook Web Access is to tell ISA what ports to listen on. These port definitions are called Web listeners; you must define a listener for the Outlook Web Access ports you want to use, in this case port 443. (If you re allowing Outlook Web Access traffic on port 80, you can create a listener for it, too.)
To create the Web listener, use the ISA Management snap-in to open the Properties dialog box for the ISA server itself (all of the ISA servers appear right under the Servers And Arrays node), then do the following:
-
In the Properties dialog box, click the Incoming Web Requests tab.
-
Select the Configure Listeners Individually Per IP Address option. This tells ISA that you want to use separate listeners for each port/IP address combination.
-
Click Add. The Add/Edit Listeners dialog box opens. Select the ISA server from the Server drop-down list.
-
Select the specific IP address you want to create a listener for from the IP Address drop-down list. In this case, be sure you create the listener on the public IP address that you want Outlook Web Access users to come in on.
-
Enter a display name for the listener so that ISA Management can tell you which is which.
-
Because you ll be using SSL, make sure that the Use A Server Certificate To Authenticate To Web Clients check box is selected. Click Select to choose the SSL certificate you want this listener to use.
-
In the Authentication section, choose the authentication methods that correspond to your Outlook Web Access server s authentication settings.
-
Click OK to return to the server s Properties dialog box. Make sure that the Enable SSL Listeners check box is set, then click OK.
After making these changes, ISA Server might prompt you to restart the Web proxy service. You ll have to do so before the changes take effect, but restarting the service renders clients unable to use it during the restart interval.
Creating the Outlook Web Access Destination Set
To create the Outlook Web Access destination set, you ll need to launch the ISA Management snap-in and navigate to the Destination Sets page (look in the left pane under Internet Security and Acceleration Server Servers and Arrays ServerName Policy Elements). Once you re there, as shown in Figure 14-11, do the following:
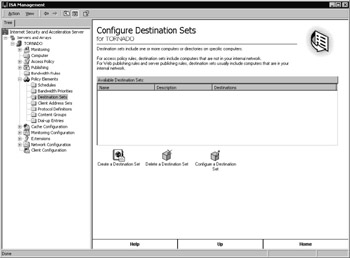
Figure 14-11: The Destination Sets page of the ISA Management snap-in.
-
Click the Create A Destination Set icon. When the New Destination Set dialog box appears, give the set a name and a description.
-
Click Add; the Add/Edit Destination dialog box opens, as shown in Figure 14-12.
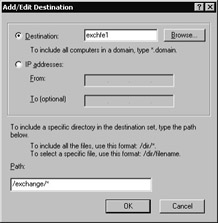
Figure 14-12: Create a destination in the destination set for the /Exchange virtual directory. -
Specify the name or IP address of the FE server (remember to use the correct IP address if your Outlook Web Access server is multihomed ).
-
In the Path field, specify the main Outlook Web Access virtual directory by typing /exchange/* . Note that the slashes and asterisk are all required ”just typing exchange into this field won t work.
-
Click OK to close the Add/Edit Destination dialog box.
-
Repeat steps 2 through 5, adding the /Exchweb/* and /public/* paths.
-
If you re allowing SSL password changes on your server, add the /Iisadmpwd/* path.
The finished destination set should resemble Figure 14-13. Click OK to finish creating the destination set.
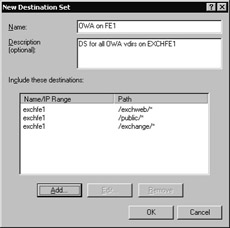
Figure 14-13: Include each Outlook Web Access virtual directory in your destination set.
Creating the Web Publishing Rule
Once the destination set is complete, you can proceed to create the server publishing rule that makes Outlook Web Access visible through the ISA Server computer. To do this, open the Publishing node in the ISA Management snap-in, then right- click the Web Publishing Rules, navigate through the New menu, and select Rule. That starts the New Web Publishing Rule Wizard.
The wizard s first step allows you to name the rule; do so, then click Next. After that, the process of creating the publishing rule is pretty straightforward:
-
The next wizard page is the Destination Sets page, in which you get to specify which destinations this rule applies to. We just created a destination set for this express purpose ”set the Apply This Rule To drop-down list to Specified Destination Set, then use the Name drop-down list to pick the destination set you created for the Outlook Web Access virtual directories. Click Next when you re done.
-
The Client Type page is where you specify which requestors can use the publishing rule. Because we re opening up our Outlook Web Access server to the world, the default value of Any Request is what you want. Make sure it s selected, then click Next.
-
The Rule Action dialog box is the heart of the rule creation process ”it s where you specify what you want the rule to actually do . In this case, we want to redirect all requests to the internal private IP address of our Outlook Web Access server. Select the Redirect The Request To This Internal Web Server option, then fill in the server name or IP address. Select the Send The Original Host Header check box, then click Next.
-
On the final page, review your changes and click Finish.
Tip Note that if you wanted to, you could use ISA to restrict access to Outlook Web Access to particular IP addresses or ranges (or time periods, for that matter). For example, you might want to set up Outlook Web Access in a kiosk at a factory so that employees without computers could still get their mail. An easy solution would be to create a separate virtual directory for the factory server, then use ISA to publish it to your intranet only.
Note If Outlook Web Access and ISA are on the same computer, you must specify the IP address as the destination ”the name alone won t work.
EAN: 2147483647
Pages: 189