Securing Outlook Web Access with Firewalls
If Outlook Web Access is just a Web application (albeit a particularly sophisticated and useful one), you might wonder why we can t just secure it by firewalling it, like we d probably do with a traditional Web application. Outlook Web Access can be, and often is, deployed with firewalls, but to get the best security, there are some additional factors to consider that aren t always present with ordinary Web applications.
First, consider whether you want to use FEs with a single firewall or in a perimeter network. In a single-firewall configuration, you ll only have to open a small number of ports to the Internet. However, if an attacker manages to compromise the FE server, he or she will probably be able to leverage that compromise into a larger scale attack on your network, because the FE server isn t segregated from that network. Perimeter networks offer additional security, because the FE is separated from Internet traffic by one firewall and from the internal network by another. The two have different sets of ports open, so even if an attacker can compromise the FE, he or she will still have an uphill battle to penetrate the second firewall and gain access to the intranet.
Second, remember that IIS uses RPCs to make authentication requests. On an internal network, RPCs are usually allowed to traverse the network freely ; however, to improve security, Microsoft has long recommended that you block RPC requests from the Internet or perimeter network from penetrating your interior network. Putting an FE in the perimeter network thus poses a conundrum : should you block RPCs, thus forcing the FE to accept anonymous requests, or should you allow RPCs, thus enabling implicit logon, public folder load balancing, and FE authentication? Of course, with Exchange Server 2003 we now have an additional choice: use an RPC over HTTPS proxy in the perimeter network and leave the FE inside the protected network. I generally recommend that RPC over HTTPS be deployed in combination with ISA Server. This provides seamless connectivity for Outlook 2003 clients without exposing the FE in the perimeter network.
Third, remember that putting a domain member into the perimeter network requires that Active Directory traffic be able to transit the perimeter network. In addition, if the FE is compromised, a savvy attacker might be able to leverage that local compromise into administrative access for the domain, at which point the risk to your network increases sharply. The best way to prevent this is to use a firewall that does not participate in the domain as a reverse proxy. A conventional proxy acts as a central point for accepting requests from multiple clients; a reverse proxy does the opposite : it accepts incoming traffic and fans it out to multiple receivers. If that server is compromised, there s no easy way for the attacker to use the system as a springboard to attack the domain. If you can t or don t want to use a reverse proxy, at least create a separate domain and put the FE in it instead. That creates additional obstacles for any attacker who scores a hit on your FE machine. Figure 14-6 illustrates this approach using Microsoft ISA Server. Notice that in this figure, the ISA server is also doing all of the SSL decryption for us. This offloads the work from the Outlook Web Access server, which is often worth doing if you can afford to dump the load on another machine. It also allows the inner firewall to inspect traffic traveling to and from the Outlook Web Access server to provide an additional layer of protection and intrusion detection.
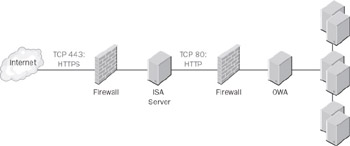
Figure 14-6: Using ISA as a reverse proxy.
Opening the Correct Firewall Ports
The key to proper firewall configuration is to think like an old-school Russian commissar: everything not specifically permitted is forbidden. To get the best possible security from your firewall configuration, you must turn off as many ports as possible so that only essential traffic can flow. By doing so, you reduce the attack surface area of your network, because it s impossible to attack an internal service if you cannot get packets to it in the first place.
Outlook Web Access poses somewhat of a challenge to this maxim ; depending on how your network is configured, you might have to open anywhere between one and a dozen ports of various kinds. The simplest (and arguably least secure) configuration is to place your Outlook Web Access server behind a firewall with only one or two ports open. At a minimum, you ll need to open the SSL port (TCP port 443). If you re allowing non-SSL requests to come in and be redirected, you might also open the HTTP port (TCP port 80), but this is optional (see Figure 14-7).
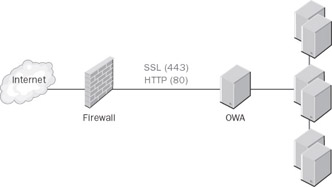
Figure 14-7: The simplest configuration is to place Outlook Web Access behind a single firewall.
| Note | If your FE also handles SMTP, POP, IMAP, or NNTP traffic (with or without SSL), you ll have to open those ports as well. For clarity s sake, I haven t shown those ports on any of the firewall diagrams, but don t forget about them when you re setting up your firewalls. |
However, this configuration leaves your internal network largely unprotected . A more common and more secure configuration is to isolate the Outlook Web Access server in a perimeter network, a sort of no-man s-land between the internal and external networks. Figure 14-8 shows what this configuration looks like. This is certainly a step up from the single-firewall configuration, but it has some problems as well. First, you have to open several ports on the firewall that separates the FE from the intranet (over and above the ports you ve opened on the external- facing firewall):
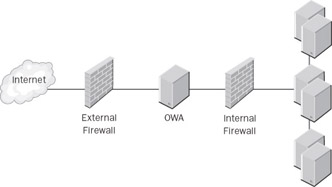
Figure 14-8: A perimeter network offers better security than a single-firewall configuration.
-
For ordinary mail services over Outlook Web Access, you ll have to open port 443 for SSL. If you re using IMAP or POP, you ll need to open ports 143 and 110, respectively. You don t need to open any ports for the SSL-protected versions of these protocols, because the FE never uses SSL to talk to the BE.
-
For the FE to communicate with a GC and domain controller, you ll have to open TCP and User Datagram Protocol (UDP) port 389 so that the FE can make Lightweight Directory Access Protocol (LDAP) queries against the domain controller. Once the FE has found the GC, it switches to using the GC query protocol on TCP port 3268, so you need to open that, too. Kerberos authentication requires TCP and UDP port 88, so unless you re willing to turn off all authentication on the FE, those ports have to be opened also.
-
The FE needs access to a Domain Name System (DNS) server hosting your Active Directory domain or domains. If you want it to use a DNS server inside the network perimeter, you ll have to open TCP and UDP port 53. If you don t need to resolve names from the internal network, you can point it to a suitable upstream DNS server. You can also just configure the FE to make DNS queries of another upstream server, like one at your ISP.
-
If your FE is acting as an SMTP server, it will be a member of some Exchange routing group. Accordingly, you need to open TCP port 691, which the Exchange routing engine uses to pass link state updates between a routing group master and routing group members . Even if your FE only delivers mail to a single internal smarthost , the routing engine becomes first confused and then surly if it cannot exchange routing information with its peers.
-
If your FE is configured to allow authentication, IIS has to be able to pass RPC traffic into the intranet. The specific ports you need to enable are covered in the next section.
-
If you re going to use RPC over HTTPS, you have to allow the corresponding ports to pass (see Chapter 11, Securing Internet Communications, for the specific port definitions, as well as information on how to change them).
Enabling RPC Traffic
IIS, Microsoft SQL Server, Exchange, and Windows all use RPCs to link services on different machines. Because these requests are actually procedure calls that cause code to run on the target machines, it s generally a good idea to be conservative about allowing them onto your network. However, you don t have to open a broad range of ports to enable RPC traffic, and you can reduce the amount of traffic required with a few simple registry changes.
Turning Off DSAccess RPC Queries
In Exchange 2000 Server Service Pack 1 and earlier, FEs would make RPC requests for various services (including time synchronization and replication) or to discover which domain controllers were available for servicing logon requests. Service Pack 2 added the ability to quash these RPC requests, but because there are two separate sets of requests you need to add two separate registry keys. Remember, you need to add these keys only if your internal firewall blocks RPC traffic. The DSAccess component works better when it can make these queries, so don t turn them off unless you have to.
-
To turn off DSAccess pings for domain controllers, add a new REG_DWORD value named LdapKeepAliveSecs to the HKEY_LOCAL_MACHINE\SYSTEM\CurrentControlSet\Services\MSExchangeDSAccess key and set its value to 0.
-
To stop DSAccess from querying the Netlogon service on a domain controller, add a new REG_DWORD value named DisableNetlogonCheck to the HKEY_LOCAL_MACHINE\SYSTEM\CurrentControlSet\Services\MSExchangeDSAccess key, then set its value to 1.
Locking RPC Traffic to One Port
Normal RPC traffic uses two ports: TCP port 135 is used for service discovery (for example, the RPC client connects to this port on the server and says, What port is service X on? ), and randomly chosen port numbers above 1024 are used for the services themselves . This is a big hassle for firewall administrators, because having to open arbitrary ports is both an annoyance and a reduction in overall security. Fortunately, you can force your RPC clients and servers to use a preselected port number instead of picking one at random. You still have to open TCP port 135, but forcing the FE to use a single RPC port is much simpler than allowing it to pick ports randomly.
To effect this change, you must add a registry key to each Active Directory server (domain controller or GC) that the FE might attempt to contact. Most sites with large numbers of FEs have dedicated GCs and domain controllers, so this change is simple enough to implement. On the affected GCs, add a REG_DWORD value named TCP/IP Port to the HKEY_LOCAL_MACHINE\SYSTEM\CurrentControlSet\Services\NTDS\Parameters key and give it the value of the port number you want replication traffic to use. Bear in mind that your internal firewalls, if any, have to accommodate this port.
Opening Ports for IPSec
IPSec offers a great deal of power for a small amount of overhead and hassle. In particular, to enable IPSec traffic between the FE and BE, you only need to open a couple of ports. IPSec key exchange uses UDP port 500 for the Internet Key Exchange (IKE) protocol, so you need to turn it on. From Chapter 2, Security Protocols and Algorithms, you might remember that there are two separate security protocols included in IPSec: Authentication Header (AH) for authentication and Encapsulating Security Payload (ESP) for confidentiality. These protocols require you to open specific protocol numbers, not just ports. If you re not sure of how to open a specific IP protocol number, see your firewall documentation. For AH, open IP protocol 51; for ESP, open IP protocol 50. In both cases, open UDP port 500, which is required for the IKE protocol (see Chapter 11 for a refresher on when IKE is necessary).
Protecting FE/BE Communications
By default, communications between the FE and BE are completely unprotected. Anyone with a network monitoring tool can read all the mail as it flows back and forth ”generally not what you d want to happen. If you re using SSL, traffic to and from the FE is protected, but for most sites it is desirable to have protection for traffic between your servers. (Of course, if you re only using a single Exchange server, you don t have to worry about this at all!) The best way to accomplish this is with the IPSec protocol. Because it s built into Windows 2000 Server and later versions, you can deploy it with a minimal resource investment. However, be forewarned that IPSec is a fairly complex protocol, and implementing it fully will probably require some careful planning. Fortunately, though, a simple implementation will suffice for protecting FE/BE traffic.
Using IPSec Between FE and BE
The first thing to consider when planning IPSec for FE/BE use is that IPSec usage is driven by policies. These policies, which are applied using the same Group Policy mechanism you might already be familiar with, control which types of communications a server attempts to encrypt or authenticate. You normally specify filters based on the IP address and port that traffic is going to or from; the IP Security Policy Management snap-in allows you to create very flexible policy rules if you need them.
| Tip | This is a little-known fact: the local policy engine is just a very small, limited-scope group policy; you can apply IPSec policies to individual machines even if you haven t done a full-blown Group Policy deployment. |
To protect FE/BE traffic, you can get by with quite a bit less. Start with some simplifying assumptions:
-
It s fine to tell the FE to initiate IPSec connections only to the BE. Kerberos and IPSec don t mix particularly well in Windows, and it isn t strictly necessary that we protect communications between the FE and the GC anyway.
-
The BE servers can accept IPSec requests they receive from the FEs, but they do not need to initiate their own outbound IPSec traffic.
Given these simplifications , you can easily build an IPSec policy that does what you want. Exactly how you target these policies will vary according to how your FEs and BEs are separated. If they re in their own OUs, guess what? You can t target IP security policies at an OU, only at a domain. For most applications, it is easiest to apply IPSec policies to the individual FEs and BEs because there will be relatively few of them.
Choosing the Right Policy
Windows 2000 Server and Windows Server 2003 include three IPSec policies that you can use out of the box. Although you can certainly create your own policies, doing so is mostly outside the scope of this book. Fortunately, the predefined policies work quite well for our needs. In our case, we can apply the predefined Client (Respond Only) policy to the BE; that way, it uses IPSec when a connection requests it. The other half of the equation is that we must create a new policy to tell the FE to use IPSec when communicating with the BE. This is fairly straightforward, too, but we ll do it second. First, let s get the policy applied to the BE.
Applying Policies to the BE
We apply the policy to the BE by using the IP Security Policy Management snap-in. You can find more complete instructions on how to use the snap-in in Chapter 11. Begin by opening the snap-in; choose the BE as the target of the IPSec policy. (If you re assigning policies to more than one BE, go ahead and add snap-ins targeted at the other BEs, too.)
In the left pane of the IP Security Policy Management snap-in, navigate to the BE for which you want to assign a policy and select it. The right pane displays the three default policies. Right-click Client (Respond Only) and select Assign. The value in the Policy Assigned column should read Yes; if not, the policy hasn t been applied yet and won t take effect. By far, the most common cause of this problem is that the IPSec Policy Agent service isn t running. It must be running at all times to assign policies or communicate with IPSec.
Applying Policies to the FE
You ll have to create a new IPSec policy to force the FE to initiate IPSec traffic with the BE. However, this is easy, because the FE always uses port 80 to pass traffic to the BE, and we know the BE s IP address. That means our policy can be very simple. To create the policy, launch the IP Security Policy Management snap-in again but, this time, target it at the FE. Right-click the IP Security Policies On Local Machine node (the name will obviously be different if you ve targeted a remote machine), and then select Create IP Security Policy. That launches the IP Security Policy Wizard. Proceed through the wizard, giving your new policy a meaningful name and accepting the default response rule. The real magic comes when you create a rule to secure the FE/BE traffic. On the wizard s last page, make sure that the Edit Properties check box is selected before you click Finish. You ll end up in the Rules tab of the new policy s Properties dialog box, shown in Figure 14-9. Click Add to start the Security Rule Wizard.
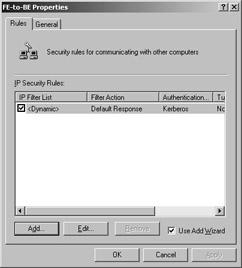
Figure 14-9: Use the Rules tab to create a new rule to protect port 80 FE/BE traffic.
Once the Security Rule Wizard starts and you ve dismissed its first page, you re ready to create the rule by following these steps:
-
The Tunnel Endpoint page is only useful if you re using IPSec in tunnel mode. This policy isn t tunneling, so make sure the This Rule Does Not Specify A Tunnel option is selected and click Next.
-
The Network Type page allows you to specify whether this IPSec connection applies to remote access requests, LAN traffic, or all connections. In this case, we re encrypting traffic across the LAN (or at least the portion of it in the perimeter network), so select the Local Area Network (LAN) option before you click Next.
-
The Authentication Method wizard page lets you choose how the two endpoints will authenticate each other. Whenever possible, you should use Kerberos, the default method; it s the most secure and the easiest to administer. Select Windows 2000 Default (Kerberos V5 Protocol) and click Next.
-
The IP Filter List page contains two default choices: All ICMP Traffic and All IP Traffic. Regrettably, neither one of them works for us: we only want to encrypt traffic on port 80, not all IP traffic (remember, no Kerberos over IP ” and our FE must be able to send authentication requests to the domain controller). Accordingly, you have to create a new filter by clicking Add; this opens the IP Filter List dialog box, shown in Figure 14-10.

Figure 14-10: The IP Filter List dialog box lists the current filters associated with a filter list; the filter list belongs to a policy. -
Give the new filter a description and a name, then click Add to start the IP Filter Wizard. Skip the wizard s first page by clicking Next.
-
The IP Traffic Source page of the IP Filter Wizard lets you specify the source address for the filter rule. In our case, the source for the FE s rule is its own IP address, so make sure the Source Address drop-down list has My IP Address selected and click Next.
-
The IP Traffic Destination page specifies the endpoint for the filter rule. The default setting matches any IP address as the destination. We only want our rule to match the IP address of the BE, so select A Specific IP Address from the drop-down list, then fill in the BE s IP address and click Next.
-
On the IP Protocol Type page, select TCP as the protocol. If you accept the default value of Any, you don t get to specify the port you want to use, as the rule then attempts to secure all IP traffic. This might not be what you want, particularly if your FE is running SMTP.
-
If you selected TCP as the protocol type, the next page you see is the IP Protocol Port page. Select the From Any Port and To This Port options, then fill in the destination port field with 80. Click Next, then click Finish.
-
When you return to the IP Filter List dialog box, click Close to return to the Security Rule Wizard. Select the IP filter list you just defined, and click Next.
-
On the Filter Action page, select Require Security, and click Next. On the final page of the wizard, click Finish. Click Close on the New IP Security Policy Properties page to return to the IP Security Policy Management snap-in.
EAN: 2147483647
Pages: 189
- ERP Systems Impact on Organizations
- ERP System Acquisition: A Process Model and Results From an Austrian Survey
- Distributed Data Warehouse for Geo-spatial Services
- Data Mining for Business Process Reengineering
- Relevance and Micro-Relevance for the Professional as Determinants of IT-Diffusion and IT-Use in Healthcare