Flash's input text boxes, combined with the UI components you'll add later in this lesson, let you create graphically appealing forms and surveys. You can use input text boxes to collect information about your users, to give users a means of logging in to your Web site, to create order forms, and much more.
-
Create a new Flash movie based on the Flash TFS Zoo Template.
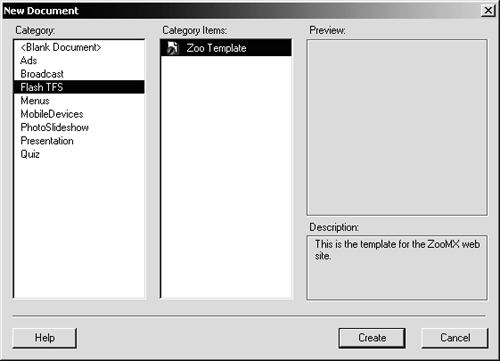
You've done this before, but here's a quick refresher. Choose File > New From Template. When the New Document dialog box opens, set the Category to Flash TFS and make sure the Zoo Template is selected. Click Create, and a new movie, based on the Zoo Template file, appears.
-
Select the Contents layer, and import guestbook.swf from the Lesson08/Assets folder on the CD-ROM.
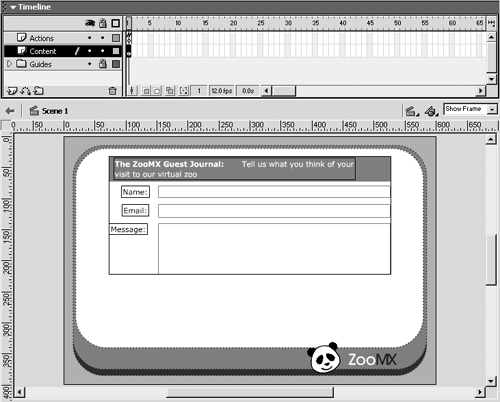
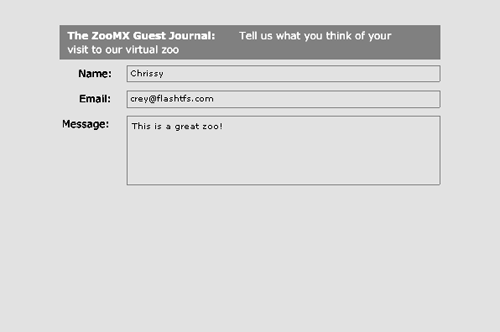
To import the file, choose File > Import and browse to the Lesson08/Assets folder. Select guestbook.swf, and click Open . The guestbook.swf file contains some text and graphics. You can re-create the contents of this file for more practicejust use the figure above as a guide.
The contents of the guestbook.swf file will act as a background for the guestbook entry form you will create as you work through this lesson.
-
Change the name of the Content layer to Background, and lock it. Add a new layer above the Background layer, and name it Text Boxes.
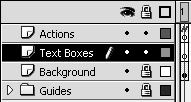
Double-click the name of the Contents layer to select it, and change the name to Background. Lock the Background layer by clicking the dot under the Lock/Unlock All Layers icon to the right of the layer's name. With the Background layer selected, click the Insert Layer button at the bottom-left side of the timeline to add a new layer. Name the new layer Text Boxes.
-
Select the text tool from the toolbox. In the Property inspector set the Text Type to Input Text. Modify the remaining properties so the Property inspector looks like the figure below.

When you select the text tool from the toolbox, the Property inspector should display the text properties. The Text Type is the setting on the far left of the Property inspector. Set it to Input Text, as you are going to add a text box that visitors will be able to use to type a message. Make sure the Font is set to Verdana, the Font Size to 10, and the Text (fill) Color to black (#000000).
The Line Type should be set to Single Line. This will ensure that the text box you create in the next step will allow users to type text only in a single line. You will add a multiline text box later in this exercise, so you will be able to see the difference.
Compare the Property inspector with the figure above, and make sure the rest of the settings are the same.
-
Select the Text Boxes layer. Create a text box on the stage by clicking and dragging to the desired width.
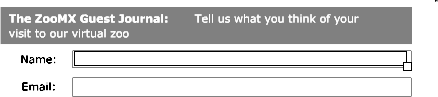
Make the text box about the same width as the area labeled Name in the Background layer. These labeled areas will be called text-box backgrounds throughout the rest of this lesson.
-
Use the arrow tool to select the text box you just drew. Position the text box so that it's in the text box-background labeled Name. In the Property inspector, type visitorName in the Var text box.

When you switch to the arrow tool, the text box should be selected automatically.
The Var setting is the variable name associated with the text box. The variable for this text box is visitorName , and the value is going to be whatever the user types into the text box.
NOTE
Flash input text boxes are similar to HTML input text fields, only they're created in Flash, and not with HTML.
Notice that the Property inspector has a Maximum Characters setting for the input text box. You can type a number in this setting to limit the number of characters a user can enter in the text box.
-
Create another text box for the text-box background labeled Email. Type visitorEmail in the Var text field to set the variable name for that text box.

You should have two text boxes, each with a different variable name. It's very important that you give each text box a different variable name. If you accidentally use the same variable name for more than one text box, both text boxes will end up with the same text.
-
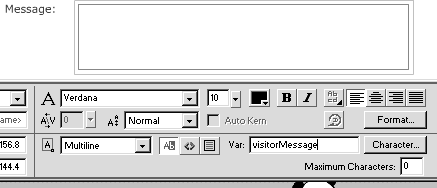
Add a third text box for the text-box background labeled Message. Set the Line Type for this text box to Multiline, and enter visitorMessage in the Var text field.
The third text box should be larger than the other two. You can make it the same size as the text-box background labeled Message by dragging down as you drag to the right.
When you set the Line Type for a text box to Multiline, Flash automatically wraps text to the next line. Notice that you can also set the text box to Multiline No Wrap, which places text on a new line only if you add a new line yourself (by pressing Return or Enter). There's also a Password option, which turns text typed into the text box into asterisks (*), as shown in the figure below.

-
Choose Control > Test Movie. When you've finished testing, close the Test Movie window, and save the file as guestbook1.fla in the FlashTFS folder on your hard drive.
When you test the movie, it may look as if there isn't anything on the screen, other than the background you added. Try clicking each of the text-box backgroundsthe cursor should appear indicating that there is a text box. Type something in each text box to see how it looks. Type enough text to reach the end of the box to make sure the text in the multiline text box wraps.
Now that you have text boxes in the movie, it's time to add some components.