Understanding User Mounting
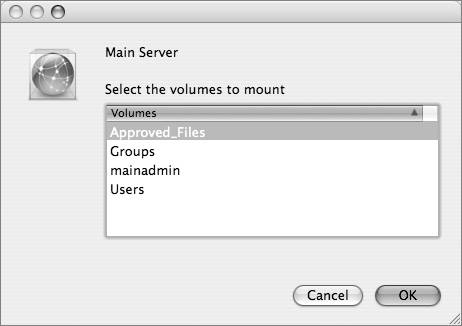
| Service discovery protocols let you view a list of computers or volumes and click to initiate a mount. In Mac OS X, you view the list by clicking the Network icon in the Sidebar. Apple supports four service discovery protocols: AppleTalk, Bonjour, Service Location Protocol (SLP), and SMB, as shown in the following figure. No single service discovery protocol discovers all file services on Mac OS X. None of the protocols discovers FTP, and only SMB discovers SMB. Browsing is not implemented for FTP, and NFS browsing is available only if the server is running Mac OS X Server. To manage those methods, you use Directory Access to enable and disable service discovery protocols. 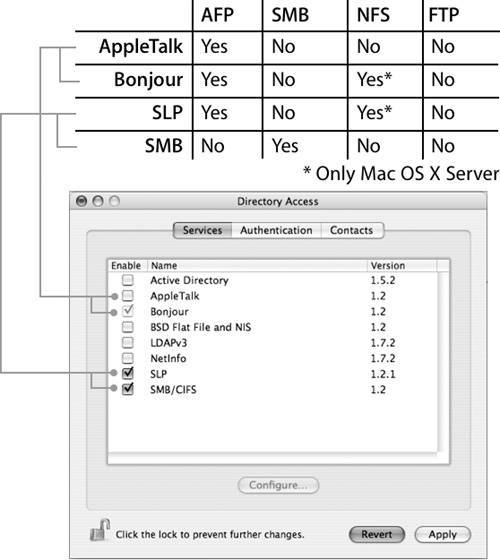 Discovering Services on a Windows NetworkWindows users can browse SMB services by selecting My Network Places. Browsing is possible because Windows networks establish service discovery with a computer that maintains a list of available computers. On each subnet of a Windows network, the workgroup members elect one computer as the Local Master Browser, as illustrated in the following figure. The Workgroup members may elect additional local browsers as backup browsers. 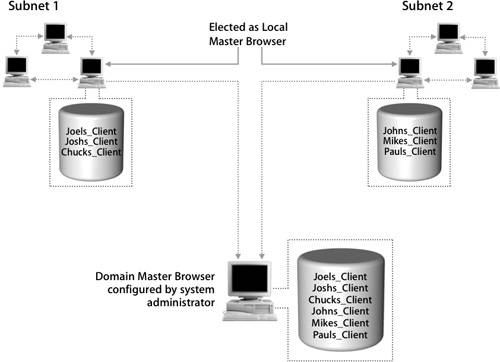 The system administrator can designate one server as the Domain Master Browser (DMB) to circulate browse lists outside of Internet Protocol (IP) subnets. The DMB registers with the WINS server. Local Master Browsers look for this name and send updates to the DMB, which then combines the lists and sends them back. When a Windows user selects My Network Places, the client computer connects to a browser, obtains a copy of the browse list, and displays it. Using the Network BrowserOn Mac OS X, when you click the Network icon in the Sidebar, the Finder displays a list of browsable servers. You will see any local computers on your network, or you can select different network areas or workgroup names to see the servers they include. To initiate a mount, as illustrated in the following figure, select a computer and click Connect, and enter the authentication information if necessary. Once you have mounted the server volumes, the contents of the server appear in the Finder window. The server (or share point) appears on the desktop and in the Sidebar, although this behavior can be modified by adjusting the Finder preferences.  In Mac OS X, volumes mounted via the Network icon in the Sidebar actually mount in subdirectories under /Volumes. Later in this lesson, you will view these mounts from the command line. Mounting Using Connect to ServerYou invoke the Connect to Server command either from the Finder's Go menu or by pressing Command-K in a Finder window. As shown in the following figure, you specify the URL of a server, and the Finder attempts to connect. 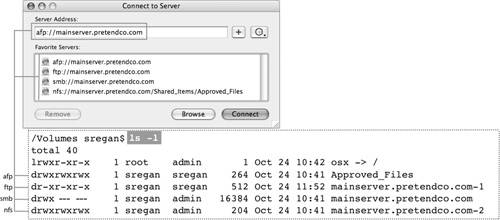 When you use Connect to Server to connect to an AFP server, AFP displays a list of volumes you can mount. Both administrators and regular users see a list of share points when mounting over AFP. It is also not necessary to type the letters afp before the IP address or name of the server, as Connect to Server will default to AFP. When you mount using Connect to Server, a volume icon appears on your desktop and in the Sidebar. You can change your Finder preferences so that you do not see volume icons on your desktop. Connect to Server actually mounts each share point on a subdirectory of/Volumes that is named for the share point or server being mounted. You can see the actual mount points by choosing Go to Folder from the Go menu and typing /Volumes, as shown in the following figure. 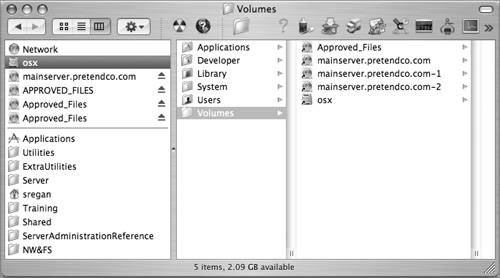 You can connect to all four service types (AFP, SMB, FTP, and NFS) using the Finder, but FTP mounts read-only, so you can download files but not upload them to the server. Browsing is not implemented for FTP, and NFS browsing is available only if the server is running Mac OS X Server. Mounting From the Command LineTo mount a volume using the mount command, you need a folder to mount on. Use mkdir or choose New Folder under the Finder's File menu to create the folder prior to mounting. Note The commands disktool e, disktool u, diskutil eject, and diskutil unmount can unmount physically attached volumes and are preferable to umount for that purpose, although they may not work consistently when used on command-line mounts. The following examples show how to use the mount command for AFP, SMB, FTP, and NFS:
Note Though it's not possible to show it properly on the printed page, all of these URLs should be typed on one line with no paragraph returns. The syntax for the three protocol types is similar in that each requires you to specify the type argument with the t option to the mount command. Also, for all three protocols, you use %20 instead of a space because URLs cannot contain spaces. (In the previous examples, however, there were no spaces in the URL and so there was no need to use %20). Other URL features, however, are different. For example, the syntax for AFP and SMB requires you to specify the share point on the server by the share name, but NFS syntax requires that you specify the full path to the shared folder. (That is, you must know where the folder resides on the NFS server in order to mount it from the command line.) NFS requires no authentication, but AFP and SMB do. AFP and SMB will prompt for the user name and password if you don't supply them on the command line. For additional options you can pass to the mount command, see the mount man page. When you mount from the command line, icons usually appear automatically. If an icon does not appear once the volume is mounted, type disktool r. Note If you have mounted a volume from the command line, you should unmount it from the command line. If you try to unmount the volume by dragging the icon to the Trash, the Finder might stop responding. If that happens, relaunch the Finder. Listing and Unmounting Mounted VolumesThe mount command, with no arguments, lists all mounted file systems: instructor:~ sregan$ mount /dev/disk0s3 on / (local, journaled) devfs on /dev (local) fdesc on /dev (union) volfs on /.vol automount nsl [135] on /Network (automounted) automount fstab [150] on /automount/Servers (automounted) automount static [150] on /automount/static (automounted) afp_005An80ZHyoM001Eic06SdO01.2c000006 on /Users/sregan/Desktop/MyAFPMount (nodev, nosuid, mounted by sregan) //MAINADMIN@*SMBSERVER/APPROVED_FILES on /Users/sregan/Desktop/MySMBMount (nodev, nosuid, mounted by sregan) mainserver.pretendco.com:Shared_Items/Approved_Files on /Users/sregan/Desktop/MyNFSMount (nodev, nosuid, mounted by sregan)The nodev option means you cannot use special files in /dev on the mounted volume. The nosuid option means the setuid/setgid bits on commands located on the server volume are not honored if you execute them from the client. Note All three protocols are used to mount the same directory, something that would not be practical in real-world use. It is shown here for comparison purposes. The umount command unmounts a volume. (The command for unmounting is umount, not "unmount.") The following lines show unmounting the three volumes from the desktop. instructor:~ sregan$ umount Desktop/MyAFPMount/ instructor:~ sregan$ umount Desktop/MySMBMount/ instructor:~ sregan$ umount Desktop/MyNFSMount/ Some details about using umount:
Mounting a Volume at LoginTo set up an automatic mount as a user, use Connect to Server or the Network browser in the Sidebar to mount the volume. Then select your account in the Accounts pane of System Preferences and click Login Items, as the following figure illustrates. 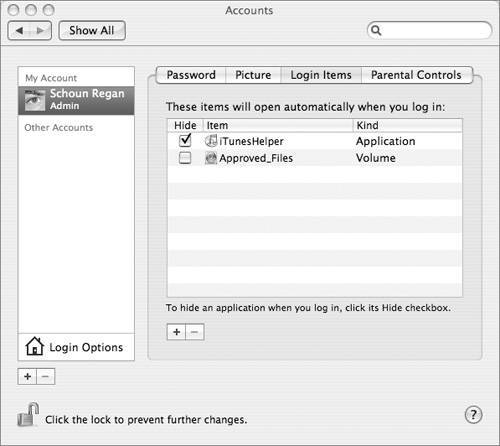 There are two methods for adding the volume to your startup items:
Any user can add a mounted volume to her startup items so that it automatically mounts when she logs in. Now each time you log in to your Mac OS X computer, the login dialog for the mount will appear. If you add your password to Keychain, or if a Kerberos infrastructure has been implemented, the mount will occur automatically. Note that this is specific to a single user, unlike automounting with the automount daemon. If you start up the computer while the server is unavailable, you may experience a delay while automount attempts to mount the volume. To prevent this delay, hold the Shift key when logging in to disable login items. Mounting With the automount DaemonYou can configure your computer to mount volumes automatically on startup by adding a mount record to the NetInfo database. When the automount daemon runs at startup, it reads the mount record and attempts to mount the volume. This type of automount is supported for AFP, SMB, and NFS. The following figure shows what tools are available to manage local automounts and what log file the automount daemon writes to. You can add the mount record from the command line using dscl or nicl, or from the NetInfo Manager utility. You can also download and install the Mac OS X Server tool Workgroup Manager and use it to configure mount records in the local domain. This type of mount cannot be disabled during startup, so avoid using it on mobile computers or for mounting a server that is frequently unavailable. Note To avoid having to include a password in the mount record, use this type of mount only for NFS servers or for AFP servers that allow guest access. Using Mount RecordsA mount record consists of the following properties:
The mount record shown in the following figure causes automount to mount the share called Users onto /Network/Servers/mainserver.pretendco.com. This occurs the first time a user attempts to list or access the volume. The name of the user who initiated the mount will appear in the output from the mount command. The automount daemon then unmounts the volume when the user logs out. 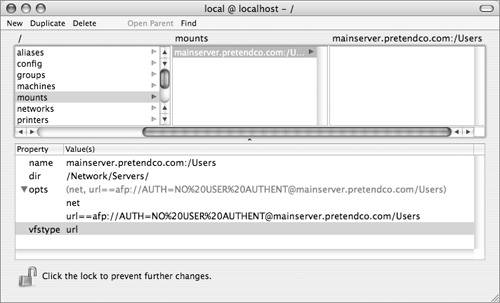 |

EAN: 2147483647
Pages: 258