Setting System Time and Date
| < Day Day Up > |
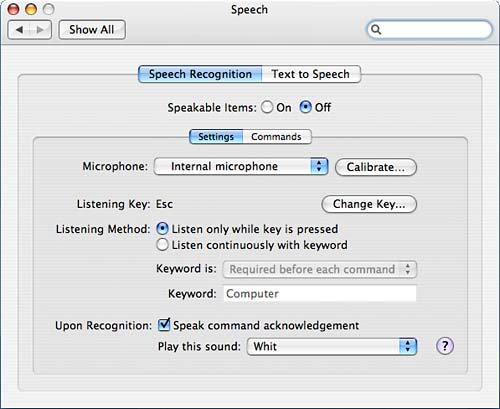
Configuring Voice and Accessibility Options: Speech and Universal AccessBy using the Speech and Universal Access panes, you can configure your system to be more accessible to any needs you have. With the Speech pane, you can configure the voice recognition system, which can be used to assist you in controlling your computer by letting you speak commands to it. The Universal Access pane provides access to a variety of ways to configure your machine to be more usefully accessible to you. Using Voice RecognitionThe voice recognition system is controlled by the Speech preferences pane, which itself has a Speech Recognition section and a Text to Speech section. The Speech Recognition section is further divided into the Settings and Commands subsections. Available to both sections is the capability to turn speakable items on or off. This turns the voice recognition system on or off. In the Settings section, shown in Figure 8.15, you set which microphone the system should use. If the system has trouble recognizing your commands, you might try the Calibrate option. Under this option, you speak a phrase and adjust a slider until the phrase flashes. Repeat this for all the phrases. Additionally, you can set your listening key either to the default key, Escape, or as a key combination out of the set listed in the configuration sheet. You also select your listening method, which can be to listen only when the listening key is pressed or to listen continuously with keyword. You can set the keyword to be optional, a requirement before each command, required 15 seconds after the last command, or required 30 seconds after the last command. Finally, you can select how the system acknowledges your command. It can respond by playing a sound or by speaking a command acknowledgement and playing a sound. Figure 8.15. The Settings subsection of the Speech Recognition section of the Speech pane.
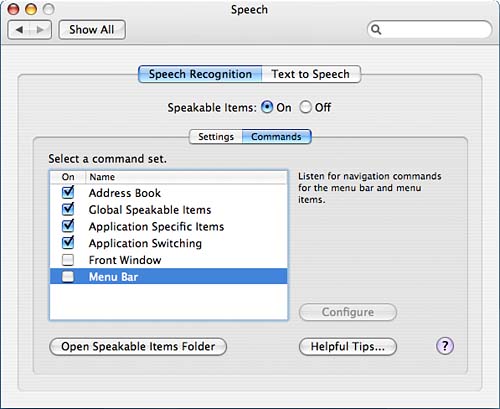
In the Commands section of the Speech Recognition section, shown in Figure 8.16, you can select which commands are available when Speakable Items is by selecting command sets. Available command sets currently are Address Book, Global Speakable Items, Application Specific Items, Application Switching, Front Window, and Menu Bar. Each set may also include a configure option. The Address Book set provides access to names contained in your address book, and the configure option allows you to set which names are speakable. The Global Speakable Items provides access to commands that may be spoken in any application, and the configure option allows you to choose whether exact wording is required for the speakable items. The Application Specific Items set allows you to access commands that may be spoken when an application is in the front, but there is no configure option at this time. The Application Switching set allows you to switch between running applications or to launch a recently run application, and does not have a configure option at this time. The Front Window set allows you to speak front window controls, such as push button names and radio names. This command set does not have a configure option at this time. The Menu Bar set enables you to speak names of any menu or menu item, and also does not have a configure option at this time. Figure 8.16. The Commands subsection of the Speech Recognition section.
In this section you can also open the Speakable Items folder, and see some tips with the Helpful Tips option. The Helpful Tips option displays the set of tips that is displayed when you first turn on speech recognition. The other main section of the Speech pane is the Text to Speech section, shown in Figure 8.17. In this section, you select the voice the speech recognition system should use and set its speaking rate. You can also test voices and rates here. Additionally, you can choose to have announcements made when there are alerts or when an application requires your attention. Under the Alert Options section, you can further customize how you want your announcement. You can choose to have the system speak selected text to you and set a key combination to trigger the action. Finally, you can access the Date & Time pane to have the clock announce the time, and you can access the Universal Access pane to change VoiceOver settings. Figure 8.17. The Text to Speech section of the Speech pane.
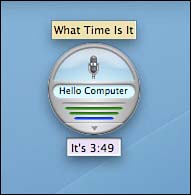
When you turn on voice recognition, the Speech Feedback window appears. It is a small round window. While you're speaking, the microphone image changes and the horizontal lines, which start as gray lines, display the microphone level, and the feedback on what key to press or phrase to speak to cause the computer to listen disappears. The bottom line is a blue color. The next two lines are green and the top line is red. The Helpful Hints recommends that you try to speak in the green levels. The arrow at the bottom of the window has links to the Speech Commands window and the Speech Preferences pane. You can open the Speech Commands window by either saying "Open Speech Commands window" or by clicking on the arrow. The Speech Commands window shows the commands that you may speak to the computer in the bottom portion. This is updated as you change which application you're using. Figure 8.18 shows what to expect when Speech Recognition works for you. The Speech Commands window shows not only which commands you may speak to the computer, but also which commands you have spoken so far. Figure 8.19 shows the Safari windows that were opened using the voice recognition system. Figure 8.18. Speaking to the computer.
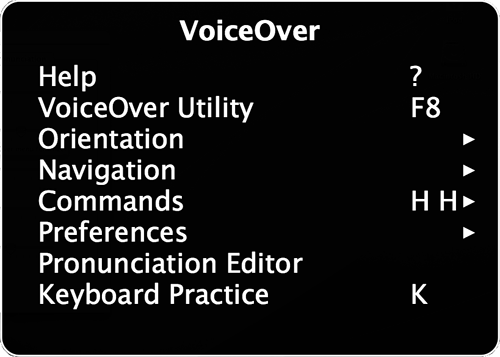
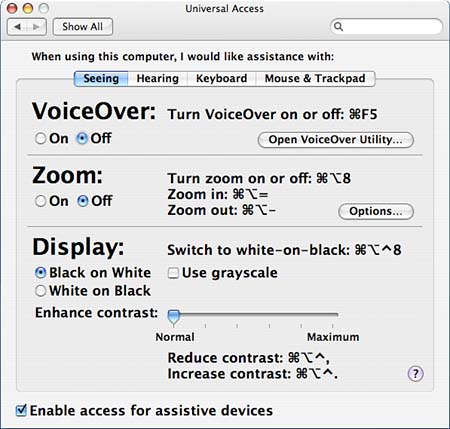
Figure 8.19. Here voice recognition was used to open and control Safari. Note that the Speech Commands window shows which commands have been spoken so far. Universal AccessThe Universal Access pane is where you can customize the computer to assist you with any difficulties that you have in seeing or hearing the computer, as well as set some keyboard and mouse behaviors to assist with any difficulties you experience with those devices. All the subdivisions of the Universal Access pane include the ability to enable access for assistive devices for the Universal Access preferences pane. Using Voiceover Navigation FeaturesNew with Tiger is the VoiceOver system, a screen-reading system. It is especially helpful if you have difficulty reading the screen. Even if you don't have difficulty reading the screen, you might enjoy having the computer read to you. VoiceOver currently works only with English language Apple keyboards. The VoiceOver system is enabled in the Universal Access pane, and from there you can open the VoiceOver utility. There are quite a few preferences that can be set in the VoiceOver utility. All the sections have access to the Reset option. Under the Verbosity section, you can set how verbose the system ought to be. You can set such options as what it should say when you type, if and when it should speak text under you mouse, announce when the mouse enters a window, or when a modifier key or Caps Lock key is pressed. Under the Navigation section, you can control general features about the VoiceOver cursor and its tracking. Under the Voices section, you set the default voice and its rate, pitch, and volume. You can additionally set voices for content, status, type, attributes, and VoiceOver menu. By default, they are set to the default voice. Under the Display section, you can set the size of the VoiceOver cursor and whether to show it, the degree of magnification of the VoiceOver menu, the size of the caption panel and whether to show it, the number of rows that should be in the caption panel, and captional panel transparency. The final preference section is the Pronunciation section, where you can specify how terms can be pronounced. You can add or remove terms. Fortunately, you can edit the terms that are already there, such as fixing the GIF entry. Depending on what settings you pick for VoiceOver, when you enable it, you might find that you now have black boxes around things, and that your computer gives you a running monologue of what you're doing. The black box is the VoiceOver cursor. You can navigate around by using Ctrl+Opt and the arrow keys. As you navigate, VoiceOver will describe what you have just navigated to. In scrollable areas, tables, lists, HTML content areas, you can begin the same sort of interactive with Ctrl+Opt+Shift+Down Arrow, and you can end the interactive mode in those areas with Ctrl+Opt+Shift+Up Arrow. Then navigate interactively with Ctrl+Opt and the arrow keys. To access the VoiceOver menu, shown in Figure 8.20, use Ctrl+Opt+F7. The VoiceOver menu can assist you in figuring out how to use VoiceOver. VoiceOver help, which you can get to using Ctrl+Opt+?, will also be useful. The figure also shows what the caption panel can look like. Figure 8.21 shows using Safari with VoiceOver enabled. The black box is the VoiceOver cursor and the gray section is the caption panel, which is detailing what VoiceOver is saying. Figure 8.20. You can get to the VoiceOver menu with Ctrl+Opt+F7.
Figure 8.21. Using Safari with VoiceOver enabled. SeeingIn the Seeing section of the Universal Access pane, shown in Figure 8.22, you can enable VoiceOver, set options for zooming in and out, or set options for the display. You can set your monitor to display white on black or to display in grayscale. The Option+Command+= combination zooms in, whereas Option+Command+- zooms out. You might find it easier to think of the zoom-in option as Option+Command++, which was the original notation that Apple used for zooming in, but please note that the + in that notation is not literally a +. The combination does not and never did require a shift to literally get the +, but was simply used to depict the key that contains the +, which is a more intuitive symbol for zooming in than the =. After you've zoomed, you can navigate. Figure 8.22. Select settings to help you see your display better under the Seeing section of the Universal Access pane.
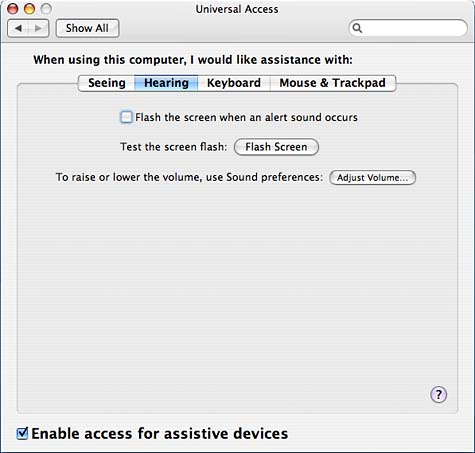
HearingIn the Hearing section, shown in Figure 8.23, you can set the screen to flash whenever a sound occurs. To get an idea of what to expect, you can test the behavior with the Flash Screen button. Finally, you can adjust the volume with the Adjust Sound button, which opens the Input section of the Sound pane for you. Figure 8.23. Set the screen to flash whenever an alert sound occurs in the Hearing section of the Universal Access pane.
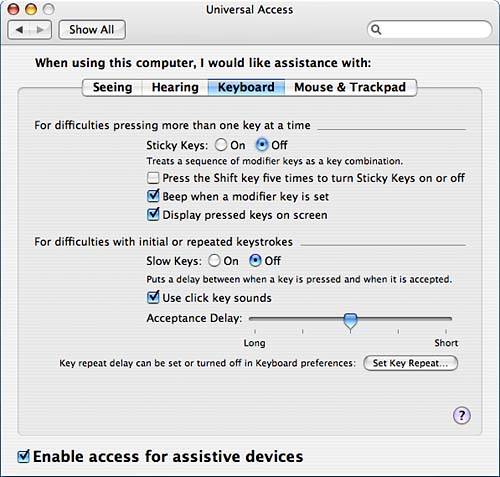
KeyboardIn the Keyboard section, shown in Figure 8.24, you can set the Sticky Keys on or off. If you set the Sticky Keys on, you can also choose to have the machine beep when a modifier key is set and to show pressed keys onscreen. The Sticky Keys option is useful if you have trouble executing multiple key combinations, such as Command+I. The keys are displayed in the same fashion as the keyboard volume controls. Note that you can also set the toggle on and off for the Sticky Keys behavior by pressing the Shift key five times. Figure 8.24. If you have difficulties pressing more than one key at a time or with keystrokes being repeated, make keyboard adjustments to assist you under the Keyboard section of the Universal Access pane.
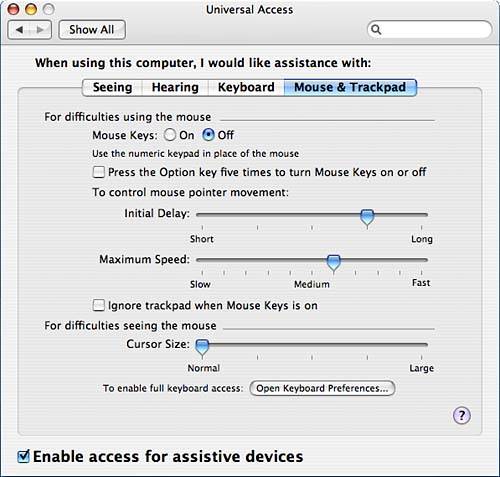
From the Keyboard section, you can also adjust settings for difficulties with keystrokes being repeated. You can turn Slow Keys on or off here. If Slow Keys is on, there's a delay between when the key is pressed and when it's accepted. This delay time is set in the Acceptance Delay slider scale. Additionally, you can choose to enable click key sounds while you're typing or otherwise interacting with the keyboard. It sounds much like you're typing at a typewriter when that option is enabled. Finally, you can adjust repeat timing through the Set Key Repeat button, which brings up the Keyboard section of the Keyboard & Mouse pane. Mouse & TrackpadDepending on what hardware you have, this section might be a Mouse section instead. If you have difficulties using the mouse, you can turn on Mouse Keys in the Mouse section, shown in Figure 8.25. When you turn Mouse Keys on, the numeric keypad is what you use to move the cursor around. The Mouse section also enables you to customize mouse pointer movement by setting a preferred initial delay and maximum speed using slider controls. Note that you can also choose to enable the toggle on and off setting for the Mouse Keys by pressing the Option key five times. If you have a trackpad, you can choose to ignore the trackpad when Mouse Keys is on. If you have difficulty seeing the cursor, you can adjust the cursor size here. In this section, you can also enable full keyboard access by clicking on the Open Keyboard Preferences, which takes you to the Keyboard pane. Figure 8.25. Set the Mouse Keys on in the Mouse or Mouse & Trackpad section of the Universal Access pane if you have difficulties with the mouse.
|

| < Day Day Up > |
EAN: 2147483647
Pages: 251