Chapter 11: Securing Virtual Private Network Access
Virtual private networking allows you to create a protected connection across an untrusted network—most often the Internet—from either a client connecting into a private network, or connecting two separate networks together in a site-to-site configuration. We discuss how to prepare for, configure, and set up virtual private networks (VPNs) in a remote access configuration, and a site-to-site configuration. We then conclude with information about using VPN Quarantine to protect your network from vulnerable machines.
Remote Access Configuration
A remote access configuration allows clients located outside of your protected network to securely connect across the Internet (or other untrusted networks). You can choose to use either the Point-to-Point Tunneling Protocol (PPTP)/Microsoft Point-To-Point Encryption Protocol (MMPE) protocol or the Layer Two Tunneling Protocol (L2TP)/IPSec protocols to connect. For authentication, you can use several protocols, including Password Authentication Protocol (PAP), Shiva Password Authentication Protocol (SPAP), Challenge Handshake Authentication Protocol (CHAP), Microsoft Challenge Handshake Authentication Protocol (MSCHAP), MSCHAPv2, or Extensible Authentication Protocol—Transport Layer Security (EAP-TLS).
| Best Practices | The most secure configuration is L2TP/IPSec with EAP-TLS authentication. |
To set up VPN for a remote access configuration, you must follow these steps:
-
Enable VPN client access.
-
Configure how VPN assigns Internet Protocol (IP) addresses to clients.
-
Configure VPN authentication.
-
Configure the user accounts.
-
Create access rules for VPN clients to access other networks.
-
Configure the client computers.
We discuss each of the steps in more detail later.
Enabling and Configuring VPN Client Access
When you enable VPN client access, Microsoft ISA Server applies the default settings shown in Table 11-1.
| Item | Configuration |
|---|---|
| System Policy | Enable the Allow VPN Client Traffic To ISA Server rule, allowing the enabled tunneling protocols (PPTP and/or L2TP) from the external network to the LocalHost network. |
| VPN Access Network | ISA Server listens only to the external network for VPN clients by default. You can modify this option in the Select Access Networks Properties dialog box. Note that listeners are on a per-network basis rather than a per-IP address basis. |
| VPN Protocols | Only PPTP is enabled by default. You can also select the L2TP/IPSec protocol in the VPN Clients Properties dialog box. |
| Network Rules | The VPN Clients network has a route relationship with the internal network, and a Network Address Translation (NAT) relationship with the external network. |
| Firewall Access Rules | No firewall access rules exist by default, and must be configured to allow access. If you use a Network template to configure access rules, the VPN Clients To Internal Network access rule is created, which allows computers in the VPN clients network to access the internal network with all protocols. |
| Remote Access Policy | ISA Server creates a Routing and Remote Access Service (RRAS) policy called the ISA Server Default Policy, which blocks all VPN connections except those specified in the remote access profile. If you choose to directly modify the RRAS policy, research the implications carefully in TechNet and at ISAServer.org. |
To enable VPN client access, follow these steps:
-
In the ISA Server Management console, select the Virtual Private Networks (VPN) node.
-
Click Enable VPN Client Access in the Tasks pane.
If you see a dialog box stating that you do not have enough IP addresses available to enable VPN, follow the steps described in the later section, "Defining IP Address Assignments."
-
Click Apply to commit the changes. Click OK to finish.
After enabling VPN client access, you can configure or modify VPN client access properties by following these steps:
-
In the ISA Server Management console, select the Virtual Private Networks (VPN) node.
-
Click Configure VPN Client Access in the Tasks pane. The VPN Clients Properties dialog box appears, as shown in Figure 11-1.
-
On the General tab, you can choose to clear the Enable VPN Client Access check box to disable VPN client access. When this check box is selected, you can specify the Maximum Number of VPN Clients Allowed setting.
-
On the Groups tab, click Add to select groups from the local machine, or, if the ISA server is part of a domain, the Active Directory groups that are allowed to access ISA Server using a VPN if the domain is in native mode or at a Windows 2003 functional level.
Note By default, no groups are allowed access to the ISA server.
-
On the Protocols tab, choose to allow either or both PPTP or L2TP/IPSec tunneling options for your VPN connections.
-
On the User Mapping tab (shown in Figure 11-2), if you want to allow Remote Authentication Dial-In User Service (RADIUS) or EAP clients, select the User Mapping check box to enable "mapping," or cross-referencing VPN clients connecting from non-Windows namespaces (RADIUS or EAP) to Windows accounts. To supply a default domain to users who don't specify a domain with their user name, type your domain name in the When Username Does Not Contain A Domain, Use This Domain text box.
Caution Be cautious when enabling this feature. Do not select User Mapping when the ISA server is not a member of the Windows domain. You will receive an "Error 619" message when VPN clients try to connect.
-
Click OK, and then click Apply. Click OK to finish.
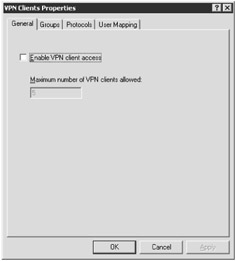
Figure 11-1: The VPN Clients Properties dialog box allows you to configure remote VPN clients.
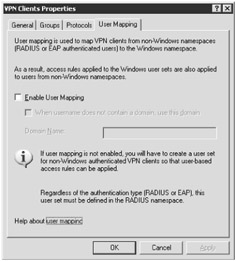
Figure 11-2: The User Mapping option allows RADIUS and EAP clients to process user-and group-based access rules. If ISA Server is not a member of a domain in which the user accounts for domain mapping rest, your VPN clients cannot connect.
Selecting Access Networks
By default, VPN clients can connect from the external network. However, there are times when you might want VPN clients to connect from other networks, such as when you configure a protected network specifically for wireless users to enable access to the Internet and nothing more. You might wish to allow your corporate clients to connect from this network into the internal network through a VPN.
To define the networks from which VPN clients can connect, follow this procedure:
-
In the ISA Server Management console, select the Virtual Private Networks (VPN) node.
-
Click Select Access Networks in the Tasks pane. You will see the Access Networks tab as shown in Figure 11-3.
-
Select the networks from which you wish VPN clients to connect by selecting the check box next to the network name. This applies to all IP addresses bound to that network's network interface.
Note These settings apply both to remote client connections and site-to-site connections.
-
Click OK, and then click Apply. Click OK to finish.
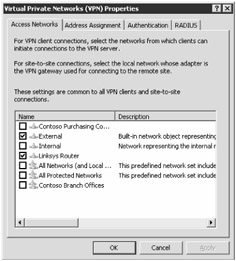
Figure 11-3: Choose the networks that ISA Server will use to establish VPN connections.
Defining IP Address Assignments
ISA Server must assign your VPN clients IP addresses that allow them to participate on protected networks. You can choose to either assign IP addresses from a static pool or assign them dynamically from an existing DHCP server.
To define the IP address assignments for a VPN, follow these steps:
-
In the ISA Server Management console, select the Virtual Private Networks (VPN) node.
-
Click Define Address Assignments in the Tasks pane.
-
On the Address Assignment tab, choose one of two methods for assigning IP addresses, as shown in Figure 11-4.
-
If you select Static Address Pool, click Add, designate the IP address range, and then click OK—the IP addresses can't be in use in another ISA Firewall network definition. If you select Dynamic Host Configuration Protocol, a DHCP server (which must already be available on the network) will provide IP addresses for the VPN clients from the specified interface.
Note Unless a DHCP Relay Agent is installed on the ISA server, the DHCP scope settings are not provided to VPN clients by default. Use the Advanced button described later to configure the Domain Name System (DNS) and Windows Internet Name Service (WINS) server entries for VPN clients.
-
In the Use The Following Network To Obtain DHCP, DNS, And WINS Services drop-down list, select the network that contains your infrastructure servers. The network containing your infrastructure servers is most often the internal network.
-
To specify DNS and WINS server addresses for your remote VPN clients, click Advanced, and specify the DNS and WINS server IP addresses, then click OK.
-
Click OK, and then click Apply. Click OK to finish.
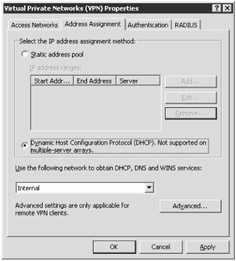
Figure 11-4: When configuring a VPN, select the source for IP addresses and infrastructure services.
Configuring VPN Authentication
ISA Server uses MSCHAPv2 authentication for VPN clients by default. There are several other options available for authentication. Should you wish to enable smart card or certificate support, or enable L2TP pre-shared key connections you will use this interface.
To configure authentication for VPN, follow these steps:
-
In the ISA Server Management console, select the Virtual Private Networks (VPN) node.
-
Click Select Authentication Methods in the Tasks pane.
-
On the Authentication tab, select the authentication methods you wish to support.
Best Practices Avoid using less secure authentication methods, such as MSCHAP, CHAP, SPAP, or PAP, whenever possible.
-
If you don't have a public key infrastructure (PKI) that allows you to use EAP certificates, and wish to use L2TP, select the Allow Custom IPSec Policy For L2TP Connection check box, and type in the Pre-Shared Key.
Important Pre-shared keys are much less secure than using a PKI, and should be considered as a temporary measure while setting up a PKI in most cases.
When using a pre-shared key, you must share the same pre-shared key (thus the clever name) with all L2TP clients when configuring them.
Best Practices Your pre-shared key should be complex, and look like a cat walked across your keyboard—for example, &^ld5*>}>:"uqew()&^&F__ Saex65q7we16
To use certificates, see the following articles:
"Description of the IPSec policy created for L2TP/IPSec" at http://support.microsoft.com/kb/248750;
"HOW TO: Install a Certificate for Use with IP Security" at http://support.microsoft.com/kb/253498.
-
Click OK, and then click Apply. Click OK to finish.
Configuring RADIUS Authentication
When your ISA Server computer is not a member of your domain (operating in stand-alone or workgroup mode), you can use RADIUS authentication to allow ISA Server to pass domain credentials from VPN clients through a RADIUS server to Active Directory directory service in your domain. If you have several ISA servers, you can also use the RADIUS server's remote access policies instead of configuring these policies on each individual ISA server.
| Note | For detailed instructions on how to configure the RADIUS environment—including how to install and configure Internet Authentication Server (IAS), the RADIUS server built into Microsoft Windows 2000 Server and Microsoft Windows Server 2003—see the "ISA Server 2004 VPN Deployment Kit: Configuring Windows Server 2003 RADIUS Support for VPN Clients—Including Support for EAP/TLS Authentication" found in the Guides and Deployment Kits section at http://www.microsoft.com/isaserver/techinfo/guidance/2004/configuration.mspx. |
To specify the RADIUS configuration for an ISA Server VPN, follow these instructions:
-
In the ISA Server Management console, select the Virtual Private Networks (VPN) node.
-
Click Specify RADIUS Configuration in the Tasks pane.
-
As shown in Figure 11-5, on the RADIUS tab, select the Use RADIUS For Authentication check box. You can also select the Use RADIUS For Accounting (Logging) check box to specify that your RADIUS server will be the accounting provider.
Caution When you enable this functionality, the RADIUS dialog box explains that user mapping can be used to map RADIUS clients to the Active Directory namespace. If your ISA Server computer is not a member of your domain, and you enable user mapping your VPN clients will not be able to connect. If your clients experience "619" errors, disable user mapping.
-
Click RADIUS Servers to open the RADIUS Servers dialog box. Click Add to open the Add RADIUS Server dialog box, as shown in Figure 11-6, and then configure the following settings:
-
In the Server Name text box, enter the IP address or host name of the RADIUS server, and a description of that server in the Server Description text box.
-
If required, click Change to enter the shared secret used to secure communications between the ISA server and the RADIUS server.
-
In the Port text box, type the User Datagram Protocol (UDP) port number used for RADIUS authentication. The default is set to 1812.
Note IAS uses Port 1812 for authentication by default. Older RADIUS servers might require port 1645. RADIUS accounting uses the authorization port number plus one (so IAS would use port 1813 for accounting, and older RADIUS servers would use 1646).
-
In the Time-Out (Seconds) text box, type the number of seconds you wish the server to wait for ISA Server to obtain a response from the RADIUS server before trying another server.
-
Select the Always Use Message Authenticator check box only if your RADIUS servers can receive message authenticators and are configured to do so. In IAS, if you have the Request Must Contain The Message Authenticator option selected, you must select this option.
Note If you cannot authenticate, check to ensure that you configured the RADIUS server to accept the ISA server as a RADIUS client.
-
Click OK.
-
-
In the RADIUS Servers dialog box, add additional RADIUS servers if necessary. Then, click OK again to return to the Virtual Private Networks (VPN) Properties dialog box.
-
In the Virtual Private Networks (VPN) Properties dialog box, click OK. When prompted, click OK to confirm that all VPN sessions will be disconnected.
-
Click Apply. Click OK to finish.
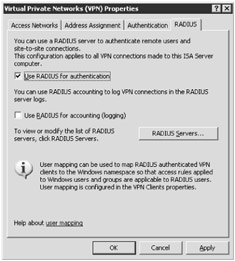
Figure 11-5: You can use RADIUS authentication for your VPN clients, which allows authentication with Active Directory if your ISA Server computer is not a member of your domain.
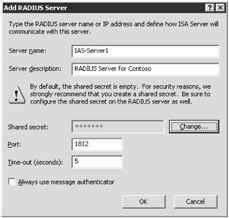
Figure 11-6: Configure the RADIUS Server information used for authentication.
Configuring the User Accounts
For your users to connect as VPN clients, their user accounts in Active Directory must have the appropriate permission set. You'll need access to the user's account in Active Directory to configure the Remote Access Permission setting.
Even though you might not be dialing up to your network using a modem, some books and reference guides use the term dial-in permissions instead of Remote Access Permission to describe enabling Remote Access.
To configure user accounts for VPN access, follow these steps:
-
On your domain controller, from Administrative Tools, open the Active Directory Users And Computers console.
-
Navigate to the user account, right-click it, and select Properties.
-
In the User Name Properties dialog box, click the Dial-In tab, as shown in Figure 11-7. Click Allow Access. If your domain is at a functional level of Windows 2000 or Windows Server 2003, you can control these settings through Remote Access Policy in RRAS.
-
Click OK.
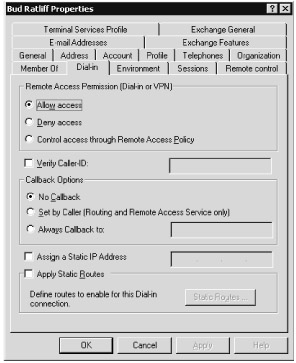
Figure 11-7: Enable the user's account in Active Directory to allow access using VPN.
Creating Access Rules for VPN Clients to Access Other Networks
If you haven't used an ISA Server network template, your VPN clients might be able to connect to the ISA server, but they won't be able to access any resources. To allow access to the internal network or other networks, create a firewall policy access rule to allow the VPN client network access to the internal network, or other networks as your needs require.
To create a basic firewall policy access rule allowing VPN clients to access the internal network with all protocols, follow these steps:
-
In the ISA Server Management console, expand the server name, and select Firewall Policy.
-
In the Tasks pane, click the Tasks tab. Under Firewall Policy Tasks, click Create New Access Rule.
-
On the Welcome To The New Access Rule Wizard page, type a name for the new access rule (such as VPN Client to Internal Network Access Rule), and then click Next.
-
On the Rule Action page, click Allow, and click Next.
-
On the Protocols page, from the This Rule Applies To drop-down list, choose one of the following: All Outbound Traffic, Selected Protocols, or All Outbound Traffic Except Selected.
-
On the Protocols page, click Ports. Confirm that traffic from any allowed source port is accepted, and then click OK. Click Next.
-
On the Access Rule Sources page, click Add. In the Add Network Entities dialog box, expand Networks, click the VPN Clients network, click Add, and then click Close. Click Next to continue.
-
On the Access Rule Destinations page, click Add. In the Add Network Entities dialog box, expand Networks, click the External network, click Add, and then click Close. Click Next to continue.
-
On the User Sets page, the default setting is for the rule to apply requests from the All Users user set. Modify the default to only allow Authenticated Users by following these steps:
-
Click All Users, and then click Remove.
-
Click Add. In the Add Users dialog box, click All Authenticated Users, click Add again, and then click Close. Click Next to continue.
-
-
On the Completing The New Access Rule Wizard page, review the summary of information, and then click Finish.
-
Click Apply to save your changes, and then click OK.
| Note | For more information about configuring access rules, see Chapter 8, "Configuring ISA Firewall Policy." |
Configuring the Client Computers
To configure a Microsoft Windows XP VPN client connection, follow these steps:
-
Open Control Panel and click Network And Internet Connections.
-
Click Network Connections.
-
In the Network Tasks pane, click Create A New Connection.
-
On the Welcome To The Network Connection Wizard page, click Next.
-
On the Network Connection Type page, click Connect To The Network At My Workplace, as shown in Figure 11-8, and then click Next.
-
On the Network Connection page, click Virtual Private Network Connection and then click Next.
-
On the Connection Name page, type a name for the connection and then click Next.
-
If you have Dial-Up Networks configured, you will see the Public Network page. Select whether you want the VPN connectoid to automatically dial a connection.
-
On the VPN Server Selection page, type the fully qualified domain name (FQDN) or external IP address of the ISA VPN server and then click Next.
-
If your computer supports smart cards, the Smart Cards page prompts you to choose whether you wish to use smart cards with the VPN connection. Select Use My Smart Card if you wish to do so, and then click Next.
-
If the Connection Availability page appears, select whether you wish to make the connection available for Anyone's Use or for My Use Only.
-
On the Completing The New Connection Wizard page, click Finish to complete.
Note If you've changed your default Windows XP settings, your screens might appear slightly different than those just described.

Figure 11-8: Use the Network Connection Wizard to create a connection from your client computer to the VPN on your ISA server.
EAN: 2147483647
Pages: 173