Site-To-Site Configuration
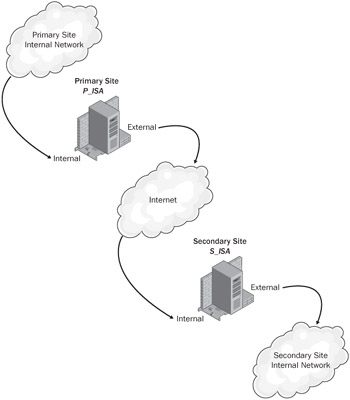
Connecting two ISA Server computers at different sites using encrypted traffic across an untrusted network to create a VPN connection is known as a site-to-site VPN configuration. This section explains how to create connections between two sites, called the primary site and the secondary site, as shown in Figure 11-9. The names of the ISA servers in each location in this example are P_ISA and S_ISA, respectively.

Figure 11-9: Connecting a primary site and a secondary site using ISA Server's site-to-site VPN configuration.
There are two prerequisites for creating a site-to-site VPN configuration:
-
Analyze and select the VPN protocol The type of protocol determines what additional steps you need to take. For example, if you decide to use an L2TP/IPSec VPN protocol, you need to obtain certificates and install those on the ISA server and the clients.
Note To learn specifically how to request a certificate for ISA Server 2004, see http://support.microsoft.com/default.aspx?scid=kb;en-us;M555281.
-
Create the VPN gateway dial-in accounts for authentication Authentication for the site-to-site configuration requires accounts created on each ISA Server computer.
In addition, you need to follow the steps described in this section to create a site-to- site VPN connection for each site:
-
Create the VPN gateway dial-in accounts.
-
Create the primary site VPN gateway.
-
Create a remote (secondary) site network.
-
Create network rules to the remote site.
-
Create two access rules: one allowing traffic from the primary to the secondary sites; the other allowing traffic from the secondary to the primary sites.
-
Configure the secondary site VPN gateway.
-
Test the VPN connection.
Analyzing and Selecting the VPN Protocol
When two networks connect to each other across the Internet or other untrusted network, they must both use a VPN tunneling protocol to establish a secure connection. ISA Server 2004 supports three VPN tunneling protocols, as described in Table 11-2. Choose the VPN protocol that matches your needs.
| Protocol | Usage Scenario | Description | Preference |
|---|---|---|---|
| IPSec Tunnel Mode | Use when connecting to non-Microsoft VPN gateways | You will need to configure either pre-shared keys or certificates. | Only if required |
| PPTP | Use when connecting to ISA Server or RRAS VPN servers | Uses user name and passwords for authentication. | Better |
| L2TP/IPSec | Use when connecting to ISA Server or RRAS VPN servers | Uses certificates or user name and passwords for authentication. For testing purposes, pre-shared keys can also be used. | Best |
| Note | When using L2TP/IPSec, best practices call for using certificates rather than pre-shared keys. |
Creating the VPN Gateway Dial-In Accounts for Authentication
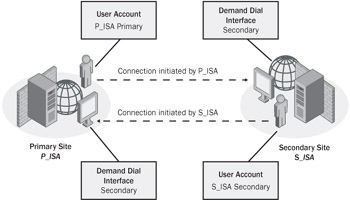
Your primary site and secondary site gateways require both a demand dial interface and an associated user account to talk with one another. You'll see how to create a demand dial interface in the following procedures, but before you do, you'll need to create an account at each site to authenticate the connection. Figure 11-10 shows how to configure the demand dial interfaces and accounts for the primary and secondary sites.

Figure 11-10: When setting up accounts for your VPN gateway, use the name of the remote VPN server's demand dial interface.
Notice that the name of the local account on each ISA server matches the name of the demand dial interface to which it is connecting.
| Important | You must use the same name for both! Giving your user account the same name as the demand dial interface tells RRAS to recognize the connection as a VPN router connection instead of a remote-access VPN connection. |
Creating the Primary Site VPN Gateway
Create the primary user account and configure the primary machine with this account. (In our example, we are calling this the P_ISA\Primary account.)
| Note | We assume that you know how to create a local user account, and don't provide those procedures here—if you want a refresher, see the Windows Server Help file. |
Do be sure to open the user account's properties, and set these options.
-
On the Account tab, select the User Cannot Change Password check box.
-
On the Dial-In tab, in the Remote Access Permission (Dial-In Or VPN) area, select Allow Access. You will be unable to connect if the VPN gateway account does not have dial-in permissions.
| Best Practices | Use a very complex password for these accounts, such as %A5*j w2l(--d4q>v7+b#^x] `eI7z/>.uoY$,K62=< |
To complete the creation of the gateway, you create a remote site network, a network rule, and access rules that allow traffic between the two sites on the network.
Creating a Remote Site Network
To connect to another (secondary) VPN server across the Internet, you must define that remote network in ISA Server. The remote-site network is defined by a range of IP addresses specific to that site.
| Important | You must enable VPN client access in order for your site-to- site access to work. See the procedure for enabling VPN client access earlier in this chapter. |
To configure a remote-site network, complete the following steps:
-
In the ISA Server Management console, select the Virtual Private Networks (VPN) node.
-
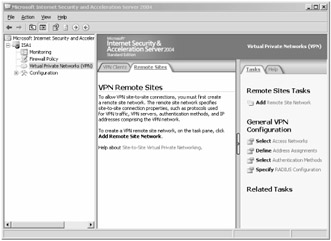
In the details pane, click the Remote Sites tab, as shown in Figure 11-11.
-
On the Tasks tab, click Add Remote Site Network.
Best Practices You can also create a remote site network from the Networks node, but following this procedure reduces the number of steps and potential errors.
-
On the Welcome To The New Network Wizard page, type the name of the remote site network, and click Next.
-
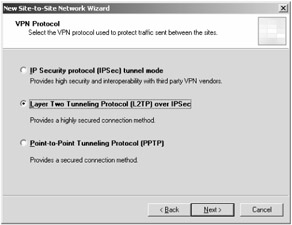
On the VPN Protocol page, select one of the VPN protocols shown in Figure 11-12, and click Next.
Tip In ISA Server 2004 Enterprise Edition, you first need to select the ISA Server array member that is the Connection Owner for the VPN site-to-site connection. If you are using Network Load Balancing (NLB), the connection owner is automatically assigned.
-
If you choose the IP Security Protocol (IPSec) Tunnel Mode option, follow these steps:
-
On the Connection Settings page, define the IP addresses for the remote and local VPN gateway addresses, and then click Next.
-
On the IPSec Authentication page, choose to use a certificate or a preshared key to establish authentication, and then click Next.
Tip If ISA Server is installed on a computer running Windows 2000, download and install the IPSecPol tool from http://www.microsoft.com/windows2000/techinfo/reskit/tools/existing/ipsecpol-o.asp.
Caution IPSec Tunnel Mode is vulnerable to several attacks. Use L2TP/IPSec with machine certificate authentication whenever possible.
-
-
If you choose the Layer Two Tunneling Protocol (L2TP) Over IPSec option, complete the following steps:
-
On the Remote Site Gateway page, type the host name or IP address of the remote site VPN server, and then click Next.
Note If you select the Layer Two Tunneling Protocol (L2TP) Over IPSec option in ISA Server 2004, Enterprise Edition, the dialog box shown in Figure 11-13 opens and prompts you to configure a user account. Click Help for more information.
-
On the Remote Authentication page, you can select the Local Site Can Initiate Connections Using These Credentials check box, and then type the User Name, Domain, and Password for the account. Choose this option only if you want the ISA server on which you are working to establish the connection. Click Next.
Important You must use an account that has the same name as the VPN site-to-site connection on the remote server. See the section entitled "Configuring the VPN Gateway Dial-In Accounts for Authentication," earlier in this chapter.
Note If you are running ISA Server 2004, Standard Edition, you will see a Local Authentication page that contains the same information shown in Figure 11-13. Configure a user account and click Next.
-
On the L2TP/IPSec Authentication page, you can define the Pre-Shared Key used by ISA Server.
Note You cannot use both a certificate and a pre-shared key—ISA Server supports using one or the other.
-
-
If you select Point-To-Point Tunneling Protocol (PPTP), follow these steps:
-
On the Remote Site Gateway page, type the host name or IP address of the remote site VPN server, and then click Next.
Note In Enterprise Edition, you are prompted with a dialog box as shown in Figure 11-13, which prompts you to configure a user account. Click Help for more information.
-
On the Remote Authentication page, you can select the Local Site Can Initiate Connections Using These Credentials check box, and then type the User Name, Domain, and Password for the account. Select this option only if you want the ISA server on which you are working to establish the connection. Click Next.
Important You must use an account that has the same name as the VPN site-to-site connection on the remote server. See the section entitled "Creating the VPN Gateway Dial-In Accounts for Authentication," earlier in this chapter.
Note If you are running ISA Server 2004, Standard Edition, you see a Local Authentication page that contains the same information shown in Figure 11-13. Configure a user account and click Next.
-
-
On the Network Addresses page, click Add to define the range of IP addresses for the remote site network. Click Next.
Enterprise Edition allows you to define this network by choosing from Enterprise Networks.
-
On the Completing The New Network Wizard page, review your settings, and then click Finish.
-
When prompted, click OK to confirm that active VPN sessions will be disconnected.
-
Click Apply to commit the changes. Click OK to finish.

Figure 11-11: The Remote Sites tab allows you to configure site-to-site VPN connections. Use the Tasks pane to perform actions.

Figure 11-12: Depending on the VPN protocol you select, you will see different pages, as described next.

Figure 11-13: Depending on whether you're using the Enterprise Edition or Standard Edition of ISA Server, you will see this information in either a pop-up dialog box or as a page.
Creating Network Rules to the Remote Site
When you create a site-to-site network, ISA Server creates two system policy rules:
-
Allow VPN Site-To-Site Traffic To ISA Server ISA Server's Local Host network allows all external networks to connect using the specified VPN tunneling protocols.
-
Allow VPN Site-To-Site Traffic From ISA Server ISA Server's Local Host network allows all VPN tunneling protocols to the external network as well as to the IPSec Remote Gateways computer set, which contains the address of the remote tunnel endpoint.
When the new network is created, review and define the network rules between the remote site network and the internal network. If you require two-way communication, you should designate a route relationship rather than NAT.
When using a route relationship, if you are using private addresses on both local area networks (LANs), ensure that the two networks do not have duplicate IP address ranges.
| Note | If they share IP address ranges, change the scope in one network so that there are no duplicate IP address ranges. If you define a NAT relationship between networks, communication attempts will fail. It is possible to define a route relationship on one of the networks and a NAT relationship on the other, which will allow communication. What's your best bet? Use a route relationship without duplicate IP address ranges. |
To configure the relationships between networks, complete the following steps:
-
In the ISA Server Management console, expand the server name, expand Configuration, and then click Networks.
-
In the details pane, click the Network Rules tab.
-
Right-click the VPN Clients To Internal Network (or other) network rule, and then select Properties.
-
In the VPN Clients To Internal Network Properties dialog box, click the Network Relationship tab, and then select Network Address Translation (NAT) or Route.
-
Click OK, and then click Apply. Click OK to finish.
Note For more information about network rules, see the section entitled "Creating a Network Rule" in Chapter 9, "Configuring Multinetworking."
Creating Access Rules
By default, there is no access between the remote site network and the internal network. Create two access rules between the two networks, allowing only the protocols, computer sets, and so on, that are required for your environment.
-
One access rule allows traffic from the internal network to the secondary remote site; in this example, it is the Primary To Secondary Access Rule.
-
The other access rule allows traffic from the secondary remote site network to the internal network; in this example, it is the Secondary To Primary Access Rule.
Figure 11-14 shows the access rules that were created on the P_ISA computer in this example. All outbound traffic is allowed for all users in both cases—your access rules should be more specific based on your traffic requirements analysis and usage scenarios.

Figure 11-14: These rules allow all outbound traffic for all users—your access rules should be more specific based on your traffic requirements analysis and usage scenarios.
| Note | For more information about configuring access rules, see Chapter 8. |
Configuring the Secondary Site VPN Gateway
To configure the secondary site VPN gateway, you follow the same procedures as described earlier in "Creating the Primary Site VPN Gateway," and summarized in this section.
Confirming Connectivity
If your ISA server cannot contact a domain controller, or if it cannot connect to a domain controller with rights to add the ISA server to the Remote Access Servers group, perform any or all of the following actions:
-
Create a local account with the same name as the remote site demand dial interface (in this example, the account is called S_ISA\Secondary).
-
Create a remote site network with the same name as the remote site's demand dial interface (in this example, this is called Primary).
-
Create a network rule that defines the connection between the secondary site and the primary site. The Network Traffic Source is the internal network, and the Network Traffic Destination is the primary network. Unless you want to use NAT to prevent two-way communication or overcome duplicate IP addresses, select the Route relationship between networks.
-
Create two access rules:
-
Allow traffic from the internal network to the primary site.
-
Allow traffic from the primary site to the internal network.
-
-
Enable VPN client access on the VPN Clients tab on the Virtual Private Network node.
Testing the Site-To-Site VPN Connection
To establish a connection between the two sites, try the following tests:
-
First, test the VPN Gateway communication by pinging the remote site IP address from one ISA server.
-
Second, connect from a client on one network to a known server on the remote network. Try the same test from a client in the remote network to a known server on the local network.
Use the monitoring interface to help troubleshoot any connectivity problems.
EAN: 2147483647
Pages: 173