| Red Hat ClusterSuite is an optional product that you can purchase for your Red Hat Advanced Server (RHAS) 3. ClusterSuite provides an application failover infrastructure with up to eight nodes. 8.2.1 Red Hat ClusterSuite Red Hat Advanced Server 3.0 offers a high availability clustering solution using its own ClusterSuite package. ClusterSuite is a set of RPM packages that are easy to set up and easy to use for managing HA clusters. We tested ClusterSuite software by setting up an highly available Apache server running in a simple cluster environment. Our goal was mainly to test the basic clustering environment with one simple application, one service IP, and one shared file system with defined http DocumentRoot. Red Hat ClusterSuite offers features that are not available on SuSE Linux, such as disk-based heartbeat and an easy-to-use graphical interface. Installing ClusterSuite The ClusterSuite package consists of the following RPM packages: If you have ClusterSuite on a CD-ROM and are using a graphical desktop, the CD is launched automatically when inserted, using the Package Management Tool. Install the software using either the Package Management Tool or the command line. Setting up a shared disk environment Before you start the cluster configuration, the shared disk environment must be set up and tested to ensure that the shared disk can be seen from both nodes of the cluster, and that the shared file system can be mounted from both nodes. ClusterSuite uses two raw partitions around 10 MB in size to run heartbeats and store cluster state information. Our test environment, and the steps needed to create and prepare the shared disk, are described here. We used two logical partitions, lpar6 and lpar8, in two different pSeries servers running Red Hat Enterprise Advanced Server 3.0. Two lpars were connected over a 10/100 ethernet network and connected to an external scsi disk array with two 36 GB disks. We configured everything on lpar6 and replicated it to lpar8. -
We changed the SCSI ID of the disk by editing the file /etc/modules.conf with the syntax in Example 8-22 on page 395. Example 8-22. Modules.conf [leecy@lpar6 etc]# cat modules.conf alias eth0 e100 alias scsi_hostadapter sym53c8xx options sym53c8xx sym53c8xx=hostid:5 ## <-- Replace 5 with your SCSI ID Next, we recreated an initrd and appended it into /etc/yaboot.conf. Example 8-23 shows the commands mkinitrd and yaboot.conf . Then we ran the command ybin . Example 8-23. Recreating a new initrd for yaboot to use [root@lpar6 etc]# mkinitrd /boot/initrd-13112003 2.4.21-4.EL [root@lpar6 etc]# cat /etc/yaboot.conf # yaboot.conf generated by anaconda boot=/dev/sda1 init-message=Welcome to Red Hat Enterprise Linux AS\! Hit <TAB> for boot options partition=2 timeout=30 install=/usr/lib/yaboot/yaboot delay=10 nonvram image=/vmlinux-2.4.21-4.EL label=linux read-only initrd=/initrd-13112003 append="console=hvc0 root=LABEL=/" [root@lpar6 etc]# -
We created two primary raw partitions of 20 MB each, using fdisk on the shared disk device /dev/sdb. -
We created one extended shared partition of 2 GB, using fdisk on the shared disk device. The fdisk -l /dev/sdb output is shown in Figure 8-14 on page 396. Figure 8-14. fdisk -l /dev/sdb  -
We created an ext2 shared file system on the extended partition: #mke2fs -j -b 4096 /dev/sdb3 # mount /dev/sdb3 /itso_share -
We modified the /etc/sysconfig/rawdevices file with the new device information. Example 8-24 shows the contents. Example 8-24. /etc/sysconfig/rawdevices /dev/raw/raw1 /dev/sdb1 /dev/raw/raw2 /dev/sdb2 -
We copied the file to lpar8: #scp /etc/sysconfig/rawdevices root@lpar8:/etc/sysconfig -
We started the rawdevices on both lpars: #service rawdevices restart -
We queried the devices by using the raw -aq command. Example 8-25 shows the output. Example 8-25. raw -aq /dev/raw/raw1 bound to major8, minor 17 /dev/raw/raw2 bound to major8, minor 18 -
We unmounted the mounted shared file system on lpar6, and mounted it on lpar8 to test whether it was accessible. There is no need to add this to /etc/fstab, as this is controlled by the cluster manager. Note It is mandatory to complete shared disk configuration before you configure the cluster, because cluster configuration requires the raw device definitions.
For detailed information on connecting shared disk systems, single and multi-channel SCSI intiators, and planning and configuring shared disks, refer to the guide Red Hat Cluster Suite: Configuring and Manging a Cluster . Configuring the cluster A Red Hat cluster is configured using the redhat-config-cluster command, which starts a graphical interface. Our simple, two-node test cluster is shown in tFigure 8-15. Figure 8-15. Simple test cluster  You can set up this test cluster as follows : -
Update /etc/ hosts or the DNS server with hostnames of cluster member nodes and any other servers that communicate with cluster members . -
Start the graphical interface with redhat-cluster-config. Figure 8-16 shows the graphical screen opened. Figure 8-16. redhat-config-cluster screen 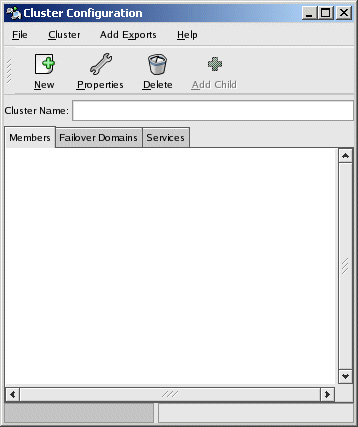 -
Enter a clustername, such as: cluster-itso. -
Click New while highlighting the "Members" tab on the window to add a new member. Figure 8-17 shows the member definition window. Type in: lpar6 and repeat the same to add lpar8. Figure 8-17. Add member window 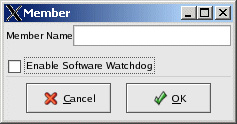 -
Switch to the Failover domains tab and click New to add a new failover domain. Select Domain name as "http-domain". Click Add Members and select members lpar6 and lpar8. Select check boxes to restrict failover to only these members and ordered failover. This controls failover with lpar6 as the primary node in this domain and lpar8 is failover node. If lpar6 fails, service is failed over to lpar8. When lpar6 comes back up, service is moved back to lpar6. Figure 8-18 shows the window to add a new failover domain. Figure 8-18. Add failover domain window 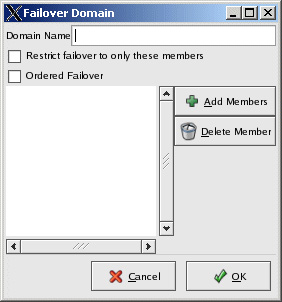 -
Switch to theServices tab and click New to define a new service named http. Define the service name as "http", select the Failover Domain as "http-domain", select the Check interval as 10 Seconds, and the User script as "/etc/rc.d/init.d/http". This adds "http" service as a shared service. Figure 8-19 on page 400 shows the window to add a new Service. Figure 8-19. Add http service 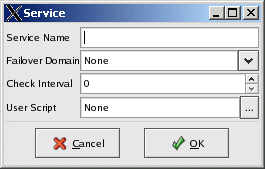 -
Confirm the default shared state devices by clicking the Cluster-Shared State Menu. Accept the default raw devices identified, or change them as necessary. /etc/sysconfig/rawdevices must be updated prior to this step and rawdevices services must be started. Figure 8-20 shows the window to confirm the raw devices. Figure 8-20. Shared State raw devices 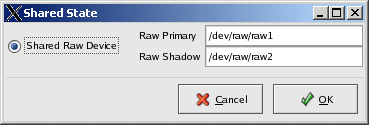 -
In the case of a two-node cluster, an IP such as a router or gateway IP on the same subnet is required to confirm network availability during a problem; this is known as a tiebreaker IP. To define a tiebreaker IP, open the cluster daemons window by using the Cluster-Cluster Daemon Properties Menu; see Figure 8-21 on page 401. We used IP 192.168.100.110 for our tiebreaker IP. Figure 8-21. Tiebreaker IP window 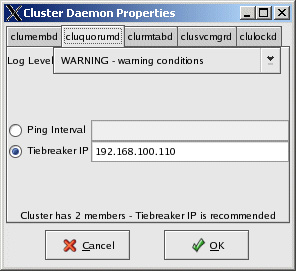 -
Add a service IP to the defined "http" service in the failover domain "http-domain" by highlighting the http service on the main screen and selecting Add Child . Define the Service IP and netmask in the window displayed. This IP is failed over with http service incase of a problem. Figure 8-22 shows the window. Figure 8-22. Adding Service IP 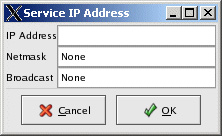 -
Add the shared file system to http service by highlighting http service and selecting Add Child-Add device . Define /dev/sdb3 as a special device file, and /itso_sharing as Mount point ext2 as FS type. Check Force Unmount ; this forcefully releases the file system before failing over, instead of waiting for the release; see Figure 8-23 on page 402. Figure 8-23. Add shared device window 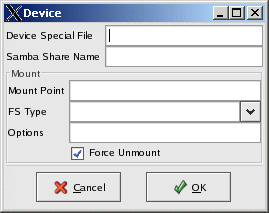 -
Select File-Save to save the config. The config is written to /etc/cluster.xml file. Copy the config file to lpar8: # scp /etc/cluster.xml root@lpar8:/etc -
Enable cluster logging by modifying the /etc/syslog.conf file: local4.* /var/log/cluster.log Refresh the syslog daemon: #service syslog restart -
Close the cluster config window and then reopen it again by typing: redhat-cluster-config . This time the cluster window displays the cluster status screen instead of configuration; see Figure 8-24 on page 403. Figure 8-24. Cluster status window before starting cluster services 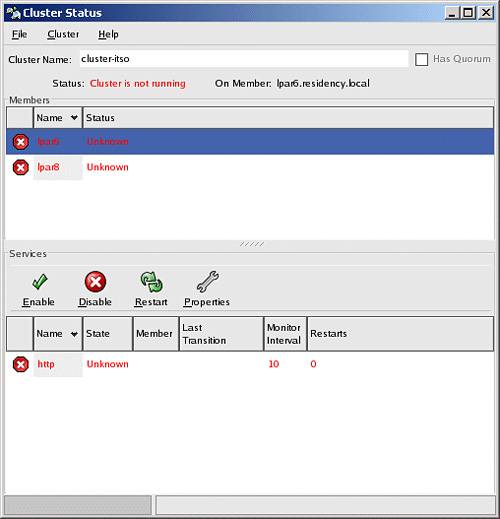 -
To modify any cluster configuration settings, select the Cluster-Configure menu. This completes the simple cluster configuration. We noticed that the cluster configuration became automatically synchronized from lpar6 to lpar8 after creating the resources on one side. Testing the cluster You can test the configured cluster for simple failovers, as follows: -
Start the cluster by selecting Cluster-Start Local Cluster Daemons first on lpar6, and then on lpar8, by using the cluster status graphical window. Once the cluster is active, it starts the cluster daemons, starts the http service, mounts the shared file system and aliases the service IP on lpar6. Figure 8-25 shows the status window when the cluster is active. Figure 8-25. Active Cluster status 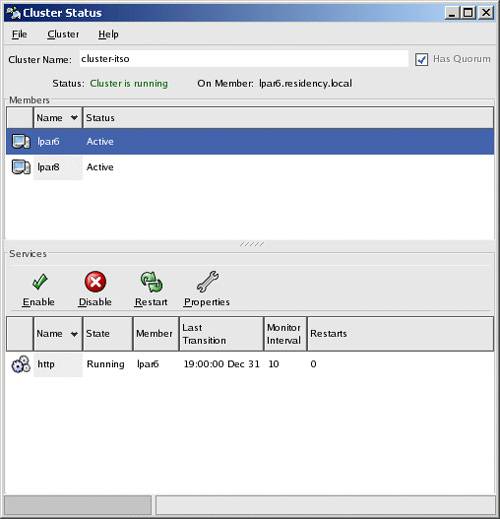 If you prefer to use the command line, you can run the command clustat . This will show a quick status of your cluster; see Example 8-26. Example 8-26. Using the command line to get cluster status [root@lpar8 root]# clustat Cluster Status - cluster-itso 13:50:57 Quorum: Yes, view 3 Shared State: Shared Raw Device Driver v1.0 [Min. Size=1176064] Member Status ------------------ ---------- lpar6 Active lpar8 Active <-- You are here Service Status Owner (Last) Last Transition Chk Restarts -------------- -------- ---------------- --------------- --- -------- http started lpar6 19:00:00 Dec 31 60 0 [root@lpar8 root]# -
Test the node failover by stopping lpar6 either by init 6, or resetting it using the Hardware Management Console (HMC). All services fail over to the active node, which is lpar8. Figure 8-26 shows the services active on lpar8 when lpar6 is shut down. Figure 8-26. Failover cluster status 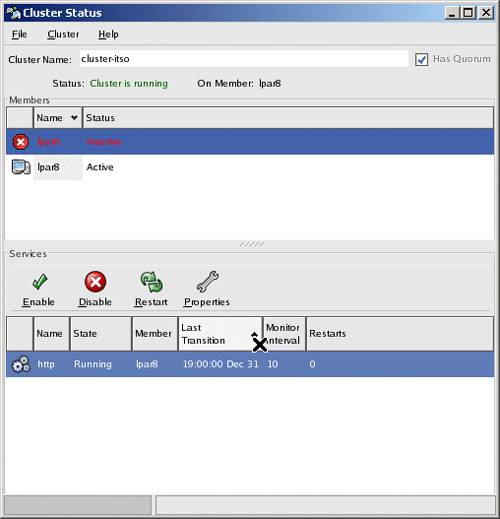 -
Power on lpar6 and start cluster services. When the lpar6 cluster manager is up, lpar8 releases the shared services and lpar6 takes over the resources. As mentioned, ClusterSuite can help you to set up and bring up a highly available cluster quickly. Virtual load balancing clusters can also be set up with Red Hat ClusterSuite software. This is called Linux Virtual Servers (LVS) and is used primarily to load balance requests coming from the Internet to a pool of back-end real servers used extensively in high traffic e-business environments. For more detailed information on ClusterSuite, supporting hardware/software, detailed install/configuration instructions and setting up sample HA applications, refer to Red Hat Cluster Suite: Configuring and Managing a cluster from Red Hat. |