8.1 High availability with heartbeat and DB2
| < Day Day Up > |
| In most environments, customers and users are very concerned about system uptime, especially regarding running their daily applications. In this case study, we discuss the high availability solution that is bundled along with SuSE Linux Enterprise Server (SLES) 8 and the IBM Data Management Solution, DB2 . While this setup is focused on how to implement database failover, it is applicable to, and similar for, other services. 8.1.1 Hardware and software componentsIn this case study, we have two logical partitions (LPARs), each with two processors (POWER4+ at 1.45 Ghz), 4 GB of memory, and one 36.4 Gb internal disk drive. In addition, the following adapters/peripherals are assigned to the system:
The system is installed with SLES8 SP1, kernel 2.4.21-83 using the 64-bit kernel. The software stack that we used in the setup are:
Heartbeat is an open source clustering solution written by Alan Robertson, which provides basic clustering solutions. Heartbeat monitors the cluster resource either using network or serial adapters. It is also bundled with scripts to create cluster IP addresses and manage Linux Virtual Service (LVS) and other applications. In this case study, we set up a cluster with a DB2 database in the external disk and cluster IP address for remote connection. Figure 8-1 shows the cluster that we will be setting up. Figure 8-1. DB2 cluster 8.1.2 Preparing the nodes for cluster readyAs with most high availability clusters, we have here external storage for disk takeover, network adapters, a dedicated LAN for heartbeats, and so on. In our setup, we call the servers that we are attaching to the disk lpar1 and lpar3; lpar1 is the primary server, and lpar3 is the failover server. Network setupFirst we assign IP addresses to the systems. We assign eth0 to be on the public LAN, and eth1 becomes the heartbeat LAN. In this setup, we are limited by the available adapters. We recommend that you have serial connection between the two servers, as well. This ensures that you will have a non-IP -based heartbeat.
Disk setupData disk is the most critical component in almost any clustering solution. Data disk ensures that the application reads the latest data from storage. In our cluster, we are using the IBM SCSI-based external disk storage solution, also known as the 2104-DU3 with the IBM Ultra3 SCSI adapters. The 2104-DU3 storage has capability as a single bus or a twin-bus configuration. In cluster setups, we require the storage to be a single bus. Figure 8-2 explains the single bus, dual-host configuration. Figure 8-2. Diagram of a single bus with dual host configuration For information on how to change the storage to a single bus, refer to the 2104-DU3 Installation Guide , GA33-3311. After setting up the storage for single bus, we need to change the SCSI ID of the adapters in the servers. The SCSI adapters defaults itself to SCSI ID 7, and that creates a conflict if both servers are booted at the same time. Therefore, we change the lpar1 SCSI ID to 5 and lpar3 SCSI ID to 6. The SCSI driver for the IBM FC-6203 SCSI adapter is "sym53c8xx". This driver is compiled natively into the SLES8 Linux kernel. We try out the new SCSI ID by entering the following string into the yaboot prompt: yaboot : linux root=/dev/sd2 sym53c8xx=hostid:5 After the system is booted up, we change the SCSI of the server permanently by appending the above parameters into the kernel image so that it always is called prior to loading the kernel. Obtain the mkzimage_command from the /ppc/netboot/ directory inside your SLES 8 CD: # cp /boot/vmlinuz . # mkzimage_command -c ./vmlinuz # mkzimage_command -a 1 -s "root=/dev/sd2 sym53c8xx=hostid:5" ./vmlinuz # cp vmlinuz/boot/vmlinuz.051103 Next , update the /etc/lilo.conf file with the new image, as shown in Example 8-1. Example 8-1. Updating LILO configuration file with new kernel# Generated by YaST2 default=test timeout=100 boot=/dev/sda1 activate image = /boot/vmlinuz label = linux root = /dev/sda2 append = "" image = /boot/vmlinuz.051103 label = test root = /dev/sda2 append = "" Then we ran the lilo command to load the kernel and reboot the system, and did the same for lpar3 with SCSI ID6. With both lpar1 and lpar3 capable of seeing the storage, we now create the disk partitions for storing our data. To create the new partition, we used the command fdisk . In Example 8-2, we create a 10 Gb disk partition in the external storage. Once the partition is created, it is instantly visible to lpar3 as well. We run the command fdisk -l to check. Example 8-2. Creating a new 10 Gb partition in the newly added diskleecy@lpar1:~ # fdisk /dev/sdc The number of cylinders for this disk is set to 34715. There is nothing wrong with that, but this is larger than 1024, and could in certain setups cause problems with: 1) software that runs at boot time (e.g., old versions of LILO) 2) booting and partitioning software from other OSs (e.g., DOS FDISK, OS/2 FDISK) Command (m for help): p Disk /dev/sdc: 64 heads, 32 sectors, 34715 cylinders Units = cylinders of 2048 * 512 bytes Device Boot Start End Blocks Id System Command (m for help): n Command action e extended p primary partition (1-4) p Partition number (1-4): 1 First cylinder (1-34715, default 1): Using default value 1 Last cylinder or +size or +sizeM or +sizeK (1-34715, default 34715): +10GB Command (m for help): w The partition table has been altered! Calling ioctl() to re-read partition table. Syncing disks. Now that we have the disk up and running, we create the file system and directories for our application: # mkdir /data/IBM/db2inst1 # mkfs.reiserfs /dev/sdc1 # mount /dev/sdc1 /data/IBM/db2inst1 Note We are using IBM DB2 as our application. Once we mount the file system, we can proceed to install our application. 8.1.3 Application installationPrior to installing IBM DB2, we run through the hardware and software requirements:
At the following site, you can check the tested kernel against the DB2 release that you are going to instal: http://www.ibm.com/db2/linux/validate Once we have all the correct software and hardware requirements, we proceed to the installation of DB2. DB2 installationAfter mounting the CD into the CD-ROM drive, we run the command db2setup in the root of the CD-ROM directory. A screen appears, as shown in Figure 8-3 on page 368. Figure 8-3. DB2 setup We select Install Products . This presents us with choices of installation and the type of installation we want to install for the server. Figure 8-4 on page 369 shows the types of installation choices available. Figure 8-4. Install types We select DB2 UDB Enterprise Server Edition and click Next. In the next screen, we are asked to accept the IBM DB2 user license agreement, then we click Next. Then we are prompted to select the type of DB2 UDB ESE we want to install (Typical, Compact, Custom), as shown in Figure 8-5 on page 370. We select Typical and proceed. Figure 8-5. DB2 installation type selection screen Next, when prompted, we create the necessary DB2 IDs. At this stage, we are still using the internal disk to store DB2. We will move the database to the external storage once we have both nodes installed. Once we have done the selecting, installation will start. After it finishes, we check the post-installation report to make sure all components are installed. Figure 8-6 on page 371 shows the sample post-installation report. Figure 8-6. DB2 post-installation Now that DB2 is installed, we need to create a database to use. We plan to use the DB2 sample bundled with DB2. To load the sample database, we run the db2sampl command as db2inst1 user. Next, we disable DB2 from starting automatically when the system is booted up. We comment out the DB2 entry inside the /etc/inittab file. We want the clustering solution to automatically bring up DB2 for us, instead. Now that DB2 is properly set up, we test the sample database that we loaded. We connect to the database locally and do a simple query. Example 8-3 shows a successful connection to the sample database. Example 8-3. Testing the connection to the DB2 sample databaselpar1:/home # su - db2inst1 db2inst1@lpar1:~> db2 connect to sample Database Connection Information Database server = DB2/LINUXPPC 8.1.2 SQL authorization ID = DB2INST1 Local database alias = SAMPLE Next, we do a simple query to make sure that we can query the database. Example 8-4 shows a simple query of the local database. Example 8-4. Querying the DB2 sample databasedb2inst1@lpar1:~> db2 "select * from ORG" DEPTNUMB DEPTNAME MANAGER DIVISION LOCATION -------- -------------- ------- ---------- ------------- 10 Head Office 160 Corporate New York 15 New England 50 Eastern Boston 20 Mid Atlantic 10 Eastern Washington 38 South Atlantic 30 Eastern Atlanta 42 Great Lakes 100 Midwest Chicago 51 Plains 140 Midwest Dallas 66 Pacific 270 Western San Francisco 84 Mountain 290 Western Denver 8 record(s) selected. We now do a similar installation in lpar3. (Select the same directory as in lpar1 to store the user directories, because this will ensure that DB2 sets up the profile and directories properly.) After the installation of DB2 in both nodes, we move the database that we created in lpar1 to the external disk. We mount the disk from external storage, copy the entire DB2 instance folder into the external disk, and create a soft link. When the DB2 instance (db2inst1) is loaded, it is using the external disk: # mount /dev/sdc1 /IBM/opt/db2inst1 # cp /home/db2inst1 /IBM/opt/db2inst1 # ln -s /IBM/opt/db2inst1/db2inst1 /home/db2inst1 # chown db2inst1.db2grp1 /home/db2inst1 # umount /IBM/opt/db2inst1 With lpar1 working, we now create a similar soft link in lpar3: # mv /home/db2inst1 /home/db2inst1.orig # mkdir /IBM/data/db2inst1 # mount /dev/sdc1 /IBM/data/db2inst1 # ln -s /IBM/data/db2inst1 /home/db2inst1 # chown db2inst1.db2grp1 /home/db2inst1 8.1.4 Heartbeat clustering software installationWith DB2 installed, we now install and configure the heartbeat clustering solution to manage our storage, application, and IP address. We install the following packages into our two systems (lpar1 and lpar3). The packages are available in the SLES 8 CD: # rpm -ivh heartbeat-ldirectord-1.0.4-0.rpm # rpm -ivh heartbeat-1.0.4-0.rpm # rpm -ivh heartbeat-stonith-1.0.4-0.rpm In the heartbeat clustering, there are three major configuration files:
In the following sections, we describe each file. /etc/ha.d/authkeysThe authkeys configuration file specifies the secret authentication keys that must be identical for both nodes in the cluster. There are several different authentication encryptions you can choose. In our setup, we use md5. The authkeys is shown in Example 8-5. Example 8-5. /etc/ha.d/authkeyslpar1:/etc/ha.d # cat authkeys # key for the cluster is linuxforp auth 3 3 md5 linuxforp The authkeys must be set to read only by the root user; otherwise , the heartbeat software will fail right away: # chmod 600 /etc/ha.d/authkeys /etc/ha.d/ha.cfThe ha.cf file is the core configuration file that defines the nodes which are part of the clustering. In this file, we also define which link we use for the heartbeat, and the sequence of the heartbeat. Example 8-6 shows the ha.cf configuration file that we use in our configuration. Example 8-6. /etc/ha.d/ha.cf# Logs definition debugfile /var/log/ha-debug logfile /var/log/ha-log logfacility local10 # HeartBeat Packets Configuration keepalive 2 # time between each heartbeat deadtime 30 # how long to declare dead bcast eth1 # heartbeat communication link # Resource Configuration nice_failback on # this will turn on the feature cascading without fall-back # Node Definition node lpar1 node lpar3 /etc/ha.d/haresourcesThe haresources file manages the resources that you want to be part of the cluster. The heartbeat looks into the /etc/ha.d/resource.d file and the /etc/init.d/ directory for scripts to start your application that you specify in the haresources file. In our setup, we required a cluster IP, the external storage to be automatically mounted, and then DB2 to be started. Example 8-7. /etc/ha.d/haresourceslpar1 192.168.100.85 Filesystem::/dev/sdc1::/data/IBM/db2inst1::reiserfs db2::db2inst1 Based on the logic of how the application is started, we create the haresources configuration file. Example 8-7 shows the contents of the file we have. It tells heartbeat to make lpar1 be the primary node with cluster IP address 192.168.100.85, and then mount the file system to the mountpoint /data/IBM/db2inst1, and then start DB2 with the instance ID db2inst1. After this is done, we customize the DB2 script located inside /etc/ha.d/resource.d/ for DB2 8 ESE. Because DB2 is parallel database-capable, we added these lines into the script, as shown in Example 8-8. Example 8-8. Extract of /etc/ha.d/resource.d/db2 : : : db2_start() { #### included for DB2 8.1 EEE NODENAME=`hostname` cp /home/db2inst1/sqllib/db2nodes.cfg.$NODENAME /home/db2inst1/sqllib/db2nodes.cfg #### included for DB2 8.1 EEE if output=`runasdb2 $db2adm/db2start` then : Hurray! DB2 started OK ha_log "info: DB2 UDB instance started: $output" else case $output in SQL1026N**"is already active"*) ha_log "info: DB2 UDB instance already running: $output";; *) ha_log "ERROR: $output"; return 1;; esac fi : : : We need to create the necessary db2nodes.cfg for lpar1 and lpar3 inside /home/db2inst1/sqllib/:
Now that we have all the configuration files ready, we copy the configuration to lpar3: # cd /etc/ha.d # scp haauthkeys ha.cf haresources resource.d/db2 root@lpar3:/etc/ha.d/ Next, we do a basic check on the cluster setup by using the command BasicSanityCheck . This command is found in the directory /usr/lib/heartbeat. This command performs basic checks and outputs the errors (if any) into the /tmp/linux-ha.testlog file. Example 8-9 on page 376 shows the BasicSanityCheck command that we ran during the creation of the configuration file for our cluster. Example 8-9. BasicSanityCheck on the heartbeat clusterleecy@lpar1:/usr/lib/heartbeat # ./BasicSanityCheck Starting heartbeat Starting High-Availability services done Reloading heartbeat Reloading heartbeat Stopping heartbeat Stopping High-Availability services done Checking STONITH basic sanity. Performing apphbd success case tests Performing apphbd failure case tests Starting IPC tests 1 errors. Log file is stored in /tmp/linux-ha.testlog 8.1.5 Testing the clusterOnce done, we test the cluster. We start the cluster by using the command /etc/init.d/heartbeat start as shown in Example 8-10. Example 8-10. Starting the heartbeat clusterlpar1:~ # /etc/init.d/heartbeat start Starting High-Availability services done lpar1:~ # We started the cluster on both nodes and then noticed that the cluster IP address automatically gets created in the primary node. At the same time, the file system gets mounted and the application started. During this process, the /var/log/ha-log shows details of what is happening in the background. This log is also very useful for debugging if the resource fails to start. Example 8-11 shows the ha-log of our cluster with the resource successfully started. Example 8-11. /var/log/ha-log output when cluster is up# tail -f /var/log/ha-log heartbeat: 2003/11/10_17:53:34 info: ************************** heartbeat: 2003/11/10_17:53:34 info: Configuration validated. Starting heartbeat 1.0.4 heartbeat: 2003/11/10_17:53:34 info: nice_failback is in effect. heartbeat: 2003/11/10_17:53:34 info: heartbeat: version 1.0.4 heartbeat: 2003/11/10_17:53:34 info: Heartbeat generation: 30heartbeat: 2003/11/10_17:53:34 info: UDP Broadcast heartbeat started on port 694 (694) interface eth1 heartbeat: 2003/11/10_17:53:34 info: pid 2795 locked in memory. heartbeat: 2003/11/10_17:53:35 info: pid 2797 locked in memory. heartbeat: 2003/11/10_17:53:35 info: pid 2799 locked in memory. heartbeat: 2003/11/10_17:53:35 info: pid 2798 locked in memory. heartbeat: 2003/11/10_17:53:35 info: Local status now set to: 'up' heartbeat: 2003/11/10_17:53:36 info: Link lpar1:eth1 up. heartbeat: 2003/11/10_17:54:05 WARN: node lpar3: is dead heartbeat: 2003/11/10_17:54:05 WARN: No STONITH device configured. heartbeat: 2003/11/10_17:54:05 WARN: Shared resources (storage!) are not protected! heartbeat: 2003/11/10_17:54:05 info: Resources being acquired from lpar3. heartbeat: 2003/11/10_17:54:05 info: Local status now set to: 'active' heartbeat: 2003/11/10_17:54:05 info: Running /etc/ha.d/rc.d/status status heartbeat: 2003/11/10_17:54:05 info: /usr/lib/heartbeat/mach_down: nice_failback: acquiring foreign resources heartbeat: 2003/11/10_17:54:05 info: mach_down takeover complete. heartbeat: 2003/11/10_17:54:05 info: mach_down takeover complete for node lpar3. heartbeat: 2003/11/10_17:54:05 info: Resource acquisition completed. heartbeat: 2003/11/10_17:54:05 info: Running /etc/ha.d/rc.d/ip-request-resp ip-request-resp heartbeat: 2003/11/10_17:54:05 received ip-request-resp 192.168.100.85 OK yes heartbeat: 2003/11/10_17:54:05 info: Acquiring resource group: lpar1 192.168.100.85 Filesystem::/dev/sdb1::/data/IBM/db2inst1::reiserfs db2::db2inst1 heartbeat: 2003/11/10_17:54:05 info: Running /etc/ha.d/resource.d/IPaddr 192.168.100.85 start heartbeat: 2003/11/10_17:54:05 info: /sbin/ifconfig eth0:0 192.168.100.85 netmask 255.255.255.0 broadcast 192.168.100.255 heartbeat: 2003/11/10_17:54:05 info: Sending Gratuitous Arp for 192.168.100.85 on eth0:0 [eth0] heartbeat: 2003/11/10_17:54:05 /usr/lib/heartbeat/send_arp eth0 192.168.100.85 0002553A068C 192.168.100.85 ffffffffffff heartbeat: 2003/11/10_17:54:05 info: Running /etc/ha.d/resource.d/Filesystem /dev/sdb1 /data/IBM/db2inst1 reiserfs start heartbeat: 2003/11/10_17:54:06 info: Running /etc/ha.d/resource.d/db2 db2inst1 start heartbeat: 2003/11/10_17:54:07 /usr/lib/heartbeat/send_arp eth0 192.168.100.85 0002553A068C 192.168.100.85 ffffffffffff heartbeat: 2003/11/10_17:54:08 info: DB2 UDB instance db2inst1 started: 11-10-2003 17:54:08 0 0 SQL1063N DB2START processing was successful. SQL1063N DB2START processing was successful. heartbeat: 2003/11/10_17:54:09 /usr/lib/heartbeat/send_arp eth0 192.168.100.85 0002553A068C 192.168.100.85 ffffffffffff heartbeat: 2003/11/10_17:54:11 /usr/lib/heartbeat/send_arp eth0 192.168.100.85 0002553A068C 192.168.100.85 ffffffffffff heartbeat: 2003/11/10_17:54:13 /usr/lib/heartbeat/send_arp eth0 192.168.100.85 0002553A068C 192.168.100.85 ffffffffffff heartbeat: 2003/11/10_17:54:17 info: Local Resource acquisition completed. (none) heartbeat: 2003/11/10_17:54:17 info: local resource transition completed. heartbeat: 2003/11/10_17:54:28 info: Link lpar3:eth1 up. heartbeat: 2003/11/10_17:54:28 info: Status update for node lpar3: status up heartbeat: 2003/11/10_17:54:28 info: Running /etc/ha.d/rc.d/status status heartbeat: 2003/11/10_17:54:29 info: Status update for node lpar3: status active heartbeat: 2003/11/10_17:54:29 info: Running /etc/ha.d/rc.d/status status Next, we power off lpar1. The resource instantly fails over to lpar3, with the cluster IP addresses created as well, as in Figure 8-7. Figure 8-7. DB2 failover test The entries in /var/log/ha-log show that lpar1 has failed and the resources fails over to lpar3. Example 8-12 on page 379 shows /var/log/ha-log during our test. Example 8-12. Fail-over logheartbeat: 2003/11/10_19:32:16 WARN: node lpar1: is dead heartbeat: 2003/11/10_19:32:16 WARN: No STONITH device configured. heartbeat: 2003/11/10_19:32:16 WARN: Shared resources (storage!) are not protected! heartbeat: 2003/11/10_19:32:16 info: Resources being acquired from lpar1. heartbeat: 2003/11/10_19:32:16 info: Link lpar1:eth1 dead. heartbeat: 2003/11/10_19:32:16 info: Running /etc/ha.d/rc.d/status status heartbeat: 2003/11/10_19:32:16 info: No local resources [/usr/lib/heartbeat/ResourceManager listkeys lpar3] heartbeat: 2003/11/10_19:32:16 info: Resource acquisition completed. heartbeat: 2003/11/10_19:32:16 info: Taking over resource group 192.168.100.85 heartbeat: 2003/11/10_19:32:16 info: Acquiring resource group: lpar1 192.168.100.85 Filesystem::/dev/sdb1::/data/IBM/db2inst1::reiserfs db2::db2inst1 heartbeat: 2003/11/10_19:32:16 info: Running /etc/ha.d/resource.d/IPaddr 192.168.100.85 start heartbeat: 2003/11/10_19:32:17 info: /sbin/ifconfig eth0:0 192.168.100.85 netmask 255.255.255.0 broadcast 192.168.100.255 heartbeat: 2003/11/10_19:32:17 info: Sending Gratuitous Arp for 192.168.100.85 on eth0:0 [eth0] heartbeat: 2003/11/10_19:32:17 /usr/lib/heartbeat/send_arp eth0 192.168.100.85 0002553A0619 192.168.100.85 ffffffffffff heartbeat: 2003/11/10_19:32:17 info: Running /etc/ha.d/resource.d/Filesystem /dev/sdb1 /data/IBM/db2inst1 reiserfs start heartbeat: 2003/11/10_19:32:18 info: Running /etc/ha.d/resource.d/db2 db2inst1 start heartbeat: 2003/11/10_19:32:19 /usr/lib/heartbeat/send_arp eth0 192.168.100.85 0002553A0619 192.168.100.85 ffffffffffff heartbeat: 2003/11/10_19:32:21 /usr/lib/heartbeat/send_arp eth0 192.168.100.85 0002553A0619 192.168.100.85 ffffffffffff heartbeat: 2003/11/10_19:32:21 info: DB2 UDB instance db2inst1 started: 11-10-2003 19:32:21 0 0 SQL1063N DB2START processing was successful. SQL1063N DB2START processing was successful. heartbeat: 2003/11/10_19:32:23 /usr/lib/heartbeat/send_arp eth0 192.168.100.85 0002553A0619 192.168.100.85 ffffffffffff heartbeat: 2003/11/10_19:32:25 /usr/lib/heartbeat/send_arp eth0 192.168.100.85 0002553A0619 192.168.100.85 ffffffffffff heartbeat: 2003/11/10_19:32:27 info: mach_down takeover complete for node lpar1. Now we are confident that our cluster is working as designed, so we add the heartbeat to the startup script for both nodes with the following command: # chkconfig heartbeat 3 8.1.6 Extending the cluster with Apache and PHP for front-endNow that we have the back-end DB2 cluster running, we set up the front-end servers to connect to the database server. We create two servers, lpar7 and lpar8, for Web servers, using Preprocessor Hypertext Protocol (PHP) software. PHP is an open source application which you can install from the SLES8 CD, or download from: http://www.php.net/ We downloaded the latest Apache and PHP software products from the Web. Apache can be obtained from: http://www.apache.org/homepage Configuring the Web serverWe recompile the Apache software we downloaded from the Web to enable dynamic module support. We also put Apache into the /usr/local/apache directory: # tar -zxvf <path>/apache_1.3.29.tar.gz # ./configure --prefix=/usr/local/apache --enable-shared=max \ --enable-module=so # make ; make install After the Web server is compiled, we need to install DB2 into the server. We recommend that you install the typical server installation and leave the directory and user IDs as defaults. After completed, we install the PHP script to interface with the DB2 database: # tar -zxvf php-4.3.3.tar.gz #./configure --with-prefix=/usr/local/php \ --with-apxs=/usr/local/apache/bin/apxs --without-mysql \ --with-ibm-db2=/home/db2inst1/sqllib # make ; make install With the Apache Web server and PHP installed, we need to update the configuration files to recognize the PHP extensions. We add the following lines to the /usr/local/apache/conf/httpd.conf file: AddType application/x-httpd-php .php AddType application/x-httpd-php-source .phps Next, we create a sample PHP script with the text shown in Example 8-13 on page 381. Example 8-13. phpinfo test<?php phpinfo() ?> After compiling and successfully enabling PHP, we pointed our browser to: http://localhost/phpinfo.php The PHP test screen shown in Figure 8-8 appeared. We scrolled to the bottom and saw that the DB2 connection had been enabled using Open Database Connectivity (ODBC). Figure 8-8. phpinfo test page Now that we have PHP interfacing with DB2, we catalog the remote database that we created in lpar1 and lpar3 into lpar7. We catalog the remote server using the cluster IP address (192.168.100.85) that we gave the DB2 heartbeat cluster: # db2 catalog tcpip node lpar7 remote 192.168.100.85 server db2c_db2inst1 Next, we need to catalog the remote database; for simplicity, we call it sample . # db2 catalog db sample as sample at node lpar7 After that, we test the database connection and do a db list directory, as shown in Example 8-14. Example 8-14. Testing the database connectiondb2inst1@lpar7:~> db2 connect to sample user db2inst1 using ibmdb2 Database Connection Information Database server = DB2/LINUXPPC 8.1.2 SQL authorization ID = DB2INST1 Local database alias = SAMPLE db2inst1@lpar7:~> db2 "list db directory" System Database Directory Number of entries in the directory = 1 Database 1 entry: Database alias = SAMPLE Database name = SAMPLE Node name = LPAR7 Database release level = a.00 Comment = Directory entry type = Remote Catalog database partition number = -1 The test is successful, and we have connected to the remote database. Now, we create a simple PHP script to connect to the remote database. Example 8-15 shows the sample PHP script that is used to connect to the remote database and do a simple query of the database by looking for the staff in the department. Example 8-15. Sample PHP script to query remote DB2 database <?php putenv("DB2INSTANCE=db2inst1"); $dbname = "sample"; $username = "db2inst1"; $password = "ibmdb2"; echo "This is from lpar7 !!!"; $dbconn = odbc_pconnect($dbname, $username, $password); echo "db2 connection : $dbconn \n"; if ($dbconn <= 0) { echo "Error in connection"; exit; } else { echo "Connection Successful \n"; }; $query = "SELECT * FROM staff WHERE dept=20"; $result = odbc_Exec($dbconn, $query ); odbc_result_all($result); odbc_close($dbconn); return($dbconn); ?> Based on the script in Example 8-15, we point our browser to the server, and we get the database query displayed into a Web page. Figure 8-9 on page 383 shows the output of the script. Figure 8-9. lpar7 db2_test.php page In your case, set up the same configuration for lpar8, and copy the php scripts to the node. Update the scripts to reflect lpar8 instead of lpar7, and test both Web servers. You should be able to connect to the database server from both lpar7 and lpar8 regardless of whether the database is on lpar1 or lpar3. This is transparent to the Web server, as it is talking to the DB2 cluster via the IP address 192.168.100.85. 8.1.7 Using LVS to load balance Web serversWe set up a load balancing cluster to create a single external IP for user connection. The load balancer distributes the requests into lpar7 and lpar8, and monitors the servers. In our test, we used IP Virtual Server (IVPS), which is the IP load balancing feature inside the Linux kernel. IPVS examines every incoming packet and rewrites the packet to support load balancing. It also automatically creates IPVS rules hash tables for connections, and checks the connection table for established connections. IPVS lets you choose how to set it up for load balancing, to manage the incoming packets and pass them to the back-end servers.There are basically three methods of configuring the IPVS:
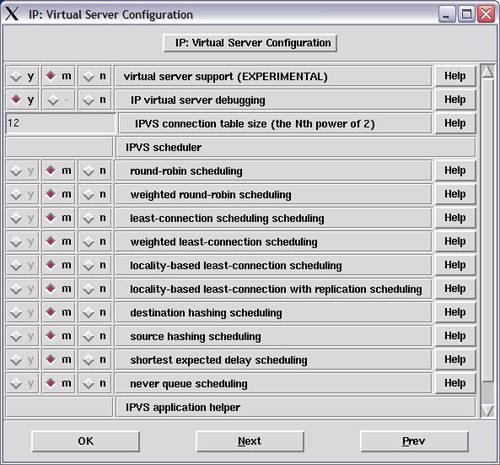
Figure 8-10 on page 385 shows the differences between the different types of IPVS options available. Figure 8-10. Differences between the IPVS options Some modifications are needed on the real server's ifconfig and routing table for LVS-DR and LVS-TUN forwarding, to enable the servers to talk directly to external clients . For LVS-NAT, the real servers only need a functioning TCP/IP stack. In LVS setup, you can serve multiple service from a number of real servers, local or remote. If you are using LVS to load balance a group of Web servers (port 80), then all real servers must present identical contents, since the client could connect to any of them, over many connections/reconnections. In our setup, we are using the direct routing option. To enable LVS in the kernel, we need to compile the kernel. First, we install the kernel source from the SLES 8 CD: # rpm -ivh kernel-source-2.4.21-83.ppc.rpm # cd /usr/src/linux We now copy the existing config file of the current server setup and customize it to include IPVS: # cp /boot/.config /usr/src/linux # make xconfig We select all the IPVS options to be compiled as modules. The IPVS options are inside the section Network Options under the tab IP: Virtual Server Configuration". Figure 8-11 on page 386 shows the available options in the kernel configurator. Figure 8-11. IP virtual server configuration After we select the IPVS options as modules, we recompile and install them. Note that we are not compiling the whole kernel; instead, we are just compiling additional modules to be part of the same kernel: # make_ppc64.sh dep # make_ppc64.sh modules # mv /lib/modules/2.4.21-83-pseries64 /lib/modules/2.4.21-83-pseries.orig # make_ppc64.sh modules_install After we recompile the kernel, we set up heartbeat to manage the LVS. The hardware requirements for heartbeat are the same as for setting up the DB2 cluster. Make sure you have the necessary adapters and cables for heartbeat. We install the heartbeat-l directord into the server: # rpm -ivh heartbeat-1.0.4-10.ppc.rpm # rpm -ivh heartbeat-ldirectord-1.0.4-10.ppc.rpm We configure the authkeys and ha.cf files to define the nodes we have in the cluster. Refer to Example 8-5 on page 373 for details about how to set up the authkeys file. You can give a new key for this pair of nodes. Example 8-16 displays lpar5 and lpar6 as our load balancer cluster. In this heartbeat setup, we are using a single adapter for both public and heartbeat. In a production environment, however, it is recommended that you have dedicated adapters for heartbeat. Example 8-16. /etc/ha.d/ha.cf file for load balancing# Logs definition debugfile /var/log/ha-debug logfile /var/log/ha-log logfacility local10 # HeartBeat Packets Configuration keepalive 2 # time between each heartbeat deadtime 30 # how long to declare dead bcast eth0 # heartbeat communication link # Resource Configuration nice_failback on # this will turn on the feature cascading without fall-back # Node Definition node lpar5 node lpar6 The major configuration file of the ldirectord cluster is the ldirector.cf file. This file is placed into /etc/ha.d. Inside the file, you need to define the virtual IP addresses, the real IP addresses of the server, and the port to use. Figure 8-17 shows the /etc/ha.d/ldirectord.cf file that we use. Example 8-17. /etc/ha.d/ldirectord.cf# Global Directives checktimeout=10 checkinterval=2 fallback=127.0.0.1:80 autoreload=yes logfile="/var/log/ldirectord.log" logfile="local0" quiescent=no virtual=192.168.100.87:80 real=192.168.100.83:80 gate real=192.168.100.84:80 gate service=http checkport=80 request="/index.html" receive="Test Page" scheduler=rr protocol=tcp As shown in Example 8-17, we specified 192.168.100.87 as the Web cluster IP address for external users. 192.168.100.83 and 192.168.100.84 are the IP addresses of lpar7 and lpar8, where we run Apache and PHP. We also specify the file used to test whether the server is up or down. For this setup, we are using the round robin scheduler. You can also manage the setup ldirectord to distribute packets based on the workload of the servers. We now make ldirectord the resource that heartbeat will be managing. As shown in Example 8-18, we have specified that lpar5 is the primary node with the IP address 192.168.100.87. This corresponds to the address that we specified in the /etc/ha.d/ldirectord.cf file. Example 8-18. /etc/ha.d/haresourceslpar5 192.168.100.87 ldirectord::/etc/ha.d/ldirectord.cf Once we load the IPVS modules into the kernel, we start the heartbeat services: # insmod ip_vs Using /lib/modules/2.4.21-83-pseries64/kernel/net/ipv4/ipvs/ip_vs.o # insmod ip_vs_rr Using /lib/modules/2.4.21-83-pseries64/kernel/net/ipv4/ipvs/ip_vs_rr.o # insmod ip_vs_sh Using /lib/modules/2.4.21-83-pseries64/kernel/net/ipv4/ipvs/ip_vs_sh.o # insmod ip_vs_lc Using /lib/modules/2.4.21-83-pseries64/kernel/net/ipv4/ipvs/ip_vs_lc.o # insmod ip_vs_lblcr Using /lib/modules/2.4.21-83-pseries64/kernel/net/ipv4/ipvs/ip_vs_lblcr.o # insmod ip_vs_wlc Using /lib/modules/2.4.21-83-pseries64/kernel/net/ipv4/ipvs/ip_vs_wlc.o # insmod ip_vs_sed Using /lib/modules/2.4.21-83-pseries64/kernel/net/ipv4/ipvs/ip_vs_sed.o # insmod ip_vs_nq Using /lib/modules/2.4.21-83-pseries64/kernel/net/ipv4/ipvs/ip_vs_nq.o # insmod ip_vs_ftp Using /lib/modules/2.4.21-83-pseries64/kernel/net/ipv4/ipvs/ip_vs_ftp.o # insmod ip_vs_lblc Using /lib/modules/2.4.21-83-pseries64/kernel/net/ipv4/ipvs/ip_vs_lblc.o # insmod ip_vs_wrr Using /lib/modules/2.4.21-83-pseries64/kernel/net/ipv4/ipvs/ip_vs_wrr.o After successfully loading the modules, we check the lsmod table; the modules should be listed in the table. We update our IPVS clients (lpar7 and lpar8) to be IPVS-ready. We create an IP address of the cluster at loopback and hide the adapter from broadcasting any ARP. Example 8-19 shows what we are running in lpar7 and lpar8. Example 8-19. Updating client to be IPVS-ready[root@lpar7 root]# echo "0" >/proc/sys/net/ipv4/ip_forward [root@lpar7 root]# sbin/ifconfig lo:0 192.168.100.87 broadcast 192.168.100.87 netmask 0xffffffff up [root@lpar7 root]# /sbin/route add -host 192.168.100.87 dev lo:0 [root@lpar7 root]# echo "1" >/proc/sys/net/ipv4/conf/all/hidden [root@lpar7 root]# echo "1" >/proc/sys/net/ipv4/conf/lo/hidden Now we can start the heartbeat software using the command /etc/init.d/ heartbeat start . This automatically creates the cluster IP addresses and starts the ldirectord to act as our load balancers. Next, let us examine the IP virtual server table in Example 8-20. We notice that the incoming packets to 192.168.100.87 automatically get distributed to lpar7 and lpar8. Example 8-20. IP virtual server routing tableIP Virtual Server version 1.0.10 (size=4096) Prot LocalAddress:Port Scheduler Flags -> RemoteAddress:Port Forward Weight ActiveConn InActConn TCP 192.168.100.87:http rr -> lpar7:http Route 1 0 0 -> lpar8:http Route 1 0 0 Testing the load balancer clusterWe run a command to loop the request for display to the db2_php.test script that queries the DB2 cluster directly. The request does a round robin, the first request to lpar7, then lpar8, and so on. We also test that if lpar7 is switched off or taken down for management, all traffic goes to lpar8. Example 8-21 shows the test of querying lpar7 and lpar8, which creates DB2 connections to the DB2 cluster we have in lpar1 and lpar3. Example 8-21. Testing IPVS cluster# while :; do lynx -dump webip/db2_test.php; sleep 1; done This is from LPAR7 !! db2 connection : Resource id #3 Connection Successful ID NAME DEPT JOB YEARS SALARY COMM 10 Sanders 20 Mgr 7 18357.50 NULL 20 Pernal 20 Sales 8 18171.25 612.45 80 James 20 Clerk NULL 13504.60 128.20 190 Sneider 20 Clerk 8 14252.75 126.50 This is from LPAR8 !! db2 connection : Resource id #3 Connection Successful ID NAME DEPT JOB YEARS SALARY COMM 10 Sanders 20 Mgr 7 18357.50 NULL 20 Pernal 20 Sales 8 18171.25 612.45 80 James 20 Clerk NULL 13504.60 128.20 190 Sneider 20 Clerk 8 14252.75 126.50 With this setup, lpar7 and lpar8 are fully redundant. We can also add new Web servers into the configuration easily by modifying the ldirectord.cf file and reloading it. Figure 8-12 on page 391 shows our current landscape with the option to set up additional Web servers when required. Figure 8-12. Load Balancers (LB) with two Web servers Tip Suppose you run the command ipvsadm -L and see the following messages: Can't initialize ipvs: Protocol not available. Are you sure that IP Virtual Server is built in the kernel or as module? These messages mean that the kernel does not have the IPVS modules made available to it. 8.1.8 Final landscape of the setupIn the final setup, we have two servers running ldirectord acting as load balancing two Web servers and two clustered database servers. This is a fully redundant solution where both the Web servers are actively talking to the database servers. The final setup looks like the diagram in Figure 8-13 on page 392. Figure 8-13. Final cluster diagram 8.1.9 Alternate solutions to improve the clusterIn this section, we discuss alternate solutions to improve the cluster. Other disk solutionOne critical improvement that we would like to see in the cluster is the use of Fibre Channel disks instead of SCSI disks. The IBM Fibre Channel adapter (F/C 6228) is compatible with the lpfcdd driver. We load it by running the command: # modprobe lpfcdd After it is loaded, we can create the disk partitions and file systems using steps that are similar to those used in the SCSI solution; refer to "Disk setup" on page 364. Other software stackBesides using Apache and PHP, we can also use WebSphere as the middleware. WebSphere is a J2EE application server supported on Linux for pSeries, and it offers a whole suite of applications and portlets. Other clustering solutions
|
| < Day Day Up > |
EAN: N/A
Pages: 108