4.2. Getting Your Pictures into iPhoto With iPhoto installed and ready to run, it's time for you to import your own pictures into the programa process that's remarkably easy, especially if your photos are going directly from your camera into iPhoto. Of course, if you've been taking digital photos for some time, you probably have a lot of photo files already crammed into folders on your hard drive or on Zip disks or CDs. If you shoot pictures with a traditional film camera and use a scanner to digitize them, you've probably got piles of JPEG or TIFF images stashed away on disk already, waiting to be cataloged using iPhoto. This section explains how to transfer files into iPhoto from each of these sources. 4.2.1. Connecting with a USB Camera Every modern digital camera can connect to a Mac using the USB port. If your Mac has more than one USB jack, any of them will do. Plugging a USB-compatible camera into your Mac is the easiest way to transfer pictures from your camera into iPhoto.
Note: A few cameras require a pre-step right about here: turning the Mode dial on the top to whatever tiny symbol means "computer connection." If yours does, do that.
The whole process practically happens by itself: -
Connect the camera to one of your Mac's USB jacks . Turn the camera on . To make this camera-to-Mac USB connection, you need what is usually called an A-to-B USB cable; your camera probably came with one. The "A" endthe part you plug into your camerahas a small, flat-bottomed plug whose shape varies by manufacturer. The Mac end of the cable has a larger, flatter, rectangular, standard USB plug. Make sure both ends of the cable are plugged in firmly. If iPhoto isn't already running when you make this connection, the program opens and springs into action as soon as you switch on the camera. (It does, that is, unless you've changed the factory settings in Image Capture, a little program that sits in your Applications folder.)
Note: If this is the first time you've ever run iPhoto, it asks if you always want it to run when you plug in the camera. If you value your time, say yes.
In iPhoto 6, there's no wondering whether iPhoto is ready to do its job; the entire screen changes to show you the "ready" message shown in Figure 4-3.
Tip: If, for some reason, iPhoto doesn't "see" your camera after you connect it, try turning the camera off, then on again.
In addition, your camera's icon appears in the Source list. That's handy, because it means that you can switch back and forth between the importing mode (click the camera's icon) and the regular working-in-iPhoto mode (click any other icon in the Source list), even while the time-consuming importing is under way. (Incidentally, as long as the camera's appearing in the Source listwouldn't it be cool if you could drag photos onto the camera too? Maybe next year.) -
If you like, type in a roll name and description for the pictures you're about to import . Each time you import a new set of photos into iPhotowhether from your hard drive, a camera, or a memory cardthat batch of imported photos is called a film roll . Of course, there's no real film in digital photography, and your pictures aren't on a "roll" of anything. But if you think about it, the metaphor makes sense. Just as in traditional photography, where each batch of photos you shoot is captured on a separate roll of film, each separate batch of photos you download into iPhoto gets classified as its own film roll. You'll learn much more about film rolls in Chapter 5. For the moment, typing in a name for each new batch Disney, First Weekend or Baby Meets Lasagna , for examplewill help you organize and find your pictures later. (Use the Description box for more elaborate textual blurbs, if you like. You could specify the date, who was on the trip, the circumstances of the shoot, and so on.) -
Turn on " Delete items from camera after importing," if you like . If you turn on this box, iPhoto will erase your camera's memory card once the pictures and movies are safely on the Mac. The memory card will be all ready for another exciting photo safari. Figure 4-3. iPhoto is ready to import, captain! If you have to wait a long time for this screen to appear, it's because you've got a lot of pictures on your camera, and it takes iPhoto a while to count them up and prepare for the task at hand. (The number may be somewhat larger than you expect if you forgot to erase your last batch of photos.) 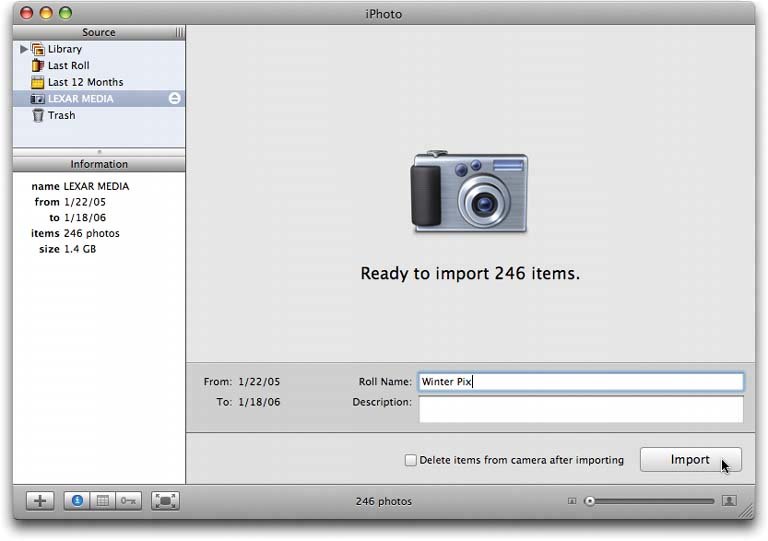 Now, iPhoto won't delete your pictures until after it has successfully copied them all to the Photo Library. However, it's not beyond the realm of possibility that a hard disk could fail during an iPhoto import, or that a file could get corrupted when copied , thereby becoming unopenable. If you want to play it safe, leave the "Delete items from camera after importing" option turned off. Then, after you've confirmed that all of your photos have been copied safely, you can use the camera's own menus to erase its memory card. -
Click the Import button . If you chose the auto-erase feature, you'll see a final "Confirm Move" dialog box, affording you one last chance to back out of that decision. Click Delete Originals if you're sure you want the camera erased after the transfer, or Keep Originals if you want iPhoto to import copies of them, leaving the originals on the camera. A different message appears if you're about to import photos you've already imported (see Figure 4-4, top). In any case, iPhoto swings into action, copying each photo from your camera to your hard drive. You get to see them as they parade by (Figure 4-4, bottom). Figure 4-4. Top: If you're not in the habit of using the "Delete items from camera after importing" option, you may occasionally see the "Import duplicates?" message. iPhoto notices the arrival of duplicates and offers you the option of downloading them again, resulting in duplicates on your Mac, or ignoring them and importing only the new photos from your camera. The latter option can save you a lot of time.
Bottom: A nice feature in iPhoto 6: As the pictures get slurped into your Mac, iPhoto shows them to you, nice and big, as a sort of slideshow. You can see right away which ones were your hits, which were the misses, and which you'll want to delete the instant the importing process is complete. 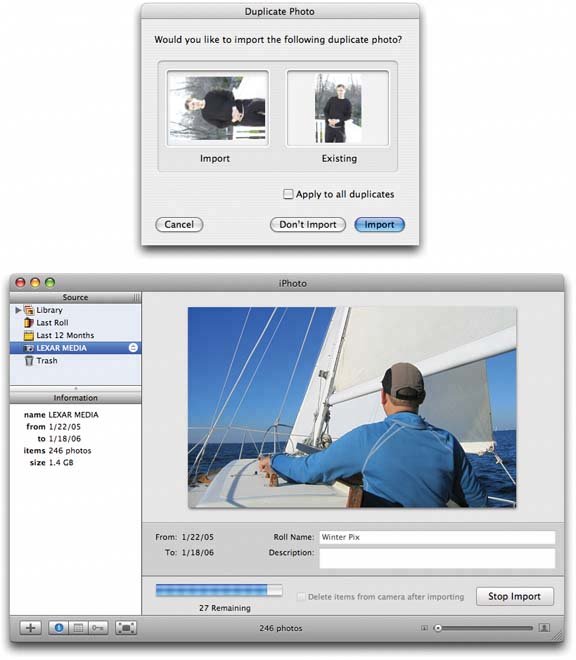 When the process is over, your freshly imported photos appear in the main iPhoto window, awaiting your organizational talents. -
"Eject" the camera by clicking the  button next to its name in the Source list . button next to its name in the Source list . Or, if the button doesn't appear, just drag the camera's icon directly downward onto the Trash icon. You're not actually throwing the camera away, of course, or even the photos on ityou're just saying, "Eject this." Even if the camera's still attached to your Mac, its icon disappears from the Source list.
Tip: Alternatively, you can Control-click or right-click the camera's icon and choose Unmount from the shortcut menu.
-
Turn off the camera, and then unplug it from the USB cable . You're ready to start having fun with your new pictures (Section 4.3). GEM IN THE ROUGH
The Memory Card's Back Door | | When you connect some camera models to the Mac, the memory card shows up as a disk icon at the upper-right corner of your desktop, as shown here. You get the same effect when you insert a memory card into a card reader attached to your Mac. Inside the disk window, you'll generally find several folders, each cryptically named by the camera's software. One of them contains your photos; another may contain movies. Opening this "disk" icon is one way to selectively delete or copy photos from the card. (If you do that, though, make sure you eject and reconnect the camera before importing into iPhoto, to avoid thoroughly confusing the software.) Finding the folder that contains the memory card's photos also offers you the chance to copy photos from your hard drive to your camerajust drag them to the "disk" icon in the Finder. The downside of having your card icon show up is that you must eject it manually after importing your photos into iPhoto. You can drag it to the Trash, Control-click it (or right-click it) and choose Eject, click its button in the Sidebar (Mac OS X 10.3 or later), or use any other diskejecting tactic you want. You can also use the Unmount command within iPhoto, as described in the Tip that appears above. If your camera doesn't show up as an icon, you can always open the Image Capture program in your Applications folder. It, too, is capable of selectively deleting or importing photos and can also import your digital movies. Then, after you've confirmed that all of your photos have been copied into the iPhoto Library folder, you can use the camera's own command to erase its memory card. 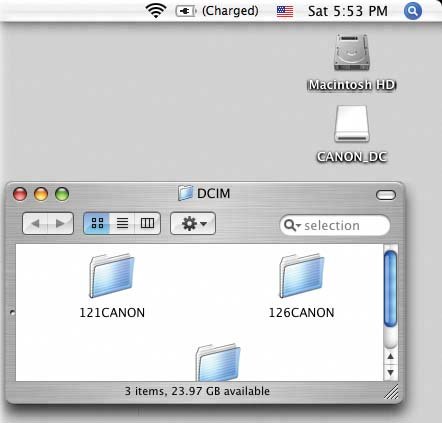 |
4.2.2. USB Card Readers A USB memory card reader offers another convenient way to transfer photos into iPhoto. Most of these card readers, which look like tiny disk drives , are under $20, and some can even read more than one kind of memory card. If you have a reader, then instead of connecting the camera to the Mac, simply remove the camera's memory card and insert it into the reader (which you can leave permanently connected to the Mac). iPhoto recognizes the reader as though it's a camera and offers to import (and erase) the photos, just as described on the previous pages. This method offers several advantages over the camera-connection method. First, it eliminates the battery drain involved in pumping the photos straight off the camera. Second, it's less hassle to pull a memory card out of your camera and slip it into your card reader (which is always plugged in) than it is to constantly plug and unplug camera cables. Finally, this method lets you use almost any digital camera with iPhoto, even those too old to include a USB cable connector.
Tip: iPhoto doesn't recognize most camcorders, even though most models can take still pictures. Many camcorders store their stills on a memory card just as digital cameras do, so a memory card reader is exactly what you need to get those pictures into iPhoto.
Connecting with a USB-compatible memory card reader is almost identical to connecting a camera. Here's how: -
Pop a memory card out of your camera and insert it into the reader . Of course, the card reader should already be plugged into the Mac's USB jack. As when you connect a camera, iPhoto acknowledges the presence of the memory card reader. A huge camera icon appears in the main window, you see the number of images on the card, and you're offered a chance to type in a roll name and description. As described in Section 4.2.1, you can also turn on the "Delete items from camera after importing" checkbox if you want iPhoto to automatically clear the memory card after copying the files to your Mac. -
Click Import . iPhoto swings into action, copying the photos off the card. -
Click the Eject button ( ) next to the card's name in the Source list, and then remove the card from the reader . Put the card back into the camera, so it's ready for more action. 4.2.3. Importing Photos from Really Old Cameras If your camera doesn't have a USB connection and you don't have a memory card reader, you're still not out of luck. First, copy the photos from your camera/memory card onto your hard drive (or other disk) using whatever software or hardware came with your camera. Then bring them into iPhoto as you would any other graphics files.
Tip: If your camera or memory card appears on the Mac desktop like any other removable disk, you can also drag its photo icons, folder icons, or even the "disk" icon itself directly into iPhoto.
4.2.4. Importing Existing Graphics Files iPhoto is also delighted to help you organize digital photosor any other kinds of graphics filesthat are already on your computer, like in a folder somewhere. In fact, if that's your situation, you've just stumbled onto one of the most profound new features in iPhoto 6. For years , Mac fans complained about the way iPhoto handled photos that were already on the hard drive: when you imported them into iPhoto, the program duplicated them. You wound up with one set inside iPhoto's proprietary library folder (Section 4.4) in addition to the original folder full of photos. Disk space got eaten up rather quickly as a result. This system also meant that iPhoto couldn't simultaneously track photos that resided on more than one hard drive. But now, for the first time in history, iPhoto can track, organize, edit, and process photos on your hard drive(s) right in place, right in the folders that contain them . The program doesn't have to copy them into the iPhoto Library folder, doesn't have to double their disk-space consumption. This is a great blessing to people who already have folders filled with photos. You can drag them directly into iPhoto's Source list (or the main viewing area). iPhoto acts like it's importing them, but doesn't really. Yet you can work with them exactly like the ones that iPhoto has actually socked away in its own library. If you choose to go this route, here are a few tips and notes: -
Very ugly things will happen in iPhoto if you delete a photo "behind its back," in the Finder. When, in iPhoto, you try to open or edit one of the moved photos, an error message will appear, offering you the chance to locate the photo manually. And if you can't find it, the photo opens up as a huge, empty, gray rectangle filled with an exclamation point. (You kind of know what the program means.) -
On the other hand, iPhoto is pretty smart if you rename a photo in the Finder, or even drag it to a different folder. Apple doesn't really want this feature publicized, hopes you won't try it, and won't say how iPhoto manages to track pictures that you move around even when the program isn't running. But it works. Moved or renamed photos still appear in iPhoto, and you can still open, edit, and export them. -
If you delete a photo within iPhoto, you're not actually deleting it from your Mac. It's still sitting there in the Finder, in the folder where it's always been. You've just told iPhoto not to track that photo any more. -
Using this feature, you can use iPhoto to catalog and edit photos that reside on multiple hard driveseven other computers on the network . Just make sure those other disks are "mounted" (visible on your screen) before you attempt to work with them in iPhoto. -
On the other hand, iPhoto's new offline smarts do not make it a good choice for managing photos on CDs, DVDs, or other disks that aren't actually connected to, or inserted in, the Mac. 4.2.5. Internal or External? Now, it's nice that iPhoto can track external photos without having to slurp in its own private copies. But the old way had some advantages, too. When iPhoto copies photos into its own library, they're safer. For example, you can back up your iPhoto Library folder, content in the knowledge that you've really backed up all your photos (instead of leaving some behind because they're not actually in the Library folder). Figure 4-5. Top: In the Preferences dialog box, click the Advanced button. Here's where you specify whether or not you want iPhoto to duplicate imported photos from your hard drive so that it has its own Library copy. (If you turn off this checkbox, iPhoto will simply track the photos in their current Finder folders.)
Bottom: When you drop a folder into iPhoto, the program automatically scans all the folders inside it, looking for pictures to catalog. It creates a new film roll (Chapter 5) for each folder it finds. iPhoto ignores irrelevant files and stores only the pictures that are in a format it can read. 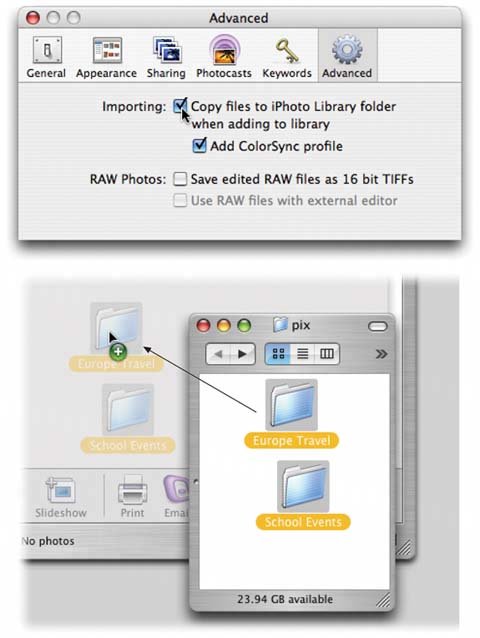
Fortunately, how iPhoto behaves when you import graphics files is entirely up to you. It can either copy them into its own Library folder, or it can track photos in whatever Finder folders they're already in. You make this choice in the iPhoto  Preferences dialog box (see Figure 4-5, top). Preferences dialog box (see Figure 4-5, top). 4.2.6. Dragging into iPhoto No matter what choice you make in the Preferences dialog box, the easiest way to import photos from your hard drive is to drag them into the main iPhoto window. You can choose from two methods : -
Drag the files directly into the main iPhoto window, which automatically starts the import process. You can also drop an entire folder of images into iPhoto to import the contents of the whole folder, as shown in Figure 4-5 (bottom). You can even drag a bunch of folders at once.
Tip: Take the time to name your folders intelligently before dragging them into iPhoto, because the program retains their names . If you drag a folder directly into the main photo area, you get a new film roll named for the folder; if you drag the folder into the Source list at the left side of the screen, you get a new album named for the folder. And if there are folders inside folders, they, too, become new film rolls and albums. Details on all this reside in Chapter 5.
-
Choose File Import to Library (or press Shift-  -I) in iPhoto and select a file or folder in the Open dialog box, shown in Figure 4-6. -I) in iPhoto and select a file or folder in the Open dialog box, shown in Figure 4-6. These techniques also let you select and import files from other hard drives, CDs, DVDs, Jaz or Zip disks, or other disks on the network. If your photos are on a Kodak Photo CD, you can insert the CD (with iPhoto already running), and then click the Import button on the Import pane, just as if you were importing photos from a connected camera. iPhoto makes fresh copies of the files you import, storing them in one centralized photo repository (the iPhoto Library folder) on your hard drive. The program also creates thumbnail versions of each image for display in the main iPhoto window. 4.2.7. The File Format Factor iPhoto can't import digital pictures unless it understands their file format, but that rarely poses a problem. Just about every digital camera on earth saves photos as JPEG filesand iPhoto handles this format beautifully. (JPEG is the world's most popular file format for photos, because even though it's compressed to occupy a lot less disk space, the visual quality is still very high.)
Note: While most digital photos you work with are probably JPEG files, they're not always called JPEG files. You may also see JPEG referred to as JFIF (JPEG File Interchange Format). Bottom line: The terms JPEG, JFIF, JPEG JFIF, and JPEG 2000 all mean the same thing.
But there's more to this storyin iPhoto 6, much more. The program now imports and recognizes some very useful additional formats. 4.2.7.1. RAW format Most digital cameras work like this: When you squeeze the shutter button, the camera studies the data picked up by its sensors. The circuitry then makes decisions pertaining to sharpening level, contrast and saturation settings, color "temperature," white balance, and so onand then saves the resulting processed image as a compressed JPEG file on your memory card. Figure 4-6. When the Import Photos dialog box appears, navigate to and select any graphics files you want to bring into iPhoto. You can -click individual graphics to select more than one simultaneously, as shown here. You can also click one, then Shift-click another one, to highlight both files and everything in the list in between. 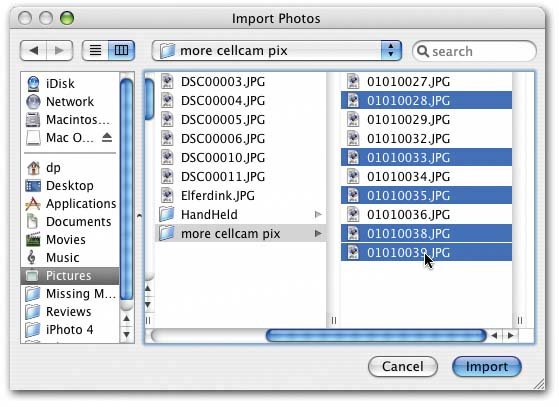
For millions of people, the resulting picture quality is just fine, even terrific . But all that in-camera processing drives professional shutterbugs nuts. They'd much rather preserve every last iota of original picture information, no matter how huge the resulting file on the memory cardand then process the file by hand once it's been safely transferred to the Mac, using a program like Photoshop. That's the idea behind the RAW file format, which is an option in many pricier digital cameras. (RAW stands for nothing in particular, and it's usually written in all capital letters like that just to denote how imposing and important serious photographers think it is.) A RAW image isn't processed at all; it's a complete record of all the data passed along by the camera's sensors. As a result, each RAW photo takes up much more space on your memory card. For example, on a 6-megapixel camera, a JPEG photo is around 2 MB, but over 8 MB when saved as a RAW file. Most cameras take longer to store RAW photos on the card, too. But for image-manipulation nerds, the beauty of RAW files is that once you open them up on the Mac, you can perform astounding acts of editing on them. You can actually change the lighting of the sceneretroactively! And you don't lose a single speck of image quality along the way. Until recently, most people used a program like Photoshop or Photoshop Elements to do this kind of editing. But amazingly enough, humble , cheap little iPhoto 6 can now edit RAW files, too. For details on editing RAW images, see Chapter 6.
Note: Not every camera offers an option to save your files in RAW format. And among those that do, not all are iPhoto compatible. Apple maintains a partial list of compatible cameras at http://www.apple.com/macosx/upgrade/cameras.html. (Why are only some cameras compatible? Because RAW is a concept, not a file format. Each camera company stores its photo data in a different way, so in fact, there are dozens of different file formats in the RAW world. Programs like iPhoto must be upgraded periodically to accommodate new camera models' emerging flavors of RAW.)
4.2.7.2. Movies In addition to still photos, most consumer digital cameras these days can also capture cute little digital movies. Some are jittery, silent affairs the size of a Wheat Thin; others are full-blown, 30- frames -per-second, fill-your-screen movies (that eat up a memory card plenty fast). Either way, iPhoto can now import and organize them. The program recognizes .mov files, .avi files, and many other movie formats. In fact, it can import any format that QuickTime itself recognizes, which is a very long list indeed. You don't have to do anything special to import movies, since they get slurped in automatically. To play one of these movies once they're in iPhoto, see Figure 4-7. 4.2.7.3. Other graphics formats Of course, iPhoto also lets you load pictures that have been saved in a number of other file formats, tooincluding a few unusual ones. They include: -
TIFF . Most digital cameras capture photos in a graphics-file format called JPEG. Some cameras, though, offer you the chance to leave your photos uncompressed on the camera, in what's called TIFF format. These files are hugein fact, you'll be lucky if you can fit one TIFF file on the memory card that came with the camera. Fortunately, they retain 100 percent of the picture's original quality. Note, however, that the instant you edit a TIFF-format photo (Chapter 6), iPhoto converts it into JPEG. That's fine if you plan to order prints or a photo book (Chapter 10) from iPhoto, since JPEG files are required for those purposes. But if you took that once-in-a-lifetime, priceless shot as a TIFF file, don't do any editing in iPhotodon't even rotate itif you hope to maintain its perfect, pristine quality. -
GIF is the most common format used for non-photographic images on Web pages. The borders, backgrounds, and logos you typically encounter on Web sites are usually GIF filesas well as 98 percent of those blinking, flashing banner ads that drive you insane. -
PNG and FlashPix are also used in Web design, though not nearly as often as JPEG and GIF. They often display more complex graphic elements. Figure 4-7. The first frame of each video clip shows up as though it's a photo in your library; only a little camera icon and the total running time let you know that it's a movie and not a photo. iPhoto is no iMovie, though; it can't even play these video clips. If you double-click one, it actually opens up in QuickTime Player, a different program on your Mac that's dedicated to playing digital movies.
See Chapter 11 for details on editing these movies, either in iMovie or in QuickTime Player Pro. 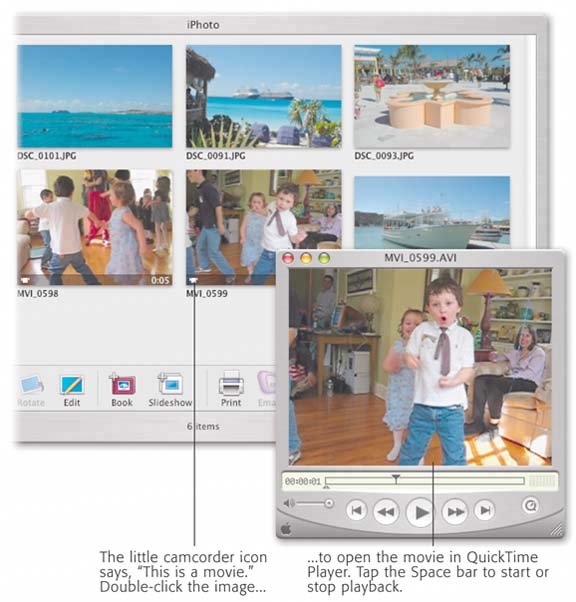 -
BMP is a popular graphics file format in Windows. -
PICT was the original graphics file format of the Macintosh prior to Mac OS X. When you take a screenshot in Mac OS 9, paste a picture from the Clipboard, or copy an image from the Scrapbook, you're using a PICT file. -
Photoshop refers to Adobe Photoshop, the world's most popular image-editing and photo-retouching program. iPhoto can even recognize and import layered Photoshop filesthose in which different image adjustments or graphic elements are stored in sandwiched-together layers . -
MacPaint is the ancient file format of Apple's very first graphics program from the mid-1980s. No, you probably won't be working with any MacPaint files in iPhoto, but isn't it nice to know that if one of these old, black-and-white, 8 x 10 pictures, generated on a vintage Mac SE, happens to slip through a wormhole in the fabric of time and land on your desk, you'll be ready? -
SGI and Targa are specialized graphics formats used on high-end Silicon Graphics workstations and Truevision video-editing systems. -
PDF files are Portable Document Format files that open up in Preview or Acrobat Reader. They can be user manuals, brochures , or Read Me files that you downloaded or received on a CD. Apple doesn't publicize the fact that iPhoto can import PDF files, maybe because iPhoto displays only the first page of multipage documents. (Most of the PDFs you come across probably aren't photos; they're usually multipage documents filled with both text and graphics.) If you try to import a file that iPhoto doesn't understand, you see the message shown in Figure 4-8. GEM IN THE ROUGH
iPhoto Becomes iSound | | OK, so iPhoto now imports and manages still photos, and it imports and manages digital movies. It's only logical, then, that you should also be able to use iPhoto to manage your digital sound files. After all, what's a movie but a sound file plus a video file? Weirdly, though, iPhoto doesn't recognize these sound files if you try to import them. Apple would probably argue that that's what iTunes is for. Still, there are times when it's far more logical to store them in iPhoto. Consider, for example, the voice annotations that you can record using most digital cameras nowadays. These are sound recordings that you can associate with particular photos as reminder notes. Fortunately, there's a workaround that lets you store these voice notes right in iPhotoif, that is, you're willing to putter around in QuickTime Player Pro (Chapter 11). To pull this off, start in iPhoto. Locate the photo to which the sound annotation was supposed to be attached, and export it to your desktop (see Section 13.3.1). Choose JPEG format, 640 x 480 resolution. Drag the exported JPEG graphic onto the icon of QuickTime Player. When the photo appears, choose Edit Select All, and then Edit Copy. Now open the sound file in QuickTime Player, too. (You'll first have to copy it from the camera's memory card, of course, either by dragging in the Finder or by using Image Capture, described in Section A.1.1.8.) It appears as just a scroll bar, with no picture. Choose Edit Add Scaled. QuickTime Player responds by creating a video track for the sound file (using the photo as the "video). Presto! You turned a sound file that iPhoto doesn't recognize into a video file that iPhoto does recognize! Choose File Export to save the resulting "movie onto the desktop, and then import it into iPhoto as described in this chapter. Now, when you see the photo, you can double-click it to open it in QuickTime Player, where you'll see the photo and hear the dulcet tones of your own masterful voice recording as it plays back. Ingenious workaround or time-wasting kludge ? You be the judge. |
|