11.2. Burning CDs and DVDs If your Mac can burn CDs or DVDs, you've got yourself the world's most convenient backup system. It's just like having a floppy disk drive ”except that a blank CD holds at least 450 times as many files, and a blank DVD holds about 3,250 times as many! You can buy blank CDs very inexpensively in bulk ”$20 for 100 discs, for example ”via the Web. (To find the best prices, visit www.shopper.com or www.buy.com and search for blank CD-R .) Blank DVDs are more expensive ”about $30 for 50 (at www.cdrdv-drmedia.com, for example) ”but that's not ridiculous, considering their capacity. UP TO SPEED
Mac OS Extended Formatting | | Whether you use Disk Utility to erase a disk (or when you first install Mac OS X and elect to erase the hard drive in the process), you'll be confronted with a choice between formatting options called Mac OS Extended and UNIX File System (UFS). (Depending on the kind of disk, you may also see an option to create a DOS-formatted disk for use in Windows machines.) Mac OS Extended or Mac OS Extended (Journaled) refers to the HFS Plus filing system, a disk format that has been proudly maximizing disk space for Mac fans since Mac OS 8.1. (For a definition of journaling, see Section A.4.) Mac OS X still accepts disks that were prepared using the older, Mac OS Standard formatting ”the ancient HFS (hierarchical filing system) format ”but you can't use one as your startup disk, and any file names longer than 31 characters will appear chopped-off. As for the UNIX File System option, it's exclusively for use on computers that run Unix (the pure variety, not the dressed-up version that is Mac OS X). |
Burning a CD or DVD is great for backing stuff up, transferring stuff to another computer, mailing to somebody, or offloading (archiving) older files to free up hard drive space. You can burn a disc in either of two ways, with the blank disc inserted or without. Both of them are new in Tiger. Read on. 11.2.1. Burn Folders: Without the Disc One of the least heralded ”but most useful ”new Tiger features is the invention of the burn folder . It's a special folder that you fill up by dragging file and folder icons to it. Then, when you're ready to burn, you just insert the blank disc and go. The burn-folder concept has a lot going for it: -
No wasted hard drive space . Using the old system of burning discs, you inserted the blank and then dragged files and folders onto its icon. The Mac duplicated each item, parking it in an invisible, temporary holding area until you were ready to burn. Trouble is, you were therefore doubling the disk-space requirement of the files you intended to burn. If you were burning a DVD to get older files off your hard drive because you were running low on space, you found yourself with a Catch-22. You couldn't free up drive space without burning a DVD first ”but you didn't have enough drive space to burn a DVD! If you use a burn folder instead, the Mac just sets aside aliases of the files and folders you want to burn. Aliases take up negligible hard drive space. When you finally burn the disc, the designated material is copied directly onto the CD or DVD. -
Easy reuse . You can keep a burn folder on your desktop, prestocked with the folders you like to back up. Each time you burn a disc, you get the latest version of those folders' contents, and you're saved the effort of having to gather them each time. -
Prepare ahead of time . You can get a CD or DVD ready to burn without having a blank disc on hand. Here's how you use burn folders: -
Create a burn folder . To make a burn folder appear on your desktop, choose File  New Burn Folder. To create one in any other window, Control-click a blank spot inside that window and, from the shortcut menu, choose New Burn Folder. New Burn Folder. To create one in any other window, Control-click a blank spot inside that window and, from the shortcut menu, choose New Burn Folder. Either way, a new folder appears, bearing the universal Mac radioactive "burn" symbol (Figure 11-3). -
Rename it . Its name is highlighted, so you can just start typing to rename it. Press Enter when you're finished. -
Load up the folder by dragging files and folders onto it . If you double-click the burn folder to open its window (Figure 11-3), you'll notice that you're not actually copying huge files. You're simply making a list of aliases (Section 2.5.1).
Tip: To check how many megabytes' worth of stuff you've added so far ”so you don't overflow your CD or DVD ”click the Burn button in the upper-right corner of the burn folder's window. The resulting message, shown at bottom in Figure 11-3, tells you the current total. (Hit the Enter key, or click Cancel, to close the dialog box.)
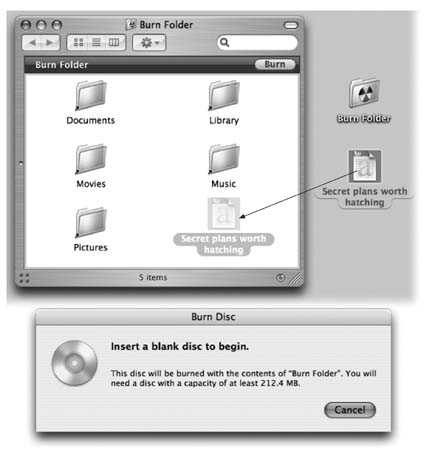 | Figure 11-3. Top: A burn folder looks like any ordinary folder ”except that it has that radioactive logo on it. You can drag files and folders right into its window; Tiger displays only aliases for now, but when you burn the disc, the actual files and folders will be there.
Bottom: If you open the burn folder, you find an unusual strip across the top. Its most important feature is the Burn button at the right. | | -
Decorate the window, if you like . You can choose list view or icon view; you can drag the icons into an arrangement that you like; you can change the background color of the window; and so on. Onenice feature of the Mac (which is not available on The Other OS) is that the look of a window is preserved when you burn it to CD. -
Click the Burn button in the upper-right corner of the window, or choose File Burn Disc . The message shown at bottom in Figure 11-3 appears. -
Insert a blank disc . If you have a slot-loading Mac, slip the disc into the slot. If your Mac has a sliding CD/DVD tray instead, open it first by pressing the button on the tray, or pressing your  Key for about one second. Key for about one second.
Tip: Once you've inserted a CD or DVD into your tray, you can close it either by pushing gently on the tray or ”if your keyboard has a key ”by pressing the key again.
One last confirmation box appears, where you can name the disc and choose a burning speed for it. -
Click Burn (or press Enter) . The Mac's laser proceeds to record the CD or DVD, which can take some time. Feel free to switch into another program and continue using your Mac. When it's all over, you have a freshly minted CD or DVD, whose files and folders you can open on any Mac or Windows PC. 11.2.2. Burn Folders: With a Blank Disc On Hand If you have a blank disc ready to go, burn folders are even simpler to use. In fact, you may not even be aware that you're using them. The whole operation requires fewer steps ”yet it still doesn't require the Mac to duplicate all the files you plan to burn. Start by inserting a blank disc. After a moment, the Mac displays a dialog box asking, in effect, what you want to do with this blank disc (unless you've fiddled with your preference settings). See Figure 11-4 for instructions. If you choose Open Finder, you'll see the disc's icon appear on the desktop after a moment; its icon also appears in the bottom half of the Sidebar, complete with a round Burn symbol that looks like a radioactivity logo. At this point, you can begin dragging files and folders onto the disc's icon, or (if you double-click the icon) into its window. You can add, remove, reorganize, and rename the files on it just as you would in any standard Finder window. You can also rename the CD or DVD itself just as you would a file or folder (Section 2.1.3.
Tip: The status bar at the bottom of the window gives you a running tally of the disk space you've filled up so far. (It may say, for example, "223.2 MB of 702.8 used on disc.") At last, you have an effortless way to exploit the blank disc's capacity with precision.
When the disk contains the files and folders you want to immortalize, do one of these things: -
Choose File Burn Disc. -
Click the Burn button next to the disc's name in the Sidebar. -
Drag the disc's icon toward the Trash icon in the Dock. As soon as you begin to drag, the Trash icon turns into that yellow fallout-shelter logo. Drop the disc's icon onto it. -
Control-click the disc's icon in the Dock and choose Burn Disc from the shortcut menu (shown in Figure 11-4). 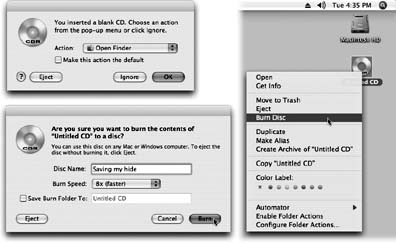 | Figure 11-4. Top left: Choose Open Finder if you plan to copy regular Mac files onto the CD, or Open iTunes if you plan to burn a music CD using iTunes. Click OK.
Right: Drag the disc onto the Burn icon in the Dock, or Control-click it and choose Burn Disc.
Lower left: Confirm your choice in this box. | |
In any case, the dialog box shown at bottom left in Figure 11-4 now appears. Click Burn. When the recording process is over, you'll have yourself a DVD or CD that works in any other Mac or PC. Here are a few final notes on burning CDs and DVDs at the desktop: -
Not sure what kinds of disks your Mac can burn? Open System Profiler (in your Applications Utilities folder). Expand the Hardware triangle, and click the Disc Burning category. There it is, plain as day: a list of the formats your machine can read and write (that is, burn). If you have a SuperDrive, for example, youll see something like: "CD-Write: -R, -RW. DVD-Write: -R, -RW, +R, +RW." -
In the Finder, you can only record an entire CD at once; you can't add any more files after the first burn. There is a trick, however, that lets you add more to a previously recorded CD-R or CD-RW if you use Disk Utility instead (technically, you create a multisession disc). See the box on the facing page. -
If you do a lot of disc burning, a full-fledged CD-burning program like Toast Titanium (www. roxio .com) adds myriad additional formatting options that let you make startup CDs, video CDs, and so on. GEM IN THE ROUGH
How to Burn a Multisession CD in Mac OS X | | Most people think that you need a program like Roxio Toast to record a CD-R disc more than once in Mac OS X. In fact, though, you can use humble old Disk Utility, right there in your Applications Utilities folder, to burn a single CD as many times as you like. Thats right ”regular, cheapie CD-R discs, not CD-RW (rewriteable). What you'll create here is a multisession disc. Each time you burn more material onto it, you create a new disc icon that will appear separately when you insert the CD. Shown here at top, for example, is a disc that's been burned twice. A folder called Photo Rabbit was burned to the CD first. Then, a week later, a folder called "Flower pix" was burned onto the same disc, creating a second session (disc icon). To pull off this stunt , prepare the material you intend to burn the first time. For example, put it all into a folder on your desktop. Now open Disk Utility. Choose Images New Disk Image from Folder. When prompted, navigate to, and select, the folder you want to burn, and then click Image. Type a name for the disk image you're creating. Specify a location (like the Desktop) and then click Save. In this example, suppose it's called PhotoRabbit CD.dmg. When you're ready to burn, open Disk Utility. Click the Burn icon on the toolbar. Navigate to, and click once, the disk image (PhotoRabbit CD.dmg). Then click Burn. In the resulting Burn Disc dialog box, click the blue triangle button at the upper-right. The dialog box expands, as shown here. Turn on "Leave disc appendable." Click Burn to record the material onto the CD. When it comes time to add new material to that disc, repeat all of these steps so far. This time, in the dialog box shown above, you'll see that instead of Burn, the lower-right button now says Append. That's your clue that Disk Utility understands what it's about to do: add information to an existing CD, resulting in a second disk icon on the desktop containing only the new material. You've just created a multisession disc! You can repeat the process over and over again, adding more and more material to a disc ”or at least until it's just about full. 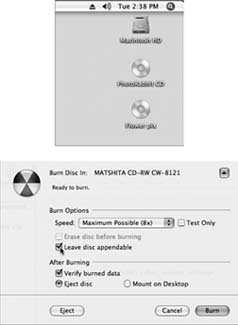 |
-
When you insert a CD- RW disc that you've previously recorded, the box shown at top left in Figure 11-4 doesn't appear. Instead, the disc's icon simply appears on the desktop as though it's an ordinary CD. Before you can copy new files onto it, you must erase it using Disk Utility as described in the previous section. -
The CDs that your Mac burns work equally well on Macs and Windows (or Linux) PCs. If you plan to insert a CD into a PC, however, remember that Windows doesn't permit certain symbols in a Windows file name (\ / : * ? " < > ). You'll run into trouble if any of your file names contain these symbols. In fact, you won't be able to open any folders on your CD that contain illegally named files. |