11.2. Burning CDs and DVDs
| < Day Day Up > |
11.1. How the Mac Does DisksApple shocked the world when, in 1997, it introduced the iMac without a floppy disk driveand proceeded to eliminate the floppy drive from all subsequent Mac models in the following years . Apple argued that the floppy disk was dead: It was too small to serve as a backup disk, and, in the Internet age, it was a redundant method of exchanging files with other computers. These days, even Windows PC manufacturers seem to agree the floppy drive is gradually vanishing as standard equipment. So, for that matter, is the Zip disk, the SuperDisk (a high-capacity floppy), and Iomega Peerless drives (a hard drive cartridge system). 11.1.1. Disks TodaySo what's springing up to take the floppy's place? Let us count the disks: 11.1.1.1. Hard drives and the iPodThanks to the Mac's FireWire or USB jacks , it's easier than ever to attach an external hard drive for extra storage. It would be hard to imagine a more convenient second hard drive than, for example, Apple's iPod, which is not only an outstanding MP3 music player but also doubles as a self- powered , extremely compact, bootable hard drive. 11.1.1.2. CDsYou wouldn't get far in today's computer world without a CD-ROM drive. Most commercial software comes on CDnot to mention the music CDs that the Mac can play so expertly (see Section 11.3.1). CD-ROM stands for "compact disc, read-only memory"in other words, you can't freely add and delete files from one, as you can from a hard drive. Yet most Mac models today don't just play CDs; they can also record them, thanks to a built-in CD burner . A CD burner can record onto either of two kinds of blank discs:
11.1.1.3. DVDsAll current Mac models include a built-in DVD drive. You use it primarily for playing back DVD movies that you've rented or bought, but you may also occasionally use it for data DVDsthat is, DVDs that contain Mac files or software installers . However, the latestand definitely the greatestkind of drive is what Apple calls the SuperDrive: a drive, actually made by a company like Pioneer or Sony, that can play and record DVDs (and CDs, too). If your Mac came with a SuperDrive, you can use blank DVDs as massive backup disks that hold 4.7 GB each. If you've used iMovie to edit your home camcorder footage, you can also save them onto one of these DVDs for playback in standard home DVD playersthe perfect way to distribute your masterpiece to friends and family without the drastic sacrifice of video quality that would result in saving the movie onto a VHS tape. The first generations of SuperDrive could record only onto so-called DVD-R and DVD-RW blank discs (note the hyphen). The latest SuperDrives, found in, for example, the Power Mac G5, can also record your files onto DVD+R and DVD+RW discs, a confusingly similar format that doesn't work in the original SuperDrives. Note: The latest Mac models can also record on dual-layer DVDs, which hold twice as much data (about 8.5 gigabytes) as a regular DVD. (A dual-layer disc still records on only one side, but at two different microscopic levels.) But iDVD 5 can burn them only if your burner is a specific model (the Pioneer A109), and the Finder can't burn them at all. And the blank discs are about $8 each, which doesn't make them especially cost-effective . 11.1.1.4. Flash drivesThe most recent invention is among the most convenient: tiny, keychain- sized flash drives or thumb drives , which plug directly into your USB jack and serve as low-capacity hard drives with no moving parts . Inside, they contain nothing but RAMpure memory. Flash drives are fantastic, inexpensive gadgets that typically hold between 128 megabytes and 2 gigabytes. They work on any Mac or Windows PC, and don't require any drivers or special software installation. Ask for one for your birthday.
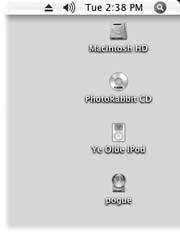
11.1.2. Disks In, Disks OutWhen you insert a disk, its icon shows up in three places (unless you've changed your Finder preferences): on the right side of the screen, in the Computer window, and in the Sidebar (Section 1.2.1). To see what's on a disk you've inserted, double-click its icon. Note: You can make the Mac work like Windows, if you choose. For example, to open a single window containing icons of all currently inserted disks, choose Go  Computer (which produces the rough equivalent of the My Computer window).To complete the illusion that youre running Windows, you can even tell Mac OS X not to put disk icons on the desktop at all. Just choose Finder Preferences, click General, and turn off the three top checkboxes"Hard disks," "CDs, DVDs, and iPods," and "Connected servers." Theyll no longer appear on the desktoponly in your Computer window. (You can stop them from appearing in the Sidebar, too, by clicking the Sidebar button in the Finder preferences and turning off the same checkboxes.) Computer (which produces the rough equivalent of the My Computer window).To complete the illusion that youre running Windows, you can even tell Mac OS X not to put disk icons on the desktop at all. Just choose Finder Preferences, click General, and turn off the three top checkboxes"Hard disks," "CDs, DVDs, and iPods," and "Connected servers." Theyll no longer appear on the desktoponly in your Computer window. (You can stop them from appearing in the Sidebar, too, by clicking the Sidebar button in the Finder preferences and turning off the same checkboxes.) To remove a disk from your Mac, use one of these methods :
Tip: Any of these techniques also work to get network disks and disk images off your screen. 11.1.3. Startup DisksWhen you turn the Mac on, it hunts for a startup disk that is, a disk containing a System folder. If you've ever seen the dispiriting blinking folder icon on a Mac's screen, you know what happens when the Mac can't find a startup disk. It blinks like that forever, or until you find and insert a disk with a viable System folder on it.
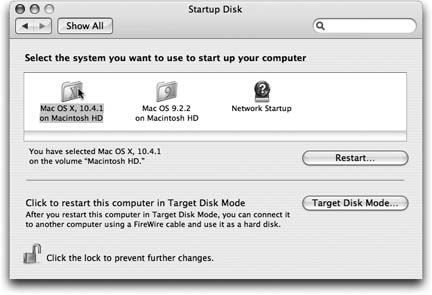
11.1.3.1. Creating a startup diskBy installing the Mac OS onto a diskbe it a hard drive or blank CD or DVDyou can create a startup disk. Not all disks are capable of starting up the Mac, however (older external FireWire disks aren't, for example), and not all older Macs can start up from external FireWire drives. 11.1.3.2. Selecting a startup diskIt's perfectly possible to have more than one startup disk simultaneously attached to your Mac. That's the deal, for example, whenever you've inserted the Mac OS X CD into your Mac: Each contains a System folder, and each is a startup disk. Some veteran Mac fans deliberately create other startup disksusing DVDs, for exampleso that they can easily start the Mac up from a backup disk, or from a different version of the OS. Only one System folder can be operational at a time. So how does the Mac know which to use as its startup disk? You make your selection in the Startup Disk pane of System Preferences (Figure 11-2). Tip: If you're in a hurry to start the machine up from a different disk, just click the disk icon and then click Restart in the System Preferences window. You don't have to close the System Preferences window first.
11.1.4. Erasing a Disk Mac OS X doesn't have an Erase Disk command at the desktop. When you want to erase a disk (such as a CD-RW disc), the only tool Apple gives you is Disk Utility, which sits in your Applications Once you've opened Disk Utility, click the name of the disk (in the left-side list), click the Erase tab, and then click the Erase button. You won't be able to do so, though, if:
|
| < Day Day Up > |
EAN: 2147483647
Pages: 506