Working with Shared Documents
Document sharing is simple with Windows SharePoint Services and can be done in one of two ways. If you have an existing Microsoft Office system document, it is an easy process to add the document to a document library in Windows SharePoint Services. If you don’t already have a document created, you can create the document directly in the Windows SharePoint Services site. When you create a document in the Windows SharePoint Services site, the appropriate application opens automatically. When the document is saved, it is placed in the site automatically. In addition to creating and adding documents to the Windows SharePoint Services site, you can do a number of things with existing documents in Windows SharePoint Services: You can edit or remove existing documents, and you can use features such as document version history, checkout, and check-in to control versions.
Uploading a Document
To upload a document to a document library, follow these steps:
-
Locate and open the document library by clicking the library name (such as Shared Documents) on the Home page. Usually the library names appear under the Documents item on the Quick Launch bar.
-
In the document library, click the down arrow next to the Upload button. Click Upload Document to upload a single file, or click Upload Multiple Documents to upload several files at once.
-
On the Upload Document page, shown in Figure 25–4, click Browse, locate the file to upload, and then click Open. You can also click Upload Multiple Files to open a Microsoft Windows Explorer-style browser from which you can select multiple files to upload.
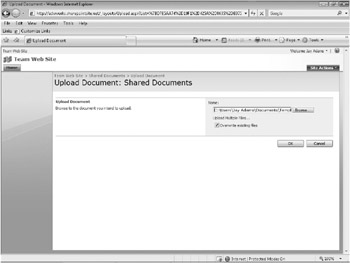
Figure 25–4: The Upload Document page is used to upload files to the document library. -
Existing files with the same name as the file or files being uploaded are not overwritten by default. If you want to overwrite any existing files, click the Overwrite Existing Files check box.
-
After you have specified or selected the files to upload, click OK. The documents are uploaded, and the Documents page appears.
You will now see the uploaded file listed in the document library.
Creating a Document from the Site
In addition to the preceding method of uploading an existing document to the document library, you can also create a new document directly from the document library site. The new document is created using the document template associated with the document library. By default, the Microsoft Office Word 2007 document template is associated with the Shared Documents library that is created when Windows SharePoint Services is installed. The Document Template setting is configured when a new document library is created, and you can set it for an existing library by clicking Settings on the document list and then clicking Document Library Settings. Click the Advanced Settings link, modify the Document Template setting, and then click OK.
To create a new document from your SharePoint site, follow these steps:
-
Open the document library in which you want to create the new document.
-
Click New, and then choose New Document, shown in Figure 25–5.
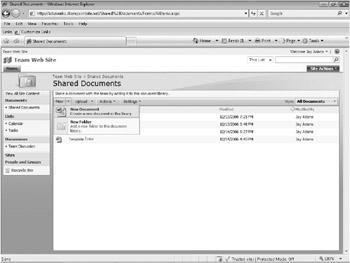
Figure 25–5: Click the New Document item on the New menu to create a new document from the SharePoint site.The Microsoft Office system application associated with the document template specified for the selected document library is downloaded and opened in its native application, such as Microsoft Office Word 2007. Figure 25–5 shows how the SharePoint site communicates with Office Word 2007 to open up the default document template. Create and then save the new document to the document library.
Your newly created document will now be shown in the document library.
Working with Existing Documents and Version Control
Document options for each item in a document library are found in the item’s dropdown menu. Position the mouse pointer over a document name, and a drop-down arrow appears. When you click the arrow, the Item drop-down menu appears. This menu was shown earlier in Figure 25–1. From this menu, you can edit the document (clicking the document name also has this effect); edit the document properties, which include the name and a descriptive title for the document; and delete the document from the library.
The key features in a shared document library are the version control features. In Windows SharePoint Services, these features include the ability to check a document in and out as well as view its version history. When you check out a document, other users can no longer edit the document until you return it to the document library by checking it in.
To check out a document, simply choose Check Out on the Item drop-down menu, as shown in Figure 25–6. Click OK when warned that you are about to check out the document. The icon in the Type column changes to display a green arrow to indicate that the document is checked out. After you specify that you want to check out the document, click the Item drop-down arrow again and click Edit In Microsoft Office Word (or whichever application name appears). The document is downloaded to your computer and displayed in the application for editing. Perform your edits. Click the Microsoft Office Button and then Save to have Word 2007 save the document to the SharePoint site.
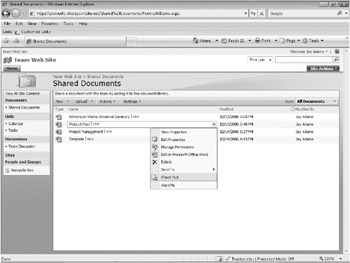
Figure 25–6: Use this drop-down list to check out documents from your SharePoint site.
| Inside Out-Force the Check-In of a Document | A user in the Administrator site group can force the checking in of a document even if another user has it checked out. This can be useful if a user checks out a document and forgets to check it back in and then leaves for the day, for example. An administrator can forcibly check the document back in so that other users can work with it. Changes made while the document was checked out might be lost in this case. |
When you have finished editing, you can close the document on your system and then return to the SharePoint site and check in the document. Checking a document back in to the document library is handled from the same drop-down menu as checking out. Click the Item drop-down arrow, and then click Check In. The Check In page shown in Figure 25–7 is displayed. Enter any comments for the version history, and then click OK. A message box appears, asking whether you want to continue. Click Yes. The document is then checked in.
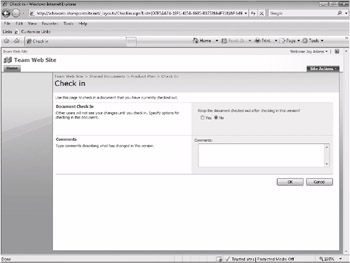
Figure 25–7: The Check In page is used to check in a document.
In the document library, choose Version History on the Item drop-down menu for a document. If version history is enabled for the document library, every time a document is checked in, it will appear in the version history, as shown in Figure 25–8. You can view each version of the document by hovering the mouse pointer over the date and time for a version and then clicking View. You also can restore a document by clicking the Restore option on this drop-down menu. You can delete old versions by clicking Delete Minor Versions.
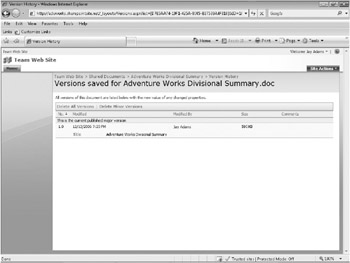
Figure 25–8: The Versions Saved page shows the document’s version history and can be used to restore old versions of the document.
| Inside Out-Enable Version History | Version history can be enabled from the Versions Saved page by clicking Site Actions and then clicking Site Settings on the right side of the screen. Under Site Administration, click Site Libraries And Lists, click Customize “Shared Documents,” and then click Versioning Settings. Specify the level of version history to retain in the Document Version History area, and then click OK when you have finished. |
EAN: 2147483647
Pages: 299