| Recall that any security system serves two functions: authentication and authorization. Authentication, which you just examined, is the process of identifying a user based on his credentials. The purpose of authorization is to determine which resources an authenticated user can access. Authorization in ASP.NET works in two ways. It can rely on Windows to tell it which resources an authenticated user has access to, which is known as file authorization. Or it can rely on the URL of the requested resource, which is known as URL authorization. It's easy to set up both methods. Before you examine how file authorization works, let's take a quick look at how the operating system handles security. Open Windows explorer, right-click on a file or folder (for example, c:\winnt), and select Properties. Next, select the Security tab. You should see something similar to Figure 21.10. Figure 21.10. Operating system security options.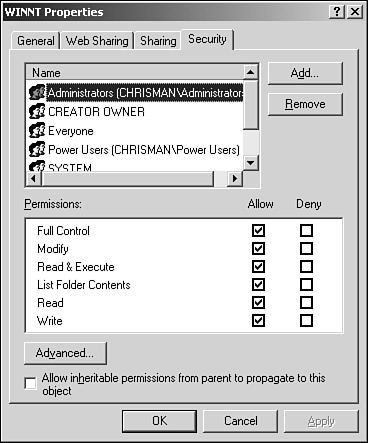
 | Assuming you're running Windows NT, 2000, or XP and your hard drive is formatted with NTFS (see your operating system help documentation for more information), Windows can set security options for every single file and folder on your computer. These options include allowing users to read or write files, execute applications, and view contents of folders, as shown in the Permissions window in Figure 21.10. These file and folder permissions are stored in Access Control Lists (ACLs) on the Windows operating system. It's easy to modify these lists by checking and unchecking boxes for each user on the Security tab. |
With file authorization, ASP.NET interacts with Windows to correlate user identities with the ACLs. When an authenticated user tries to access a file on your Web server, Windows checks the ACL to determine if that role or identity is allowed to view that file. This all happens automatically and invisibly, and it's an easy way to implement security. File authorization works with impersonation to determine ACL permissions. (See "Impersonation" later today for more information.) However, sometimes ACLs can be a chore to manage. If you have a Web site with 50 different directories, each with several files, setting the ACLs can be a huge headache. Thus, ASP.NET also allows URL authorization, which maps user identities to the directories specified in the requested URLs. (You've already used URL authentication in the bonus projects, so it should look familiar.) To enable URL authorization, you have to set a few properties in the web.config file. Let's look at the syntax of the authorization tag: <authorization> <allow users="comma-separated list of users" roles="comma-separated list of roles" /> <deny users="comma-separated list of users" roles="comma-separated list of roles" /> </authorization> The allow and deny attributes specify lists of identities that should be allowed or denied access to resources. If you place the following web.config file in the root of your directory, and assuming no other web.config files override these settings, the user clpayne will have access to all resources and john won't: <authorization> <allow users="clpayne" /> <deny users="john" /> </authorization> These tags can specify authorization for both user identities and roles. Thus, you can deny a whole group of users simply by specifying the role that they belong to. Note Note that permissions specified with the allow and deny tags apply to the directory containing the corresponding web.config and those below it. In other words, it follows the hierarchical configuration system like the rest of the web.config file.
There are two special identities in ASP.NET that allow further grouping of users. A question mark in the users attribute signifies anonymous users those that haven't been authenticated otherwise. An asterisk indicates all users, regardless of their authentication status. For example, a resource that's restricted to valid users could use the following to deny anyone who isn't authenticated: <authorization> <deny users="?" /> </authorization> On the other hand, the following code snippet could be used to allow anyone into a certain directory: <authorization> <allow users="*" /> </authorization> This is the default behavior of ASP.NET when no other authentication or authorization methods are specified. In addition to specifying users and roles, ASP.NET allows you to specify authorization information based on how those users access resources. The verb attribute specifies the HTTP action that can be taken to access a resource: either GET or POST. For example, the following snippet allows all users to get pages, but only clpayne can post: <authorization> <allow verb="GET" users="*" /> <allow verb="POST" users="clpayne" /> <deny verb="POST" users="?" /> </authorization> Why would you ever need to implement this scenario? Imagine you've built a very useful piece of functionality in ASP.NET, such as a mortgage calculator. You want to allow anyone to view the calculator and interact with it in basic ways, but you only want to allow registered users to use the calculator because it requires posting data to the server. In essence, all users are allowed a "sneak peek" at the functionality, which should entice them to register at your site and gain full access to your calculator. Although this hierarchical configuration system is very handy, it doesn't provide much fine-grained control. For example, the settings in web.config will apply to the directory this file resides in as well as any subdirectories. If you want to override the security settings, you need to build new web.config files in each directory that requires it. This is a lot like the headaches you experienced with ACLs. The web.config file allows you to control the resources that users are authorized to access through the location tag, with more granularity. This tag can be implemented in any web.config file, and it specifies which resources are restricted according to the directory structure of the site. For example, you can use the web.config file described in Listing 21.3 in the root directory, and it will control authorization for several directories below it. See Listing 21.4. Listing 21.4 Controlling Authorization for Several Directories from One web.config File 1: <configuration> 2: <location path="day21/account.aspx"> 3: <system.web> 4: <authorization> 5: <deny users="?"/> 6: </authorization> 7: </system.web> 8: </location> 9: <location path="day21/subdir2/"> 10: <system.web> 11: <authorization> 12: <deny users="?"/> 13: </authorization> 14: </system.web> 15: </location> 16: </configuration>  | On line 2, you set security information for the day21/account.aspx file. In the authorization tag on line 4, you prevent all anonymous users from accessing this file. On line 9, you set authorization properties for the day21/subdir2 directory, again keeping out all anonymous users. You can specify as many directories as you want here, regardless of their depth in the file hierarchy. |
Notice that the location tags are outside of the authorization tags. A common beginner's mistake is to place them inside the tags. Also note that you need a separate location tag for each directory for which you want to specify authorization information. | 