| Authentication in ASP.NET is implemented through authentication providers modules that contain the code for authenticating requests from Web clients. These providers are controlled through the web.config file, with the authentication tags. The basic syntax is as follows: <configuration> <system.web> <authentication mode="Mode"> </authentication> </system.web> </configuration> Additionally, within the authentication tags, you may specify form and credentials elements. You'll learn about these later today in "Forms Authentication." Caution The authentication tag can be used only at the root web.config file. Attempting to use it in web.config files in any subdirectories will result in an error.
ASP.NET provides three methods, or modes, for authenticating users, each implemented through a separate authentication provider: Windows, Passport, and Forms. Windows authentication is performed with IIS, requiring little or no modification to your pages. Passport and Forms authentication are similar: The latter is implemented on your own server; the former through a subscription service from Microsoft. Each of these methods is detailed in the following sections. Windows Authentication When clients make requests to ASP.NET pages, they first encounter Microsoft's Web server, Internet Information Server (IIS). At this point, IIS can authenticate the user, or hand off the authentication duties to the ASP.NET application. When IIS handles authentication, it can talk directly to the operating system (Windows NT, 2000, or XP) to validate the user's credentials. Figure 21.3 illustrates the IIS Web application architecture. Figure 21.3. The ASP.NET security architecture.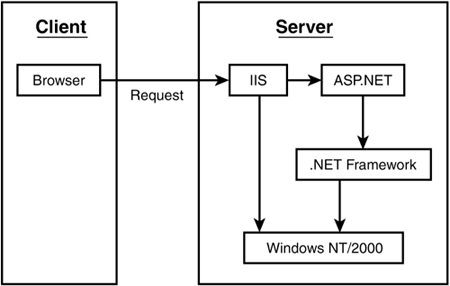
Note Authentication is not required by IIS. IIS can let users into the application without authentication, relying on the ASP.NET pages to provide any authentication. Any users who IIS lets by without valid credentials are known as anonymous users.
The identities that IIS assigns are defined by Windows user accounts, hence the name Windows authentication. These user accounts are similar to the roles you saw in Figure 21.2. The Web clients are restricted to the same permissions that Windows users and roles are restricted to. For example, if a Web client accesses an administrative role, she has permissions to modify the filesystem in any way she chooses, such as deleting and moving files. You enable this method of authentication by using the following line in web.config: <authentication mode="Windows" /> IIS uses three different types of Windows authentication: Basic, Digest, and NTLM (also known as integrated windows authentication). Let's examine each of these methods and how to implement them. Basic authentication is the simplest form of authentication next to no authentication at all. Chances are you've already seen this one used on Web sites. It's an industry-standard way of collecting user credentials, and it's part of the HTTP specification from the World Wide Web Consortium. The process of basic authentication is as follows: The client requests a restricted resource from the server. The Web server responds with "401 Unauthorized". The Web browser receives this message and asks for the user's credentials, usually a username and a password. The Web browser then tries to access the server resources using these credentials. If the credentials fail, the process starts over at step 2. When authentication succeeds, the browser has access to the requested resource(s). Now let's secure something! Open the Internet Services Manager (ISM) by selecting Start, Settings, Control Panel, Administrative Tools, Internet Service Manager. Expand the Default Web site node in the window that pops up. Choose a directory to secure (you'll use /tyaspnet21days/day21 for this example, create it in the c:\inetpub\wwwroot folder if necessary). Right-click the directory and select Properties, as shown in Figure 21.4. Figure 21.4. Accessing directory properties in Internet Services Manager.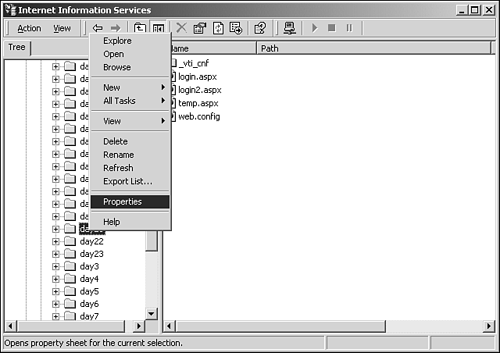
Select Directory browsing on the Directory tab so you know when your authentication is successful. Find the Directory Security tab and edit the Anonymous access and authentication control. You should see the window shown in Figure 21.5. Figure 21.5. Setting authentication properties.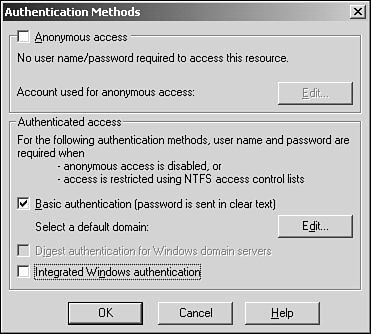
Deselect Anonymous access if it's checked. Anonymous access allows any user to access the directory via the Web site, which you don't want for your application. Check Basic authentication instead (deselect Integrated Windows authentication if it's checked). Click OK twice to get back to the ISM window. Now enter the following URL into your browser: http://localhost/tyaspnet21days/day21 You should see the dialog box in Figure 21.6, which asks for your credentials. Figure 21.6. When basic authentication is enabled, the browser asks for credentials.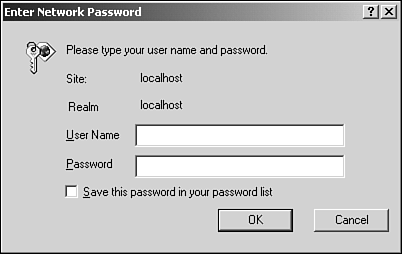
Enter the credentials for an account on your computer (for instance, the username and password you use to log on to your machine). IIS will compare these values to the operating system's list of users, and will authenticate or deny your request. If it's successful, you should see something similar to Figure 21.7. Figure 21.7. Directory browsing when authentication succeeds.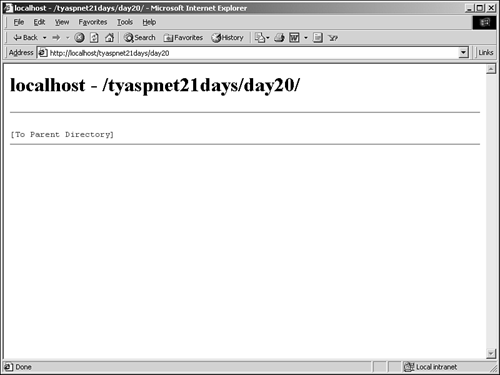
Note If authentication succeeds and you want to try again with another username and password, you'll have to close all windows of your browser and try again. The browser will remember the supplied credentials for as long as it's running, so opening a new browser window while one is still open won't work.
With basic authentication, the username and password you entered in the dialog box in Figure 21.6 is sent across the network to the server as plain text. This is an effective mechanism for authentication, but it's not very secure. A clever hacker can intercept the message before it arrives at the server, and then can use the username and password information to break into your system. Digest authentication works similarly to basic authentication, but the username and password are encrypted first before they're sent across the network. This encryption mechanism, known as hashing, alters the information so it's not possible to decrypt it. It's truly a one-way process: The client requests a restricted resource from the server, and the server sends a request for authentication. The Web server responds with "401 Unauthorized". The Web browser receives this message and asks for the user's credentials. The browser adds some unique information to the supplied data and encrypts it. This unique data ensures that no one will be able to copy the hashing and gain access later. The Web browser sends the encrypted credentials and an additional copy of the unique information, unencrypted, to the server. The server then uses the additional information to encrypt its own copy of the credentials (that is, the credentials stored in the Windows user account information). The server compares the newly encrypted credentials with the values sent by the browser. If the credentials fail that is, the two encrypted versions don't match the process starts over at step 3. When authentication succeeds, the browser gains access to the resources. To enable digest authentication, check Digest authentication for Windows domain servers from the Authentication Methods dialog (shown in Figure 21.5) (note that this option might be disabled if you are not connected to a domain). Make sure Anonymous access is not selected! Finally, with NTLM authentication, the user never sees a prompt for credentials. Instead, once the browser contacts the server, it sends the encrypted username and password information that the user used to log on to your computer. The server evaluates this information to determine if the user should have access. This is all invisible to the user. You can also enable this method from the Authentication Methods dialog shown in Figure 21.5. However, be aware that this method only works when both the server and client machines are using the Windows operating system. Note that if you have more than one method selected, the more restrictive method takes precedence (for instance, Windows authentication overrides anonymous access). Normally, Windows authentication is used when you want an easy-to-implement method that doesn't require any ASP.NET coding. All you have to do is set properties in IIS and you're done. Both digest mode and Windows authentication require that your users are running Internet Explorer, so confirm your target audience for implementing these methods. Additionally, Digest mode works only on a special type of server. See the following article for more information: http://support.microsoft.com/support/kb/articles/q222/0/28.asp Forms Authentication With ASP.NET, you can opt to authenticate not through IIS but through your ASP.NET application via a process known as Forms authentication. This gives you more control over your site's authentication scenarios. For example, you can store your users' credentials in a database or XML file instead of through Windows. With this method, users are directed to a login form on your Web site, where they supply their credentials. If your application accepts the credentials based on the custom scenario you've built, ASP.NET creates an authorization cookie on the browser's computer (see Day 4, "Using ASP.NET Objects with VB.NET and C#," for information on cookies). This cookie contains either the credentials, in some form, or a string that can be used to acquire the credentials. This cookie is then used throughout your application for authorization. The process is as follows: A client requests a secure page from your site. If the request doesn't contain a valid authentication cookie, your Web server redirects the user to the URL specified in the loginURL attribute of the Authentication tag in your web.config file. This URL should contain a login form for the user. Credentials are entered into the form and submitted via a form post. If the credentials are valid (this is determined in several different methods; we'll discuss it in more detail later today), ASP.NET creates an authentication cookie on the client. The user can then be redirected back to the originally requested page. Figure 21.8 illustrates the Forms authentication process. Figure 21.8. The Forms authentication workflow.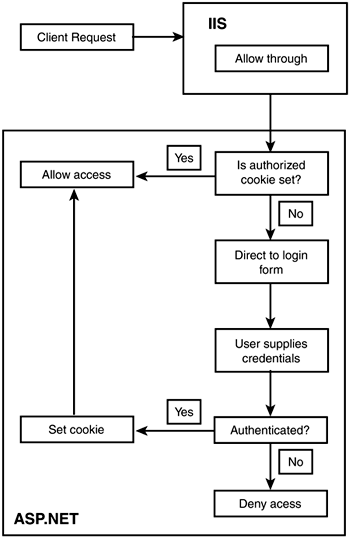
Once the authorization cookie is set, all subsequent requests will be authenticated automatically until the user closes the browser or the session ends. At that point, the user will have to log in again. Or, you can specify that the cookie never expires and the user is always authenticated, as you'll see in a moment. Let's take a look at the necessary settings for Forms authentication in web.config: <configuration> <system.web> <authentication mode="Forms"> <forms name="name" loginUrl="loginForm" /> </authentication> <authorization> <deny users="?" /> </authorization> </system.web> </configuration> The third line specifies that you're using Forms authentication. The fourth line tells ASP.NET the name of the cookie to use for authentication and the URL of the login page. When you turn on Forms authentication, you'll typically want to deny access to non-authorized users (otherwise, why turn authentication on?), so you must also supply the <authorization> element. We'll cover this element more later today. For now, just know that lines 6 8 deny access to anonymous users. Let's look at an example. Enable anonymous access again and disable other forms of IIS authentication in the /tyaspnet21days/day21 folder, as shown in "Windows Authentication" earlier today. Now edit the web.config file in your root directory (c:\inetpub\wwwroot), adding the following code in the location specified in the previous code snippet: <authentication mode="Forms"> <forms name="AuthCookie" loginUrl="/tyaspnet21days/day21/login.aspx" /> </authentication> <authorization> <deny users="?" /> </authorization> When a user is authenticated, a cookie named AuthCookie is created. If this cookie is not present, the user is redirected to /tyaspnet21days/day21/login.aspx, which should contain a form that allows a user to enter his credentials. Next, create a simple login form named login.aspx in the /day21 directory, as shown in Listing 21.1. Listing 21.1 A Simple Login Form 1: <%@ Page Language="VB" %> 2: 3: <script runat="server"> 4: sub Login(Sender as Object, e as EventArgs) 5: if tbUserName.Text = "clpayne" and _ 6: tbPassword.Text = "hello" then 7: FormsAuthentication.SetAuthCookie(tbUserName.Text, false) 8: 9: Response.redirect("account.aspx") 10: else 11: lblMessage.Text = "<font color=red>Sorry, " & _ 12: "invalid username or password!</font><p>" 13: end if 14: end sub 15: </script> 16: 17: <html><body> 18: Please enter your username and password.<p> 19: 20: <form runat="server"> 21: <asp:Label runat="server" /> 22: 23: Username: 24: <asp:Textbox runat="server" /><br> 25: Password: 26: <asp:Textbox TextMode="password" 27: runat="server" /><p> 28: <asp:Button runat="server" 29: OnClick="Login" 30: Text="Submit" /> 31: </form> 32: </body></html>  | This form allows the user to enter her username and password into the text boxes on lines 24 and 26. When the form is submitted, the Login method examines the supplied credentials and determines if the user is valid. This is just a simple authentication test, so on line 5 you hard-code the valid username and password. If the values entered by the user match these hard-coded values, you'll authenticate that user. On line 7, you call the SetAuthCookie method of the FormsAuthentication object, which creates a cookie with the user ID supplied by the first parameter. The second parameter specifies whether or not the cookie should persist after the user closes her browser. Using True here will cause the cookie to be persisted even across browser restarts, meaning that the user won't have to log in again on her next visit to the site. Finally, on line 9, you redirect the user to an account page (make sure this page exists, otherwise you'll receive an error after authentication passes). |
If the supplied credentials are invalid, the else statement on line 10 prints out an error message. Figure 21.9 shows the output after invalid credentials have been entered. Figure 21.9. The output after Forms authentication fails.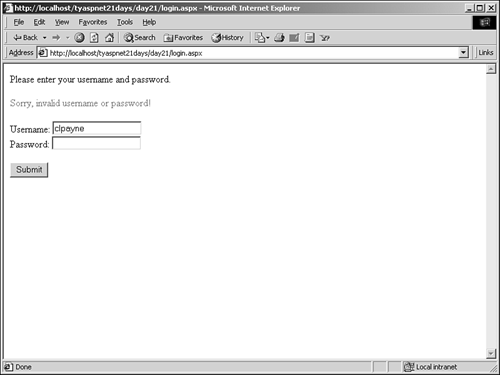
Note You don't have to validate against hard-coded values. In the Login method, you can build any validation mechanism you want, including connecting to and comparing values against a database.
In addition to the forms attribute, you can specify a credentials attribute that provides username and password definitions to be used with authentication. This allows you to validate the user's credentials against web.config, as shown in Listing 21.1, instead of checking them manually. Modify your web.config file to read as follows: <configuration> <system.web> <authentication mode="Forms"> <forms name="AuthCookie" loginUrl="day21/login.aspx" > <credentials passwordFormat="Clear"> <user name="clpayne" password="helloworld" /> </credentials> </forms> </authentication> <authorization> <deny users="?" /> </authorization> </system.web> </configuration> The credentials section contains valid user identities that should be used by ASP.NET when authenticating. The passwordFormat specifies the encryption method that should be used when sending credentials to the server. This attribute can have these values: Clear, which specifies no encryption, or MD5 or SHA1, which are both well-known encryption algorithms. Any of the values will work in most modern Web browsers. Inside the credentials section, you add the user element. It contains two attributes, name and password, which specify valid user credentials. Note that you can have as many user elements here as you want. Listing 21.2 is a login form that uses the credentials section. Listing 21.2 Validating User Credentials Against the credentials web.config Section 1: <%@ Page Language="VB" %> 2: 3: <script runat="server"> 4: sub Login(Sender as Object, e as EventArgs) 5: if FormsAuthentication.Authenticate(tbUserName.Text, _ 6: tbPassword.Text) then 7: FormsAuthentication.SetAuthCookie(tbUserName.Text, false) 8: 9: lblMessage.Text = "<font color=red>Success!</font> <p>" 10: else 11: lblMessage.Text = "<font color=red>Sorry, " & _ 12: "invalid username or password!</font><p>" 13: end if 14: end sub 15: </script> 16: 17: <html><body> 18: Please enter your username and password.<p> 19: 20: <form runat="server"> 21: <asp:Label runat="server" /> 22: 23: Username: 24: <asp:Textbox runat="server" /><br> 25: Password: 26: <asp:Textbox TextMode="password" 27: runat="server" /><p> 28: <asp:Button runat="server" 29: OnClick="Login" 30: Text="Submit" /> 31: </form> 32: </body></html> | Save this listing as login2.aspx. This form is very similar to Listing 21.1. It contains the same UI elements and event handlers. The only major difference is on line 5. Instead of comparing the supplied user credentials against hard-coded values, you call the Authenticate method of the FormsAuthentication object. This method takes two parameters the supplied username and password and validates them against the information contained in the credentials section of web.config. If the supplied credentials match any of the user elements, Authenticate returns true and you can set the authentication cookie, as shown on line 7. Thus, the web.config file provides an easy way to define valid users. |
The FormsAuthentication object, used in Listings 21.1 and 21.2, provides many helper methods used for authenticating users and controlling authentication tickets. You've already seen a few of these methods, such as Authenticate and SetAuthCookie. When a user requests a page that's restricted, ASP.NET automatically sends him to the URL specified in the loginUrl attribute of the forms configuration element. The URL that was originally requested is then stored in the querystring, for use later. So far you've been ignoring this value, but you can use it to redirect users back to the original URL upon successful authentication. The FormsAuthentication.RedirectFromLoginPage method sets the authentication cookie exactly like the SetAuthCookie method, but it also causes a redirect back to the original URL. If there's no original URL in the querystring, this method redirects to default.aspx in the root directory. For example, you could change the Login method of Listing 21.2 to read as follows: 4: sub Login(Sender as Object, e as EventArgs) 5: if FormsAuthentication.Authenticate(tbUserName.Text, _ 6: tbPassword.Text) then 7: FormsAuthentication.RedirectFromLoginPage (tbUserName.Text, false) 8: else 9: lblMessage.Text = "<font color=red>Sorry, " & _ 10: "invalid username or password!</font><p>" 11: end if 12: end sub If you request this listing directly, upon successful authentication ASP.NET will redirect you to default.aspx. So, be sure that you have one available! This method is useful for sending the users back where they came from, but it doesn't allow you to perform any functionality after setting the authentication cookie. If you simply want to set the authentication cookie and retrieve the original URL from the querystring without redirecting, you can use the GetRedirectURL method: dim strURL as string = FormsAuthentication.GetRedirectURL ("username", false) Another helpful method of the FormsAuthentication object is the GetAuthCookie method. This method creates an HttpCookie object with the authentication information. (For more information on the HttpCookie object, refer back to Day 4.) It doesn't set the cookie on the user's computer, however. This method allows you to perform additional functionality after the authentication cookie is created, but before the cookie is set. For example, you could add additional information to the authentication cookie. Just remember to set the cookie when you're finished, or the user won't be authenticated! Listing 21.3 shows an example. Listing 21.3 Using GetAuthCookie to Enhance Your Authentication Cookie 1: <%@ Page Language="VB" %> 2: 3: <script runat="server"> 4: sub Login(Sender as Object, e as EventArgs) 5: if FormsAuthentication.Authenticate(tbUserName.Text, _ 6: tbPassword.Text) then 7: 8: dim cookie as HttpCookie 9: 10: cookie = FormsAuthentication.GetAuthCookie ("clpayne", false) 11: cookie.Expires = DateTime.Now.AddMinutes(2) 12: 13: Response.Cookies.Add(cookie) 14: 15: lblMessage.Text = "<font color=red>Success!</font> <p>" 16: else 17: lblMessage.Text = "<font color=red>Sorry, " & _ 18: "invalid username or password!</font><p>" 19: end if 20: end sub 21: </script> | This listing is very similar to Listings 21.1 and 21.2, so the UI portion of the page has been left out. On line 8, you create a new HttpCookie object named cookie to hold your authentication cookie. On line 10, you create this cookie using the GetAuthCookie method, with the same parameters used in the SetAuthCookie method, and store it in your cookie variable. Now you're free to manipulate the authentication cookie however you want before authenticating the user. On line 11, you change the expiration time to two minutes from the current time. You then set the authentication cookie on line 13 by adding it to the Response.Cookies collection. |
The FormsAuthentication object also contains SignOut, a method to log the user out. It removes the authentication cookie and forces users to log in again if they want to access restricted resources again. Many sites that require a user to log in also provide a method to log out, for additional security. This ensures that two users sharing one computer do not use the same account. To log out a user, simply have him visit an ASP.NET page that calls the SignOut method: FormsAuthentication.SignOut Forms authentication is very powerful and gives developers a lot of flexibility when implementing authentication. Additionally, because the settings are contained in the web.config file, this method of authentication is easy to implement. All you need to do is build a login page. Recall that you don't have to put the user information in web.config. You can put the information in a database and build your own custom routines to authenticate users but, of course, doing so disallows you from using the Authenticate method to validate the users. Passport Authentication Passport authentication is a centralized authentication service (not a Web Service) provided by Microsoft. It works very similarly to Forms authentication, except that you don't need to build any custom functionality yourself. Both create authentication cookies that reside on the client, and are used for authorization. When a user encounters passport authentication on your site, he's redirected to the Passport login page (see http://www.passport.com for details on that), which provides a very simple form to fill out. This form then checks the user's credentials against Microsoft's Passport service and determines if the user is valid. Then it sets an authentication cookie, similarly to Forms authentication. The exact steps are as follows: A client requests a secure page from your site. If the request doesn't contain a valid Passport authentication cookie, your Web server will redirect the user to the Passport login service. The Web server also passes some encrypted information about the request to the Passport service. The user is presented with a login form on the Passport login site. Credentials are entered and submitted via a form post (using SSL encryption). If the credentials are valid, the Passport service creates an authentication ticket and places it in the querystring. The user is then redirected back to the original site. When the server sees that an authentication ticket is present in the querystring, it creates the authentication cookie for the user. Thus, the Passport authentication service doesn't actually create the authentication cookies. That's left to the originating Web server. You won't examine this service much further because your site must be a member of Microsoft's Passport service to use this authentication method. Additionally, you need to pay a fee to become a member. For more information, check out the Passport documentation at http://www.passport.com/business. Once you've become a member, you'll need to download the Passport SDK and configure your application accordingly. The final step in setting up Passport authentication is to set up your web.config file properly. The syntax is simple: <configuration> <system.web> <authentication mode="Passport"> </authentication> </system.web> </configuration> The Passport service is a very useful and easy way to implement security you can trust on your site. Many existing Web sites, including nearly all of Microsoft's sites, use the Passport service. After a user has a valid passport identity, he can log in to any and all the Passport sites with the same username and password. Thus, if you ever plan to team up with other sites, or to build a family of different sites, the Passport service might be a good security measure to look into. | 