| Vector graphics deals with drawing geometric shapes such as lines, curves, and polygons. In this section we illustrate vector graphics in GDI+ with an interactive drawing program. Later in the chapter we will introduce raster graphics and bitmaps. Our sample program, DrawDemo , allows you to draw a picture consisting of rectangles and ellipses of various sizes, colors, and patterns. The program illustrates both standard painting (implemented by an override of OnPaint ) and "rubber- band " drawing, in which a shape is temporarily outlined as the mouse is moved. We also illustrate use of a clipping rectangle, which can make for more efficient drawing. Rubber-Band Drawing Version 1 of DrawDemo illustrates drawing a single rectangle. When the program is started, a small square is shown in the top-left area of the client window. Pressing a mouse button erases the current rectangle (by redrawing the rectangle with the background color of the container) and begins a new drawing. As the mouse is moved, with the button still pressed, a rectangle is outlined. When the mouse button is released, the current rectangle is "locked" and will be always displayed via OnPaint . Here is the code:  Public Class Form1 Inherits System.Windows.Forms.Form #Region " Windows Form Designer generated code " Private m_start As Point Private m_end As Point Private m_track As Boolean Private Function MakeRectangle(ByVal p As Point, _ ByVal q As Point) As Rectangle Dim top, left, bottom, right As Integer top = IIf(p.Y < q.Y, p.Y, q.Y) left = IIf(p.X < q.X, p.X, q.X) bottom = IIf(p.Y > q.Y, p.Y, q.Y) right = IIf(p.X > q.X, p.X, q.X) Return New Rectangle(left, top, right - left, _ bottom - top) End Function Protected Overrides Sub OnPaint(_ ByVal e As System.Windows.Forms.PaintEventArgs) Dim rect As Rectangle rect = MakeRectangle(m_start, m_end) Dim g As Graphics = e.Graphics g.DrawRectangle(Pens.Black, rect) MyBase.OnPaint(e) End Sub Protected Overrides Sub OnMouseDown(_ ByVal e As System.Windows.Forms.MouseEventArgs) m_start = New Point(e.X, e.Y) m_end = m_start m_track = True Invalidate() End Sub Protected Overrides Sub OnMouseUp(_ ByVal e As System.Windows.Forms.MouseEventArgs) m_track = False Invalidate() End Sub Protected Overrides Sub OnMouseMove(_ ByVal e As System.Windows.Forms.MouseEventArgs) If m_track Then Dim p As New Point(e.X, e.Y) If Not p.Equals(m_start) Then Dim g As Graphics = Me.CreateGraphics() Dim rect As Rectangle ' erase previous rectangle rect = MakeRectangle(m_start, m_end) g.DrawRectangle(Pens.White, rect) ' draw new rectangle m_end = p rect = MakeRectangle(m_start, m_end) g.DrawRectangle(Pens.Black, rect) End If End If End Sub Private Sub Form1_Load(ByVal sender As Object, _ ByVal e As System.EventArgs) Handles MyBase.Load m_start = New Point(5, 5) m_end = New Point(50, 50) End Sub End Class Public Class Form1 Inherits System.Windows.Forms.Form #Region " Windows Form Designer generated code " Private m_start As Point Private m_end As Point Private m_track As Boolean Private Function MakeRectangle(ByVal p As Point, _ ByVal q As Point) As Rectangle Dim top, left, bottom, right As Integer top = IIf(p.Y < q.Y, p.Y, q.Y) left = IIf(p.X < q.X, p.X, q.X) bottom = IIf(p.Y > q.Y, p.Y, q.Y) right = IIf(p.X > q.X, p.X, q.X) Return New Rectangle(left, top, right - left, _ bottom - top) End Function Protected Overrides Sub OnPaint(_ ByVal e As System.Windows.Forms.PaintEventArgs) Dim rect As Rectangle rect = MakeRectangle(m_start, m_end) Dim g As Graphics = e.Graphics g.DrawRectangle(Pens.Black, rect) MyBase.OnPaint(e) End Sub Protected Overrides Sub OnMouseDown(_ ByVal e As System.Windows.Forms.MouseEventArgs) m_start = New Point(e.X, e.Y) m_end = m_start m_track = True Invalidate() End Sub Protected Overrides Sub OnMouseUp(_ ByVal e As System.Windows.Forms.MouseEventArgs) m_track = False Invalidate() End Sub Protected Overrides Sub OnMouseMove(_ ByVal e As System.Windows.Forms.MouseEventArgs) If m_track Then Dim p As New Point(e.X, e.Y) If Not p.Equals(m_start) Then Dim g As Graphics = Me.CreateGraphics() Dim rect As Rectangle ' erase previous rectangle rect = MakeRectangle(m_start, m_end) g.DrawRectangle(Pens.White, rect) ' draw new rectangle m_end = p rect = MakeRectangle(m_start, m_end) g.DrawRectangle(Pens.Black, rect) End If End If End Sub Private Sub Form1_Load(ByVal sender As Object, _ ByVal e As System.EventArgs) Handles MyBase.Load m_start = New Point(5, 5) m_end = New Point(50, 50) End Sub End Class Multiple Shapes | | Version 2 of DrawDemo is a more full-blown program, allowing the user to choose among different shapes and to specify a color and a brush. With a toolbar, the user can choose between a rectangle and an ellipse (these choices are also available from the Draw menu). The menu Draw Brush brings up a modeless dialog box, [1] which allows the user to specify the style of the brush. By clicking Color, the user can pick a color. The chosen color and a text string for the shape are shown in an edit control. [1] See Chapter 12 for a discussion of how you can create your own modeless dialog boxes using Windows Forms. | Note that the settings chosen from the Brush Properties dialog apply to the next shape that is drawn. Each shape that is drawn is stored in a list of shapes. Figure 11-7 shows a simple drawing created using this program, consisting of a rectangle and two ellipses, with different colors and hatch styles. Figure 11-7. With drawing program, you can draw various shapes. 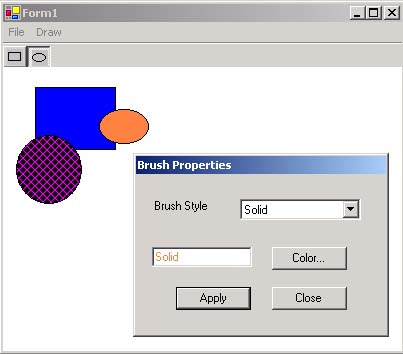 Shape Hierarchy This kind of program can be implemented by using a hierarchy of shapes. For simplicity, our hierarchy only includes rectangles and ellipses. The file Shape.vb provides the code for this hierarchy. The key feature is that the base class CShape is an abstract class with a MustOverride method DrawShape . The DrawShape method of the derived class draws the shape corresponding to the class. Hence DrawShape can be used polymorphically. ' Shape.vb Imports System.Drawing Public MustInherit Class CShape Protected m_p1 As Point Protected m_p2 As Point Protected m_pen As Pen Protected m_brush As Brush Public Sub New(ByVal p1 As Point, ByVal p2 As Point, _ ByVal pn As Pen, ByVal br As Brush) Dim rect As Rectangle rect = MakeRectangle(p1, p2) m_p1 = rect.Location m_p2 = New Point(rect.Right, rect.Bottom) m_pen = pn m_brush = br End Sub Public Sub New(ByVal p1 As Point, ByVal p2 As Point) m_pen = Pens.Black m_brush = Brushes.Transparent Dim rect As Rectangle rect = MakeRectangle(p1, p2) m_p1 = rect.Location m_p2 = New Point(rect.Right, rect.Bottom) End Sub Public MustOverride Sub DrawShape(ByVal g As Graphics) Private Function MakeRectangle(ByVal p As Point, _ ByVal q As Point) As Rectangle Dim top, left, bottom, right As Integer top = IIf(p.Y < q.Y, p.Y, q.Y) left = IIf(p.X < q.X, p.X, q.X) bottom = IIf(p.Y > q.Y, p.Y, q.Y) right = IIf(p.X > q.X, p.X, q.X) Return New Rectangle(left, top, right - left, _ bottom - top) End Function End Class Public Class CRectangle Inherits CShape Public Sub New(ByVal p1 As Point, ByVal p2 As Point, _ ByVal pn As Pen, ByVal br As Brush) MyBase.New(p1, p2, pn, br) End Sub Public Sub New(ByVal p1 As Point, ByVal p2 As Point) MyBase.New(p1, p2) End Sub Public Overrides Sub DrawShape(ByVal g As Graphics) Dim rect As New Rectangle(m_p1.X, m_p1.Y, _ m_p2.X - m_p1.X, m_p2.Y - m_p1.Y) g.FillRectangle(m_brush, rect) g.DrawRectangle(m_pen, rect) End Sub End Class An Arraylist of Shapes The main form can store the shape objects in an array list. The handler for the MouseUp event adds a shape to the list. ... Private m_list As New ArrayList() ... Private Function MakeShape(ByVal p As Point, _ ByVal q As Point, ByVal stype As ShapeType) As CShape Select Case stype Case ShapeType.Ellipse Return New CEllipse(p, q, m_pen, m_brush) Case ShapeType.Rectangle Return New CRectangle(p, q, m_pen, m_brush) End Select End Function ... Protected Overrides Sub OnMouseUp(_ ByVal e As MouseEventArgs) m_track = False m_shape = MakeShape(m_start, m_end, m_type) m_list.Add(m_shape) Invalidate() End Sub Displaying the Shapes The shapes are displayed in the override of OnPaint by looping through the array list. Notice how polymorphism makes this code very concise . Protected Overrides Sub OnPaint(ByVal e As PaintEventArgs) Dim g As Graphics = e.Graphics Dim objShape As CShape For Each objShape In m_list objShape.DrawShape(g) Next MyBase.OnPaint(e) End Sub |
